
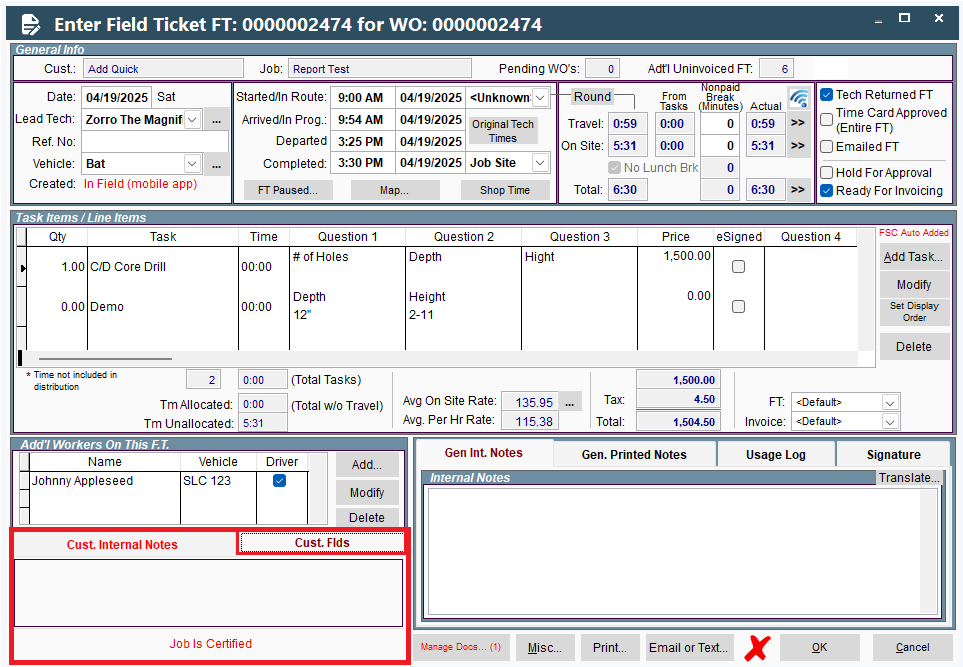
Field Ticket Fields on Desktop
Please remember that Field Tickets and Work Orders cannot be retrieved once deleted!
General Info Table on Desktop
Here's an example of the General Info table
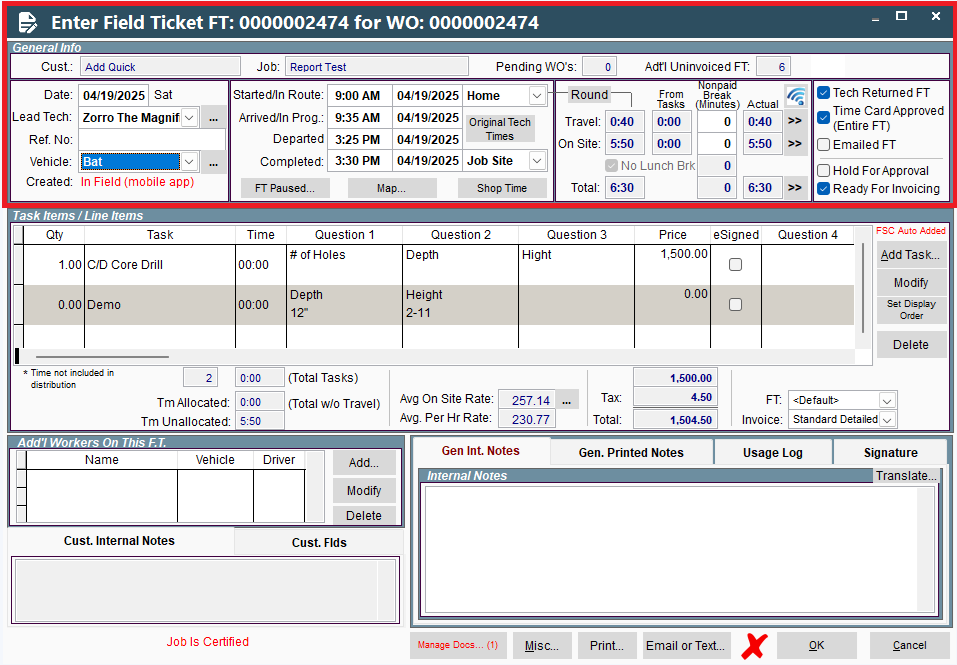
Job Number, Work Order Number, + General Info on Desktop
Field ticket number, Customer, Job name, the number of work orders for the Job,
and the number of uninvoiced Field Tickets for the Job are displayed at the top of the Field Ticket.
.png)
Lead Tech on Desktop
The lead tech is usually filled in from the Work Order/Mobile App but can be changed manually.
The lead tech can be selected from the drop-down list. Only users in a field technician department
within this branch will display in the drop down. If you need to assign a different user,
you can do so by clicking the ellipsis next to the drop down and clicking select a tech not in the list.
.png)
Reference Number on Desktop
You can add a reference number to the Field Ticket
.png)
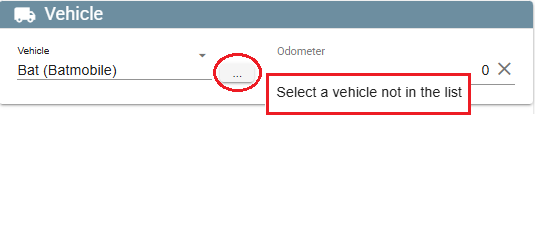
Vehicle on Desktop
The vehicle is usually filled in from the Work Order/Mobile app but can be changed manually.
The vehicle can be selected from the drop-down list. Only vehicles from the branch the job is assigned to will be in the list.
If you need to assign a different vehicle you can do so by clicking the ellipsis next to the drop-down list
and click select vehicle not in the list.
.png)
Time (Started, Arrived, Departed, Completed, etc...) on Desktop
Time on the Field Ticket is populated from either manual entry of the date/time on the Desktop,
or is filled in from the Technician on the CenPoint Mobile App.
Desktop Field Ticket view

Started/In Route: This is the time the Tech started heading towards the job.
Arrived/In Progress: The time that the Tech started working on the job.
Departed: The time the Tech left the job location
Completed: The time the Tech completed the work on the field ticket or finished working for that customer for the day.
FT Paused: A tech can pause the time to represent things like unpaid breaks. They can pause and resume the field ticket an unlimited amount of time. If the day ends and the Field Ticket is still paused, the end time is counted as the last paused time recorded.
Map: By clicking this you can get the address or geocode of the Jobsite.
Shop Time: Displays the clock in time vs the Field Ticket time to help you determine if you need to include prep time in your billing.
Home: This is a dropdown to select where the Technician started traveling from. Examples include a previous Job site, home, the Shop, ect...
Job Site: This is a dropdown to select where the Technician was when they completed the Field Ticket. Examples include the Job site, home, Shop, etc...
Original Tech Times: This displays the difference between the time reported on the Field Ticket vs time reported by Tech so you can view any discrepancies.
Said discrepancies are often caused by unpaid commute or by someone manually changing the time for a number of reasons.
Mobile App Technician Field Ticket view
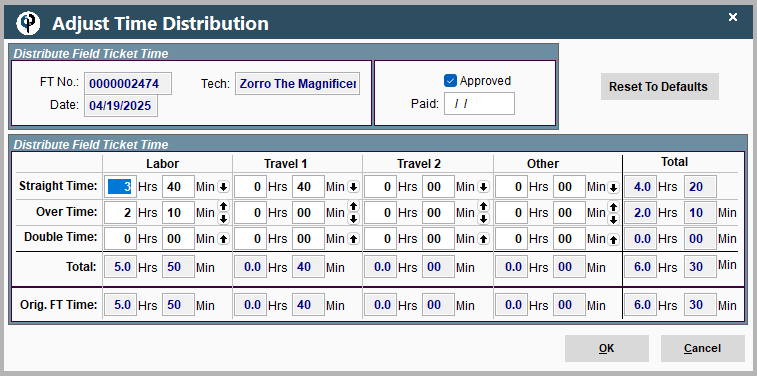
Time Breakdown/Distribution on Desktop
Time is distributed in this section. If time needs to be redistributed click on the >>
to open the Adjust Time Distribution table.

Round: This rounds the time to the nearest 15 minute mark. For example, if a tech arrived at 9:35am it would round to 9:30am, but if a tech arrived at 9:53am it would round to 10:00am.
A window pops up showing the original times and the rounded times and gives you the opportunity to accept or reject the rounding of time.
Travel: Displays the amount of time spent travelling.
On Site: Displays the amount of time spent on the job site.
Total: Displays the total amount of time spent
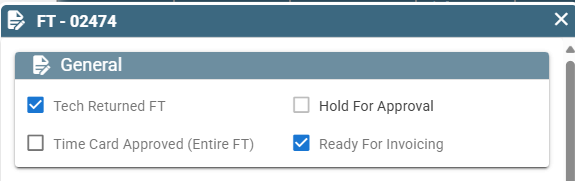
Status of the Field Ticket (Check Boxes in the Upper Right Corner) on Desktop
Weather forecast is populated by the address on the Job/Work Order.
Tech Returned FT: Automatically gets checked when the technician submits their Field Ticket on the Mobile App
or can be manually checked in the office. All other options must be done manually.
Time Card Approved: Signifies if someone has approved the time on the Field Ticket
Emailed FT: Signifies if the Field Ticket report has been emailed to a customer or site contact.
Hold For Approval: Signifies that this Field Ticket is waiting for someone to review and approve it.
Ready For Invoicing: Signifies that the Field Ticket is ready to be added to an invoice.
Field Tickets will not show up in create invoice screen unless Ready for Invoicing is checked on the Field Ticket.

Task Items/ Line Items Table on Desktop
Add Task on Desktop
Add a task to the Field Ticket by clicking Add Task, if the task is not on the list, scroll down and click add Task Not on Job and
you will be able to choose a task from the entire task list.
.png)
Modify
Allows you to make adjustments on a task such as pricing etc..
.png)
Set Display Order on Desktop
Click Set Display Order to change the order the tasks are listed
.png)
Delete on Desktop
The delete option will delete the task off of the Field Ticket.
.png)
Avg. On Site Rate on Desktop
Click the ellipsis next to Avg. On Site Rate to bring up your Field Ticket Time Information.

FT on Desktop
This allows you to choose what type of Field Ticket you are creating. Some jobs may require a custom Field Ticket to be able to display all the necessary information.
Custom FT or Custom Invoices can also have the company logo embedded into them.
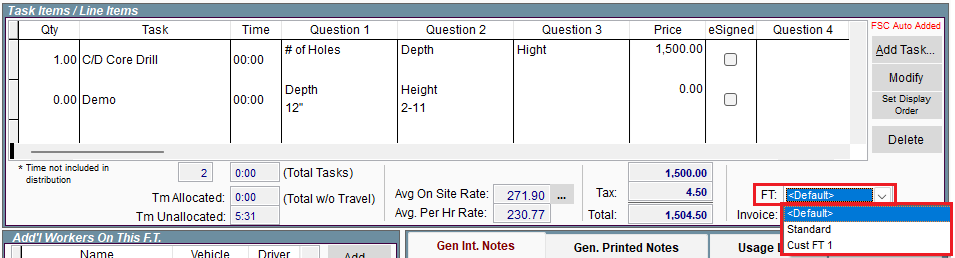
Invoice on Desktop
Choose what type of invoice you want for this Field Ticket. Doing this is helpful if you use the Quick Invoice option from the Field Ticket Screen.
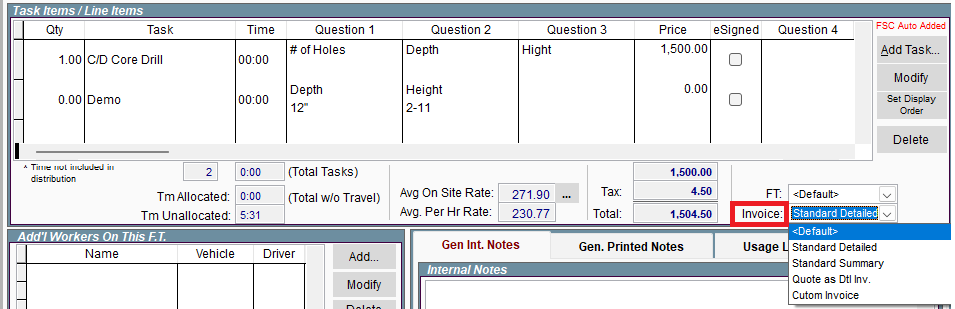
Quick Invoice on Desktop
Allows you to create an invoice quickly and easily for the one Field Ticket.
This is helpful for something like a one Field Ticket Job that doesn't require linking together multiple Work Orders or Change Orders that would also have to be invoiced.
Click on "Misc" at the bottom of the Field Ticket -> Quick Invoice
Add'l Workers On This F.T. Table on Desktop
Add on Desktop
Adds a worker to the Field Ticket. If the worker is not already on the Work order
go to <Add Worker Not On WO> and search for your worker from there.
.png)
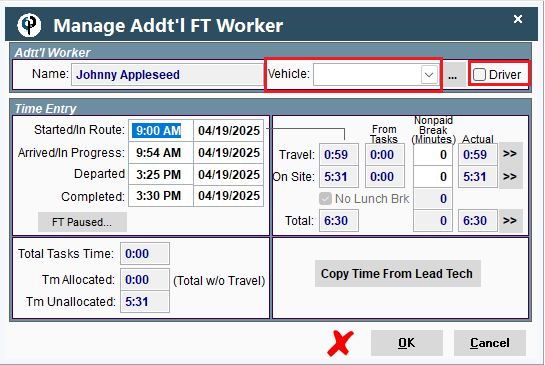
Modify on Desktop
Click Modify on an additional worker to change any information relating to them.
A common thing to alter is their vehicle assignment
By default, additional workers will be passengers in the lead techs vehicle,
but if you modify the additional worker, you can assign them to their own vehicle.
Delete on Desktop
Select a technician and click Delete to remove them from the Field Ticket.
.png)
Cust. Internal Notes on Desktop
Cust. Internal Notes are populated from the Customer Screen.
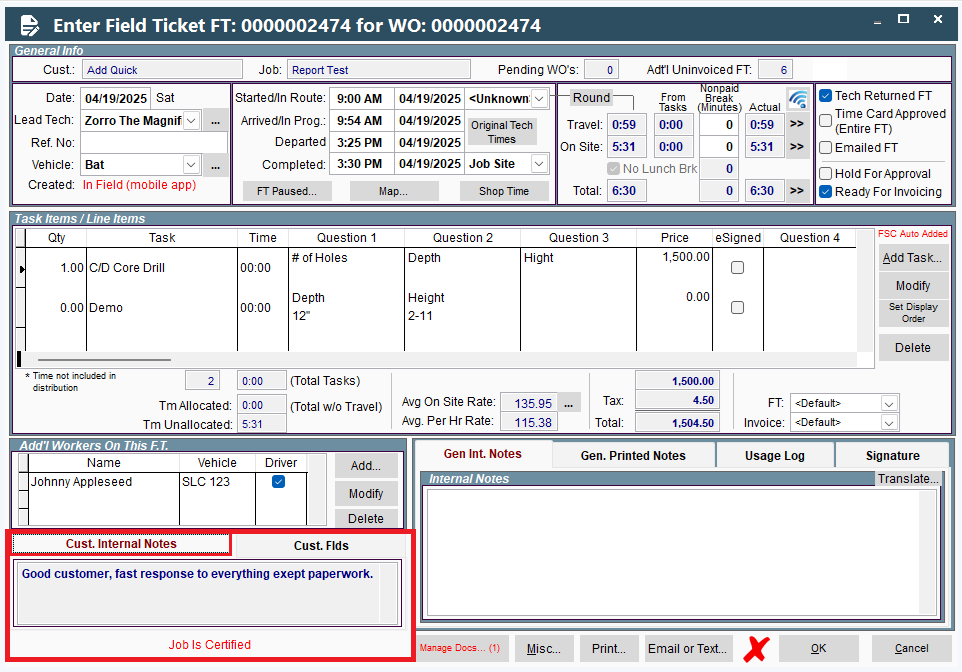
In the Define/Setup Customer window you can adjust what people should know about this customer..png)
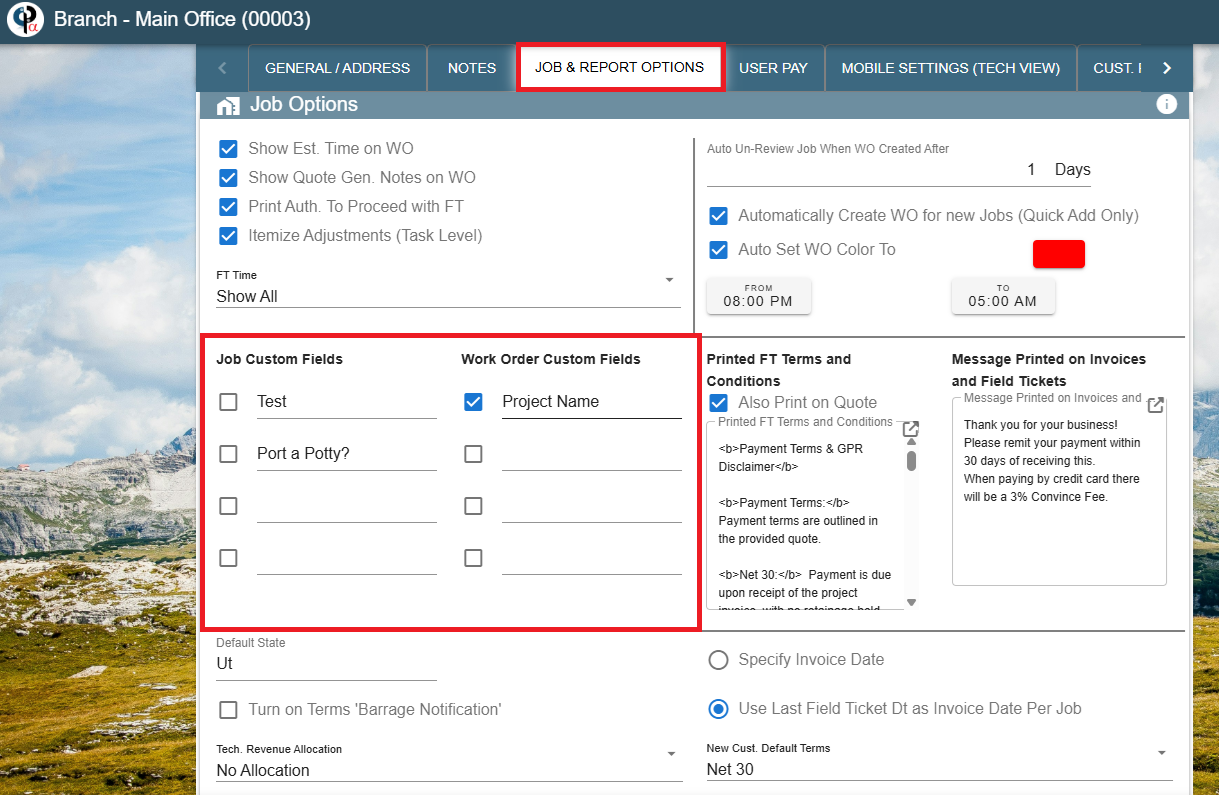
Cust. Flds on Desktop
Custom Fields are populated from the Work Order.
To add/remove a custom field from your branch go to File->
Company Branch Information->Select your branch -> Modify
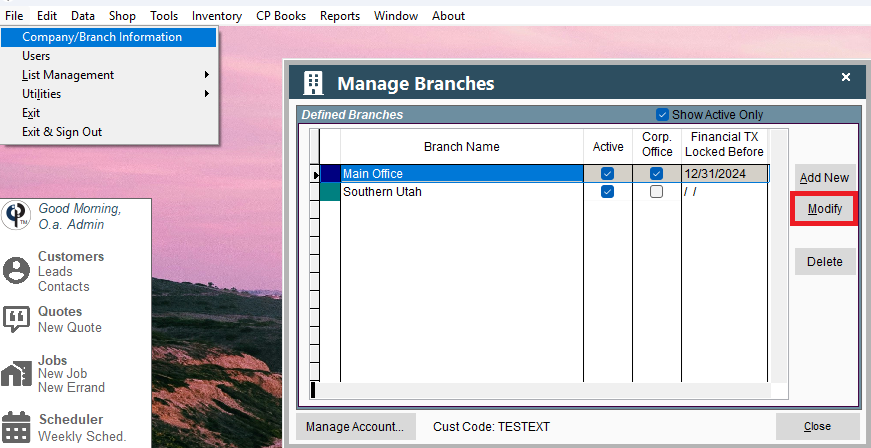
Then go to the Job & Report Options tab-> update your Work Order or Job Custom Fields.
Bottom-Right Tabs + Buttons on Base of Field Ticket on Desktop
General Int. Notes on Desktop
General Internal Notes come from the Technician entering notes under
Additional Info on the CenPoint Mobile App..png)
Gen. Printed Notes on Desktop
General Printed Notes are populated from the desktop application. Click the ellipsis for predefined notes.
You can manage predefined notes here, or also under File ->List Management -> Jobs, Quotes, & Invoices -> Predefined Notes -> Predefined Notes
.png)
Usage Log on Desktop
The usage log is from the technician filling out the odometer reading on the Field Ticket.
This can also be done manually on the office side by filling in the Value column.
.png)
Technician view of filling out the Odometer
.png)
Signature on Desktop
The signature can be obtained 2 ways:
1. From the Technician on the Cenpoint App

Technician view of Signature
.png)
2. by sending a link from the office for an eSignature.
.png)
Manage Docs on Desktop
Manage Documents contains all the photos and documents on the job.
A technician can add documents from their mobile app and they will be found here.
Click on Manage Docs -> View Documents (choose if you want just the ones for that Field Ticket or all documents for the Job)
-> Choose to view and/or edit the documents in the Desktop or Browser app.
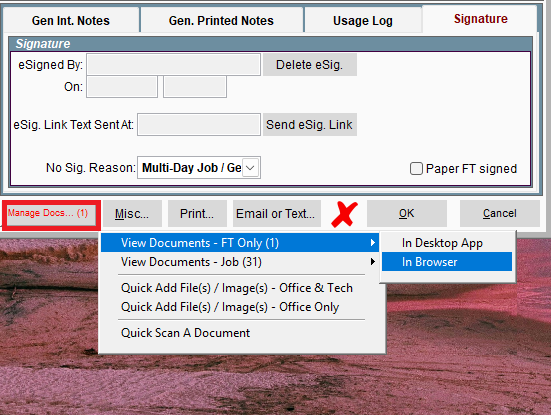
If you would like a document or photo to print with the Field Ticket, select your document and click on Edit or Manage and then check the box "Print With FT"
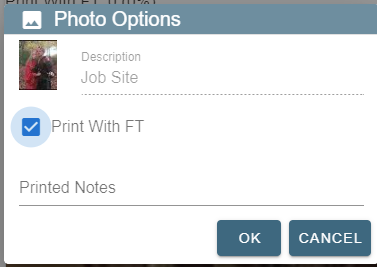
Modify the photo on the desk top to see this option.
.png)
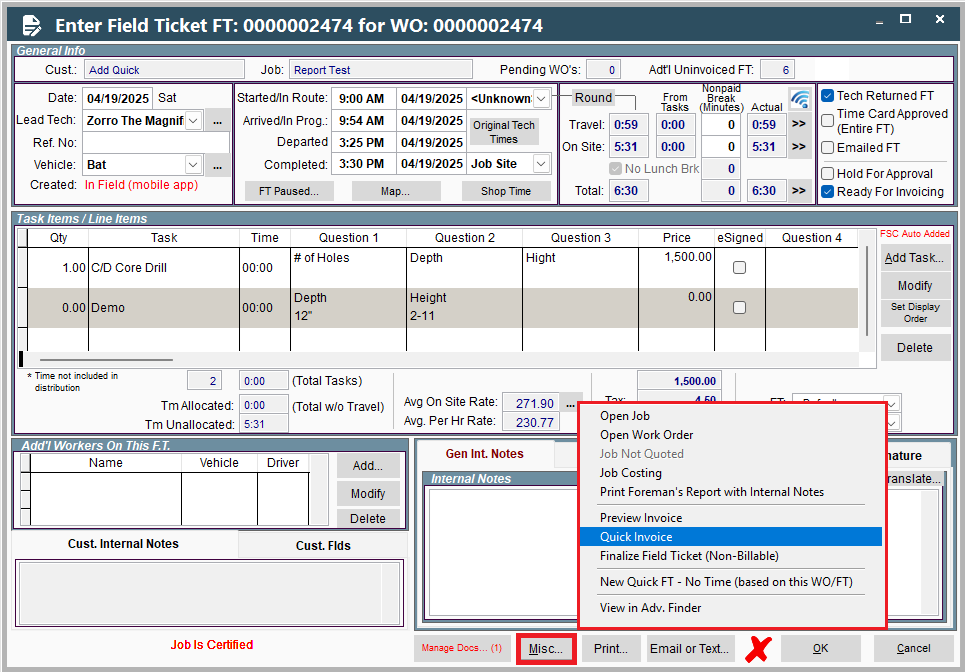
Misc... (Button) on Desktop
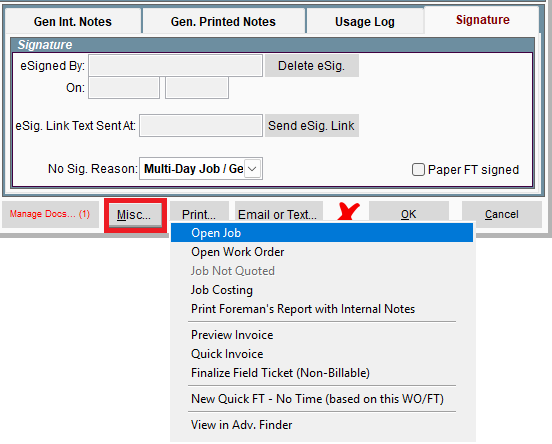
- Open Job
- Open Work Order
- Open the Quote (if applicable)
- Run the Job Costing Report
- Print the Forman's Report
- Preview the Invoice
- Quick invoice- this is a quick way to invoice just this Field Ticket to the customer
- Finalize Field Ticket Non-Billable to the customer, creates an invoice and a corresponding adjustment if needed.
- New Quick FT- Fast and easy way to make a copy of the selected WO. Creating a new WO with the same information and corresponding FT.
Print (Button) on Desktop
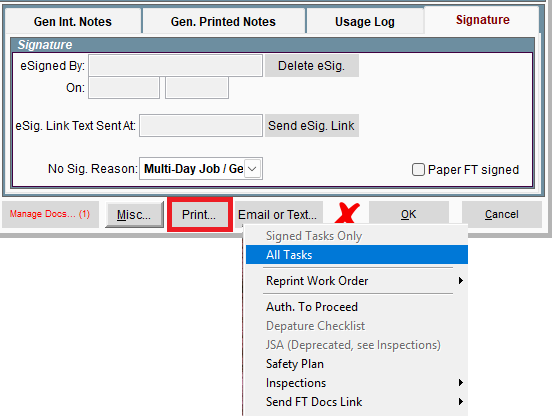
- Signed Tasks Only
- All Tasks
- Reprint Work Order -> With or Without Prices
- Authorization to Proceed
- Departure Checklist
- Job Safety Analysis
- Safety Plan
- Inspections
- Send FT Docs Link -> send PDF through Email or Text, with or without link to documents
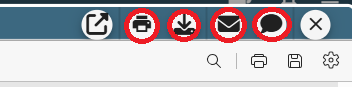
Email or Text on Desktop
.png)
This allows you to send the Field Ticket to a customer or site contact.
Please remember that Field Tickets and Work Orders cannot be retrieved once deleted!
Field Ticket Fields on Portal
General Table on Portal
Here is what the General table looks like:
The Field Ticket Number is found at the very top of the Field Ticket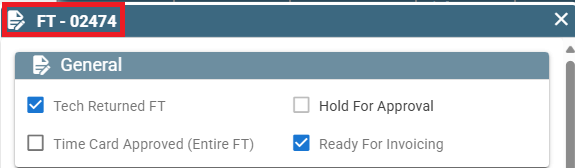
Tech Returned FT: Automatically gets checked when the technician submits their Field Ticket on the Mobile App
or can be manually checked in the office. All other options must be done manually.
Time Card Approved: Signifies if someone has approved the time on the Field Ticket
Hold For Approval: Signifies that this Field Ticket is waiting for someone to review and approve it.
Ready For Invoicing: Signifies that the Field Ticket is ready to be added to an invoice.
Beware: Field Tickets will not show up in create invoice screen unless Ready for Invoicing is checked on the Field Ticket.
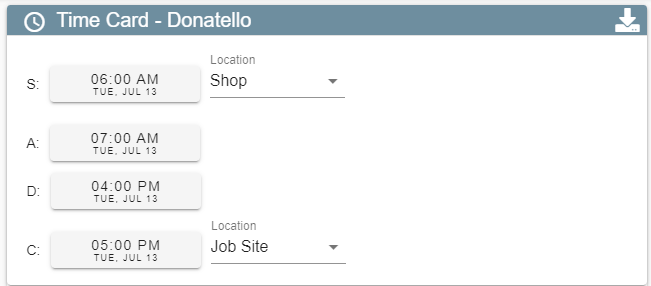
Time Card on Portal
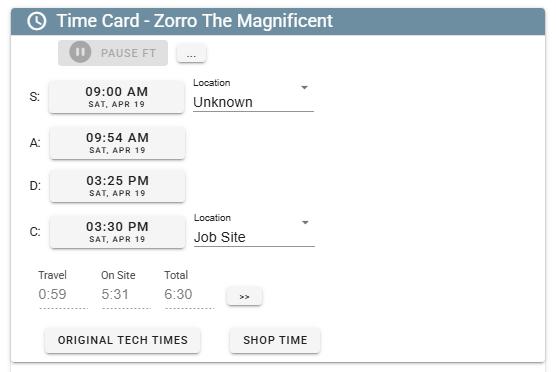
Pause FT: Allows workers to pause the clock so things like unpaid breaks can happen.
The ellipsis just to the side of "Pause FT" allows you to see previous Field Ticket pauses.
S: Started/In Route: The time that the Tech started heading towards the job.
A: Arrived/In Progress: The time that the Tech started working on the job.
D: Departed: The time the Tech left the job location
C: Completed: The time the Tech completed the work on the field ticket or finished working for that customer for the day.
Location: Where the Tech was when they started that segment of time.
Original Tech Times: This displays the difference between the time reported on the Field Ticket vs time reported by Tech so you can view any discrepancies.
Shop Time: Displays the clock in time vs the Field Ticket time to help you determine if you need to include prep time in your billing.
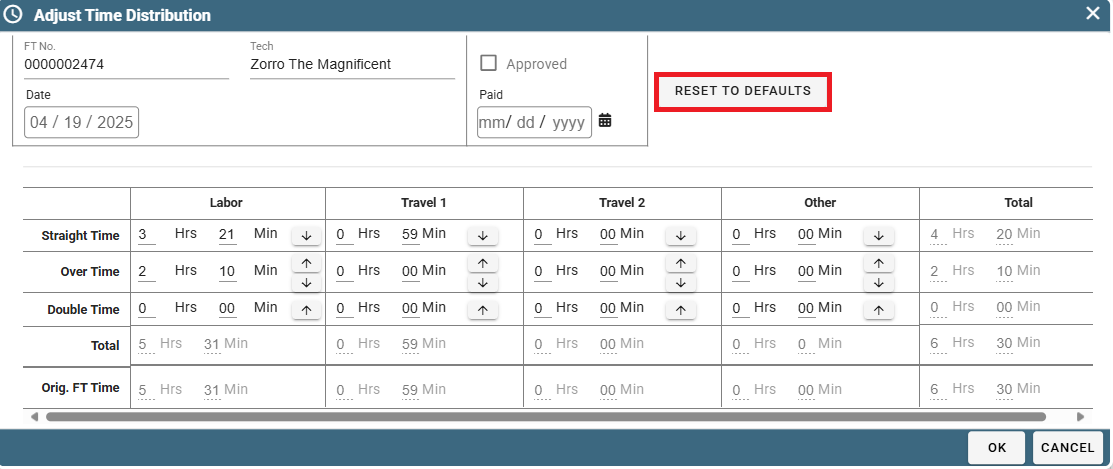
Adjust Time Distribution on Portal
>> Click on this symbol (>>) to adjust the time distribution of the lead tech.
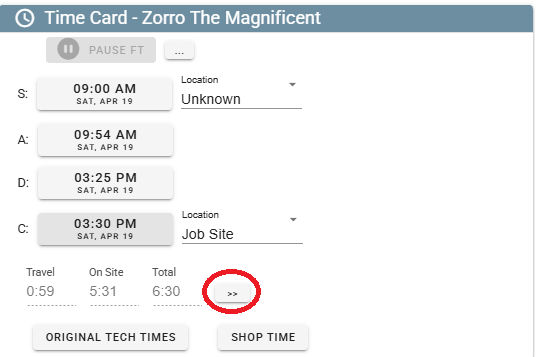
You can alter what category which parts of time fall under and adjust how long someone worked.
Reset to Defaults will have CenPoint adjust the time into Straight Time vs Overtime according to your presets in the Branch Settings.
Breaks Table on Portal
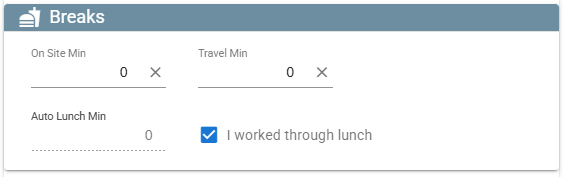
On Site Min: The number of minutes spent on site working
Travel Min: The number of minutes spent travelling
Auto Lunch Min: The number of minutes spent eating lunch. The default is 30 minutes
I Worked Through Lunch: This checkbox allows a worker to opt out of the 30-minute break to eat lunch
Add'l Workers Table on Portal

Crew Time: Displays the crew's clock in - clock out times.
Add Add'l Workers on Portal
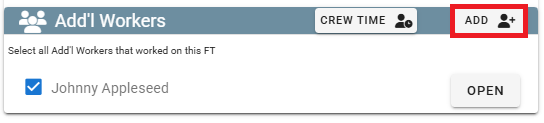
Allows you to add additional workers that participated on this Field Ticket.
Click Add and find the desired worker either by scrolling or using the Search bar.
The "Show Even More Techs" will help you find techs that wouldn't usually show up on the suggested list.
Select your tech and click OK.
Open Add'l Workers on Portal
Clicking Open allows you to alter the time that the Add'l workers spent on that Field Ticket.
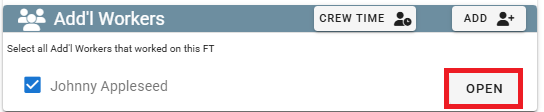
It opens up this window: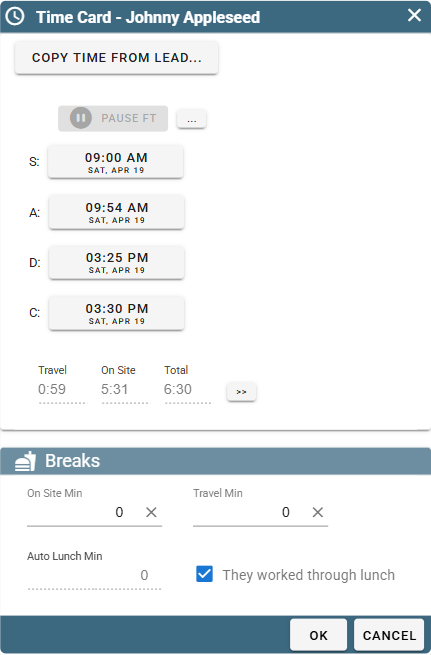
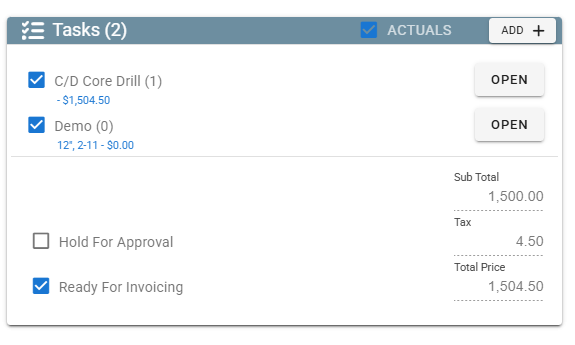
Tasks Table on Portal
Add Tasks on Portal
Click the Add button to add tasks to the Field Ticket.
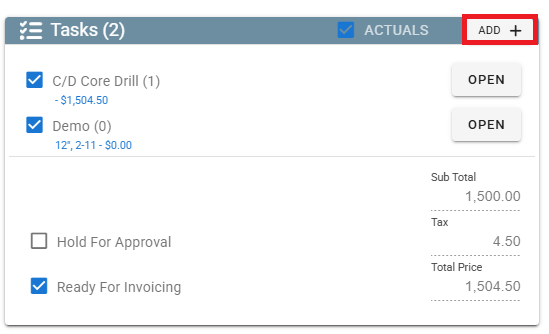
You can search for the task you want
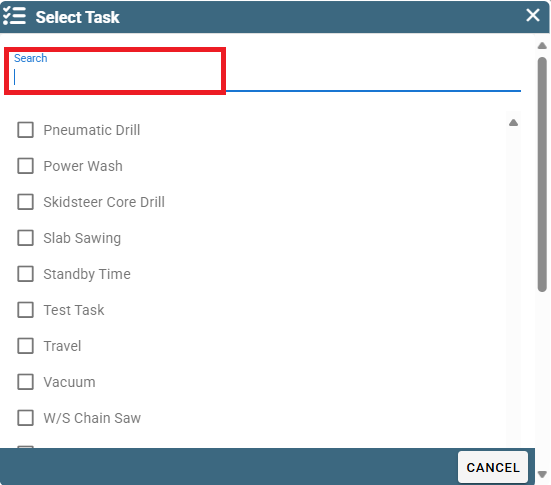
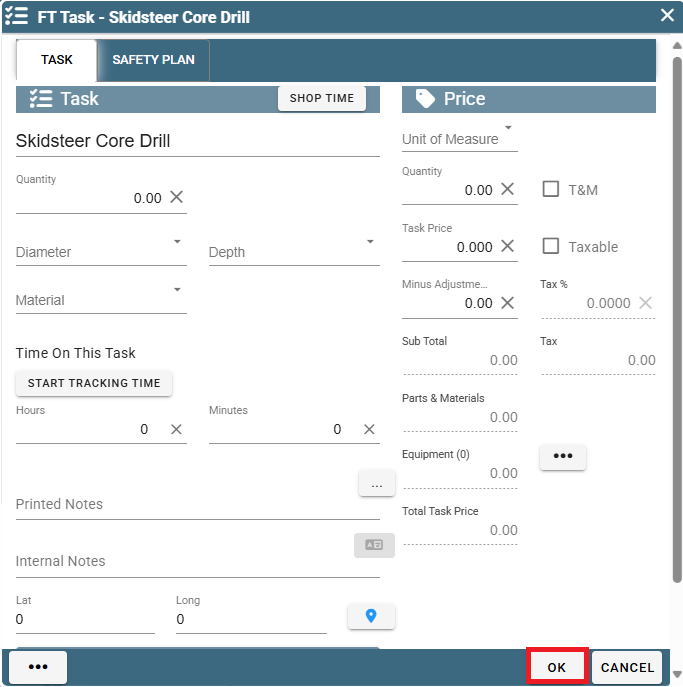
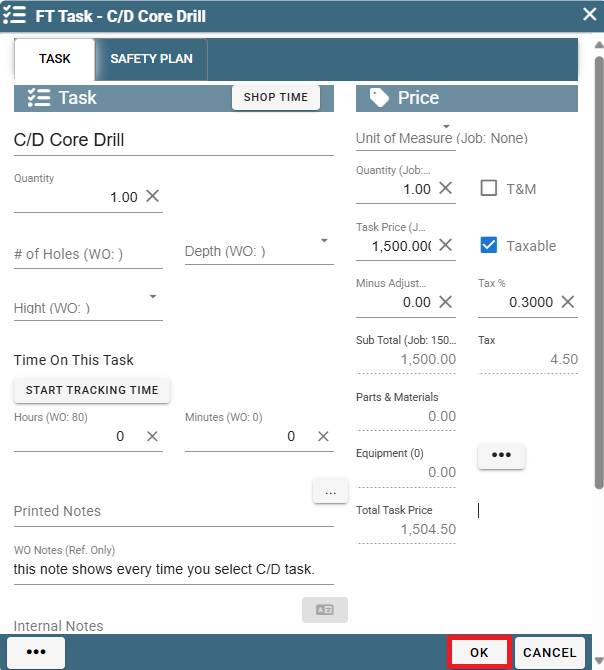
Upon selecting a task you'll be taken to a window like this to fill out more information on the Task.
Fill out the information and select OK when finished.
Open
Click the Open button to edit a task.

It will take you to the task and you can edit the information found therein.
Select OK when you are finished to save your changes
Task Check Boxes
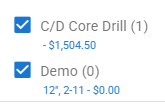
These check boxes display which tasks were worked on in this Field Ticket. You can uncheck the tasks that did not receive any labor.
Hold For Approval: Signifies that this Field Ticket is waiting for someone to review and approve it.
Ready For Invoicing: Signifies that the Field Ticket is ready to be added to an invoice.
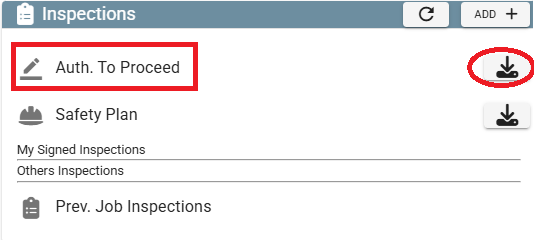
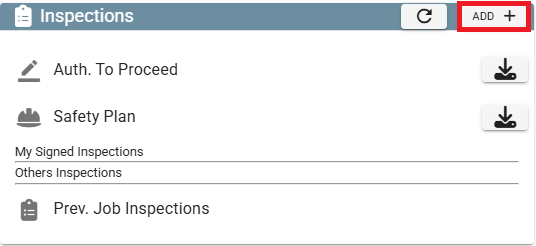
Inspections Table on Portal

Refresh: 
This will refresh the table allowing it to display the most updated information
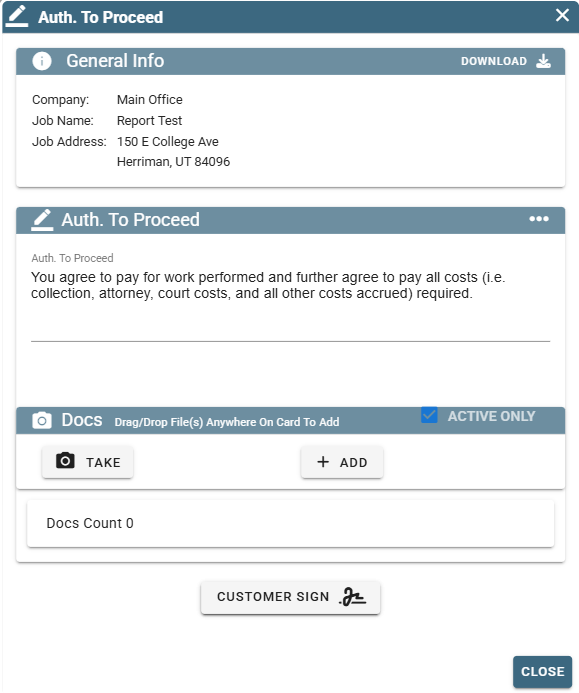
Auth. To Proceed on Portal
Click on the words "Auth. to Proceed" to pull up
the information on the Customer's authorization of the work being done along with any documents associated with it.
You can click the download button to the right to download a copy of the Authorization.
Here's the window with further information on the Authorization.
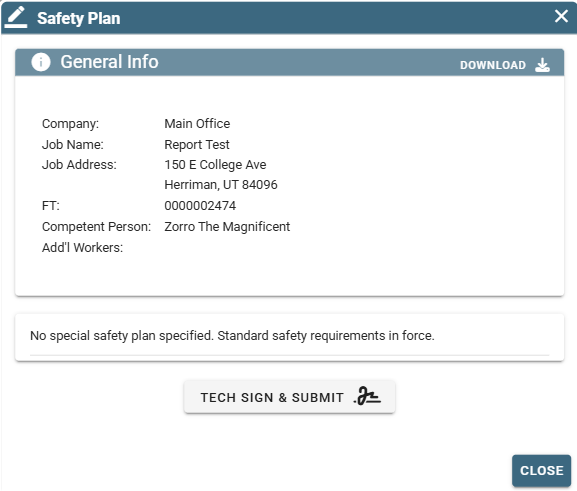
Safety Plan on Portal
Click on the words "Safety Plan" to view CenPoint's generated safety plan for the Field Ticket.
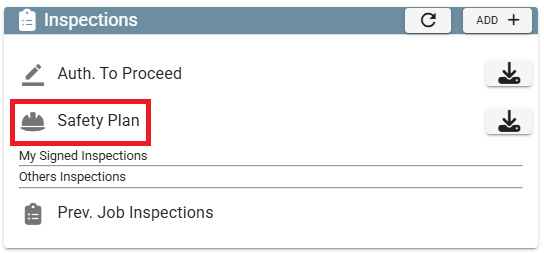
You can also see the Tech's signature and submission of the safety plan (if applicable)
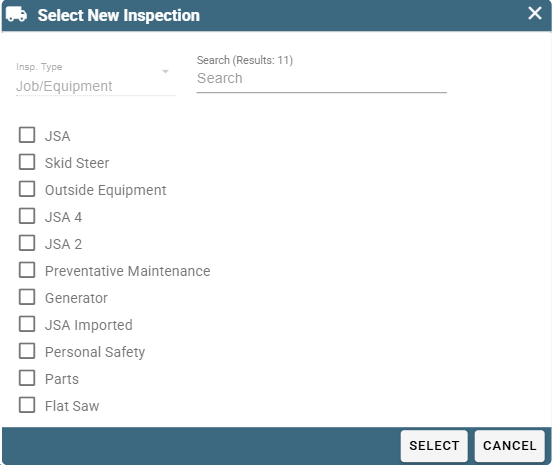
Add Inspections on Portal
Click Add in the upper right corner to add another inspection to the list of inspections being done.
It will pull up a window like this for you to search in.
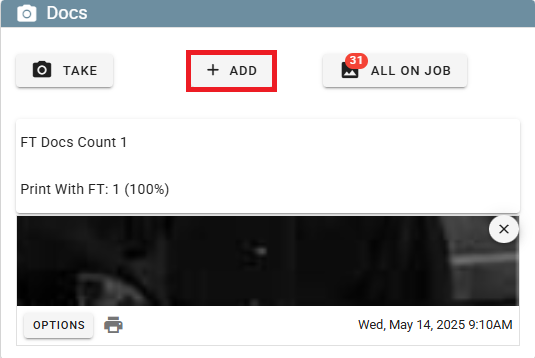
Docs Table on Portal
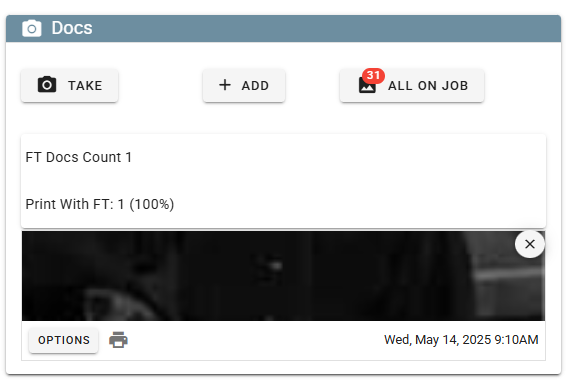
Add Docs on Portal
Clicking Add will pull up your File Explorer where you can select documents to upload.
Take
Clicking Take will try and take a photo right there and turn it into a document to upload.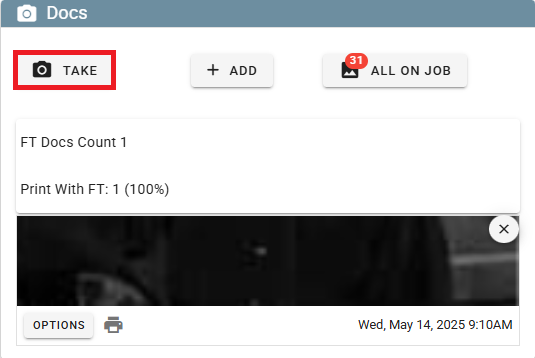
All On Job
Clicking "All On Job" will open up a window where you can manage all documents associated with the job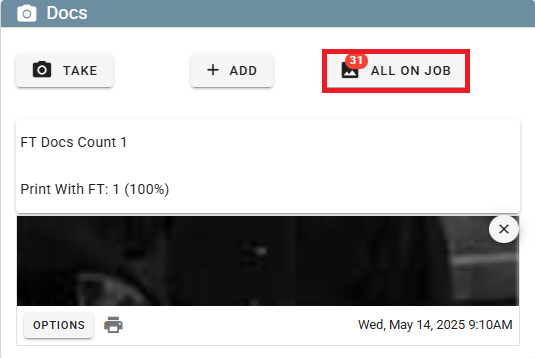
This is the window that will open. You can search for documents and filter them by category if you so desire.
If you click Options it will open up a window with more detailed options for that particular document.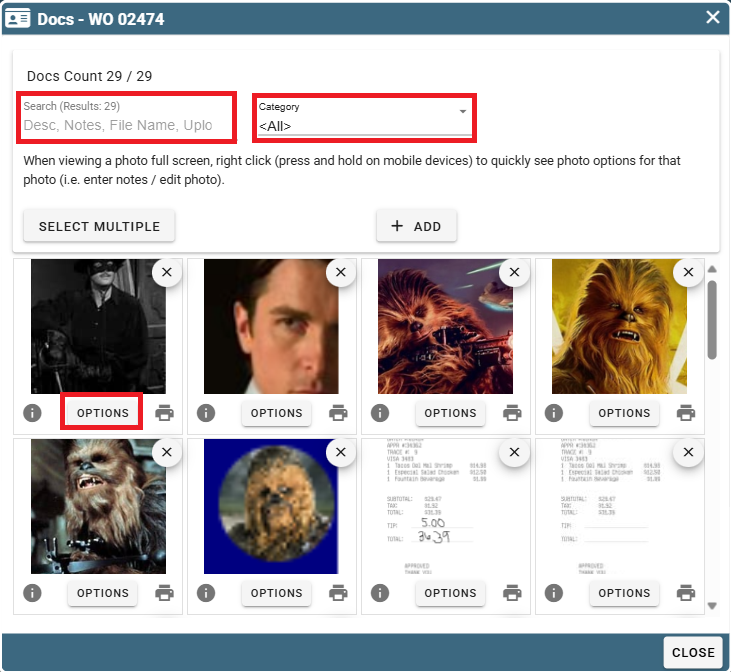
Options opens a window like this
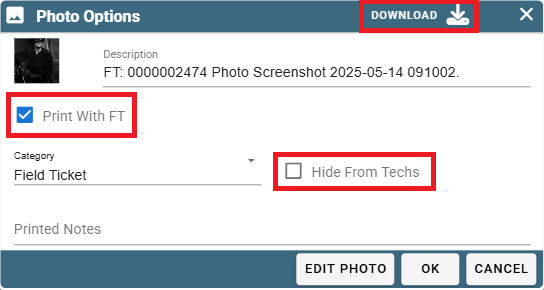
Print With FT: This will let the document be printed with the Field Ticket when it is sent to the customer or site contact
Hide From Techs: This makes it so the document isn't visible to the Techs in the field
Download: Allows you to download a copy of the document.
Vehicle Table on Portal
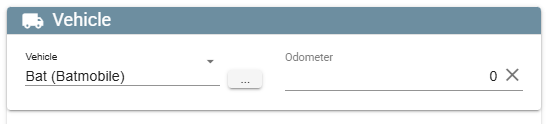
Vehicle
This is a dropdown that let's you choose which vehicle was used.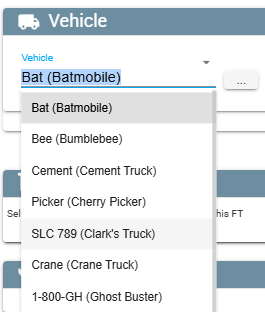
The ellipsis will pull up the option for you to find even more vehicles
Odometer
You may enter the odometer of the vehicle here

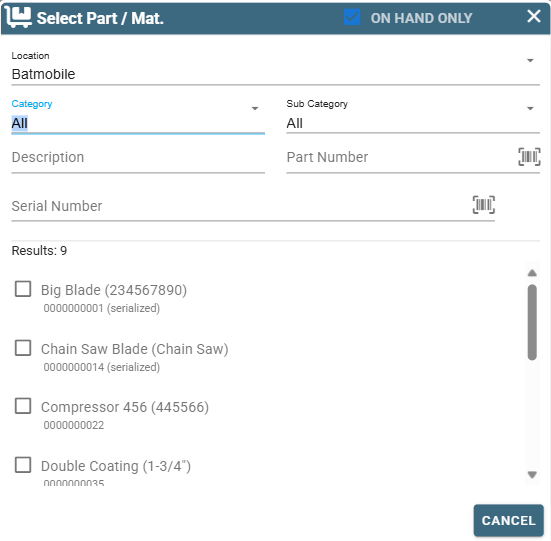
Parts & Materials Table on Portal

Add
You may click Add to list the Parts and Materials that were used in this Field Ticket.

It will pull up a window like this:
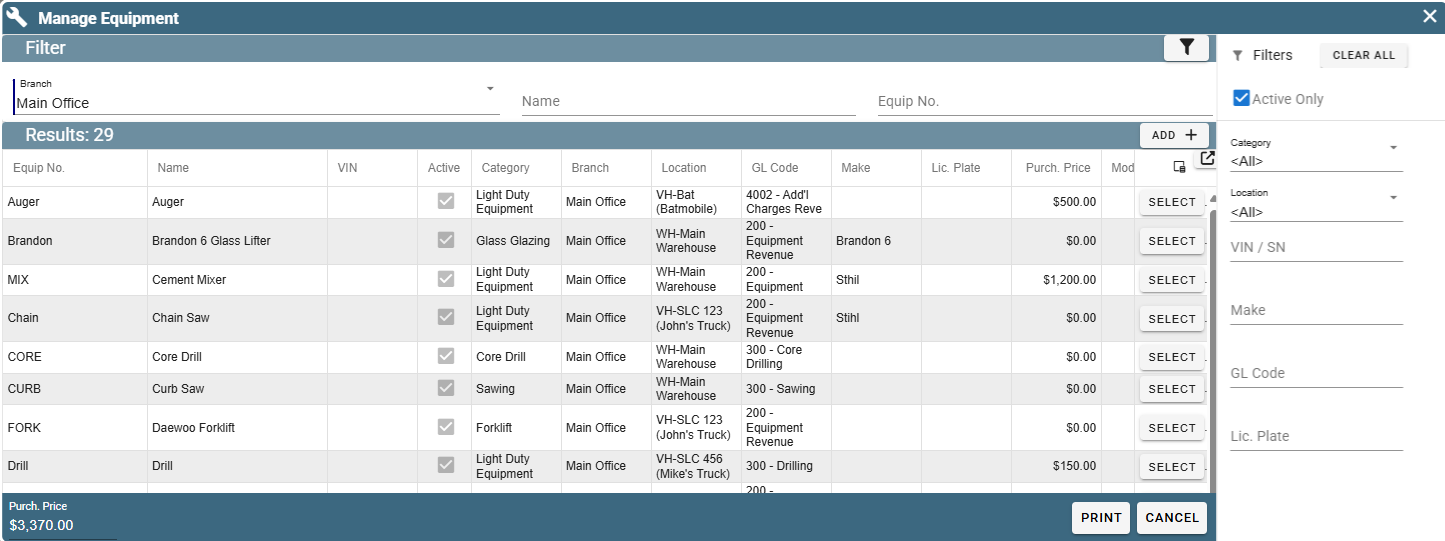
Equipment Table on Portal

Add
Click Add to list any equipment that was used in this Field Ticket

It will pull up a window like this:
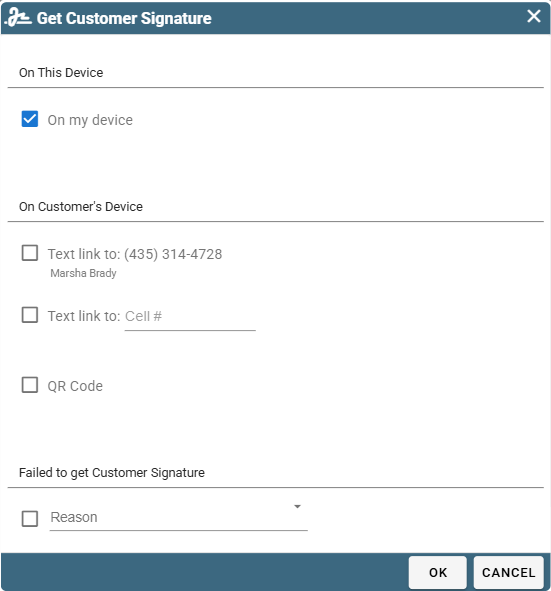
FT Signed on Portal
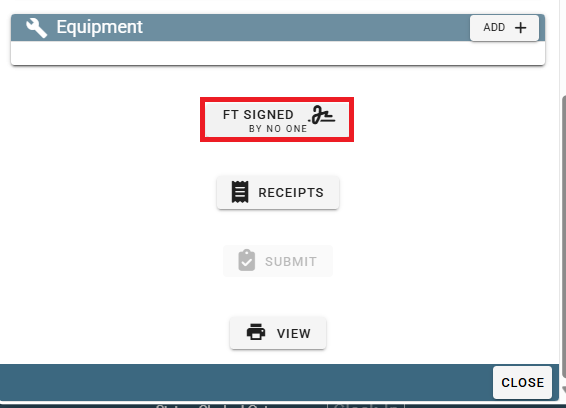
When clicked it will pull up a window for you to get the Customer's signature.
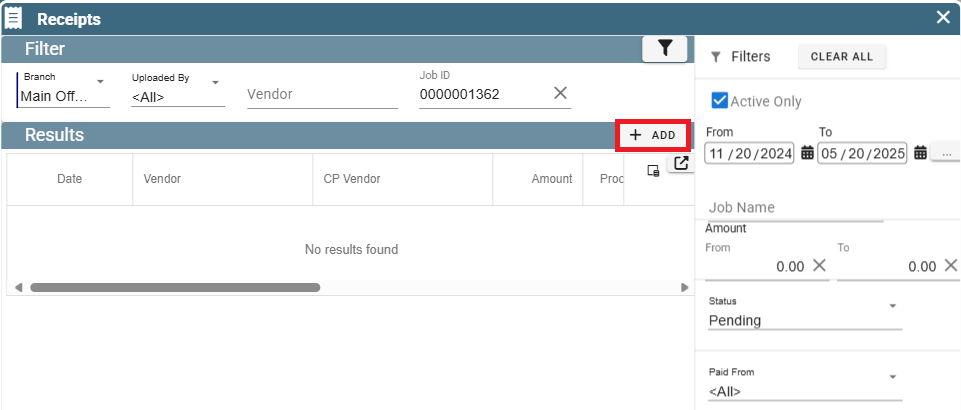
Receipts on Portal
This will pull up all receipts associated with this field ticket.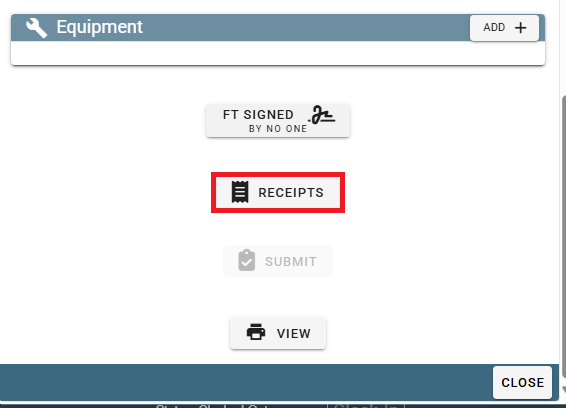
Add Receipts
Click on the button Receipts
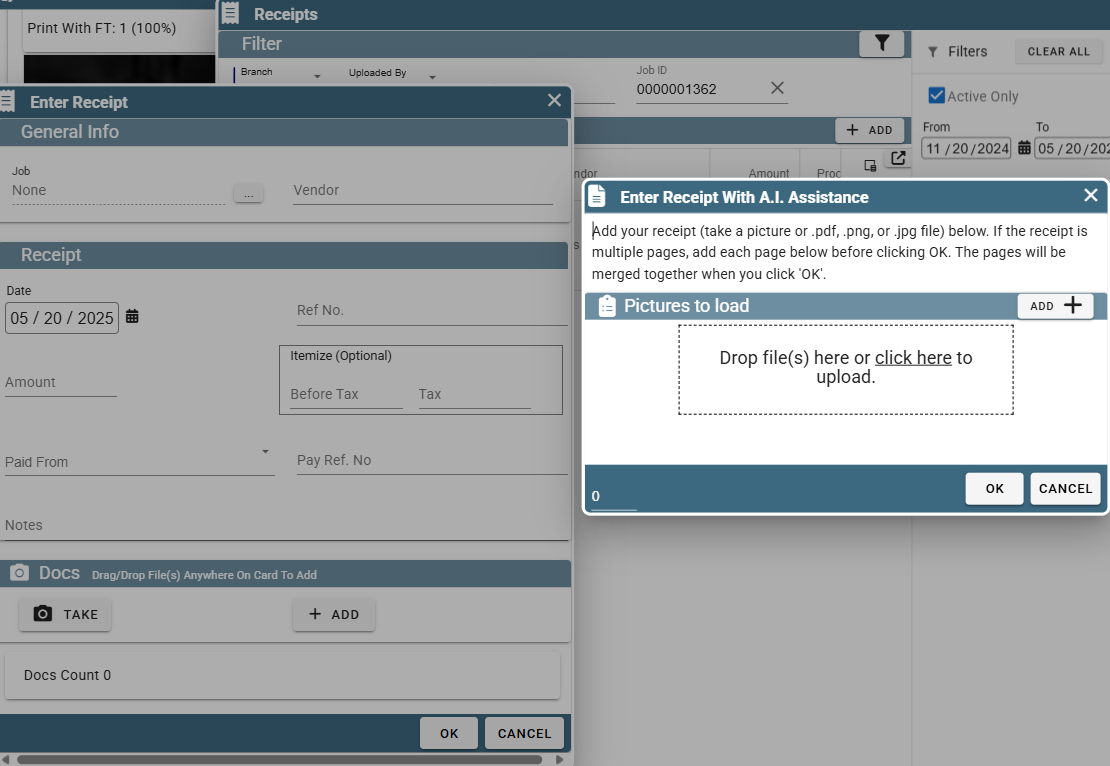
It will take you to this page. Click on Add
Clicking Add will take you to this window where you upload your file and
correct any data fields that may be missing and then click OK.
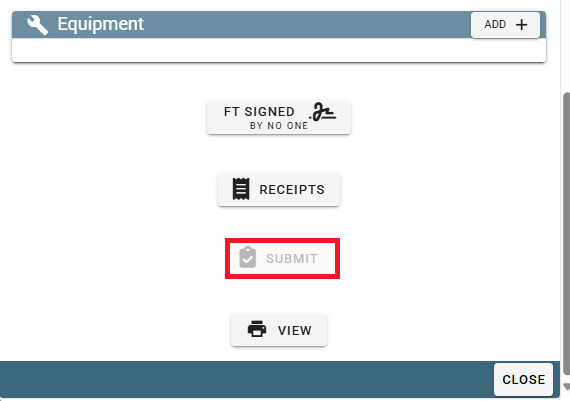
Submit on Portal
The submit button will send a copy of this field ticket to the customer or site contact.
It will only let you click it when all the appropriate data has been entered to avoid a premature submission
View on Portal
Clicking View will give you a preview of the Field Ticket that your customer will see
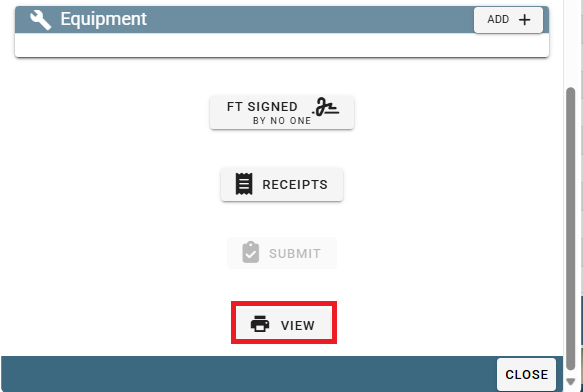
In the top hand corner of your preview you have options where you can print, download, email, or text this Field Ticket to someone.
Please remember that Field Tickets and Work Orders cannot be retrieved once deleted!