
This article will walk you through the steps to review and export technician time.
The videos below are for an older version of the software, but can still be a useful point of reference.
Part 1
Understanding and Interpreting Review / Export Time
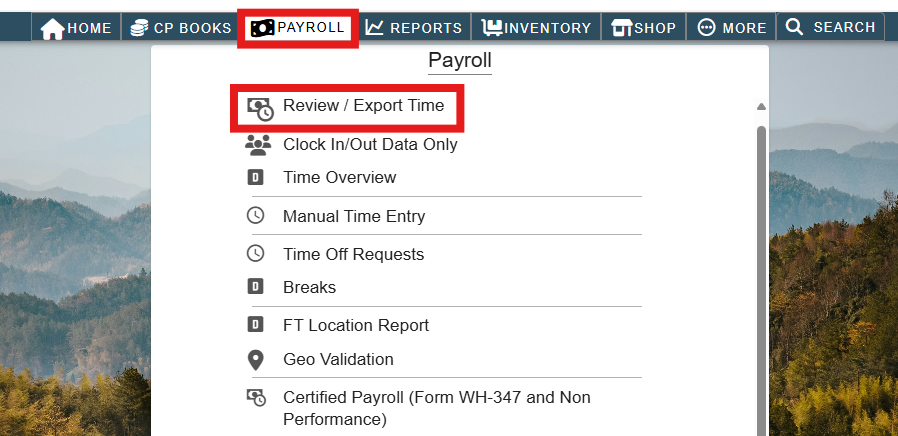
Payroll -> Review / Export Time
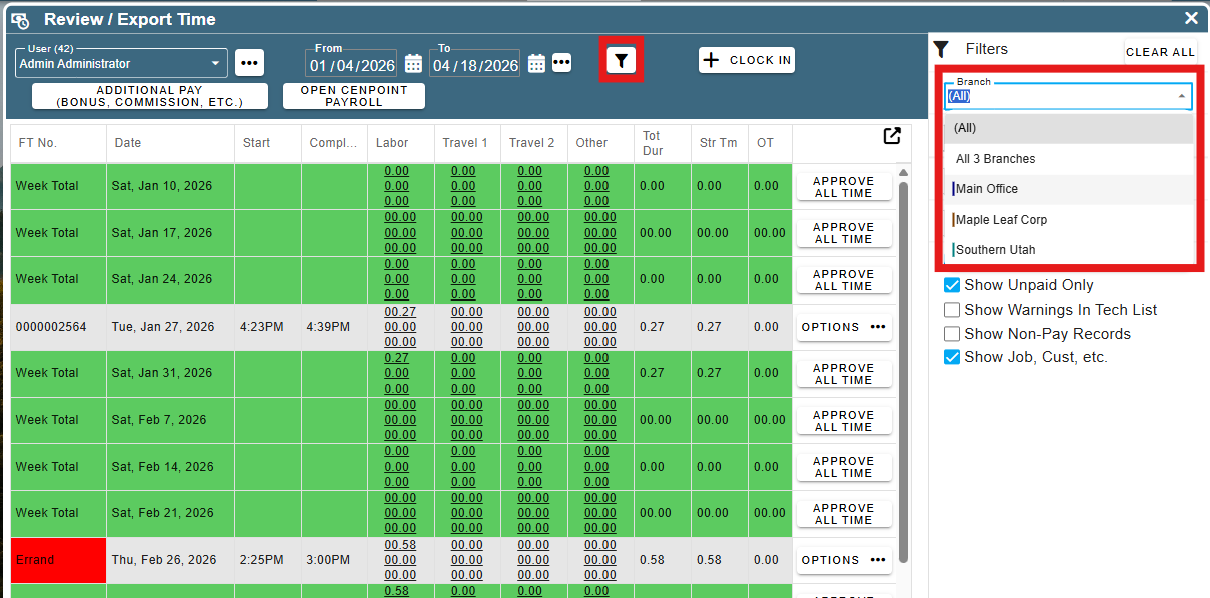
To filter by branch, click the filters button and select the relevant branch to view its technician details.
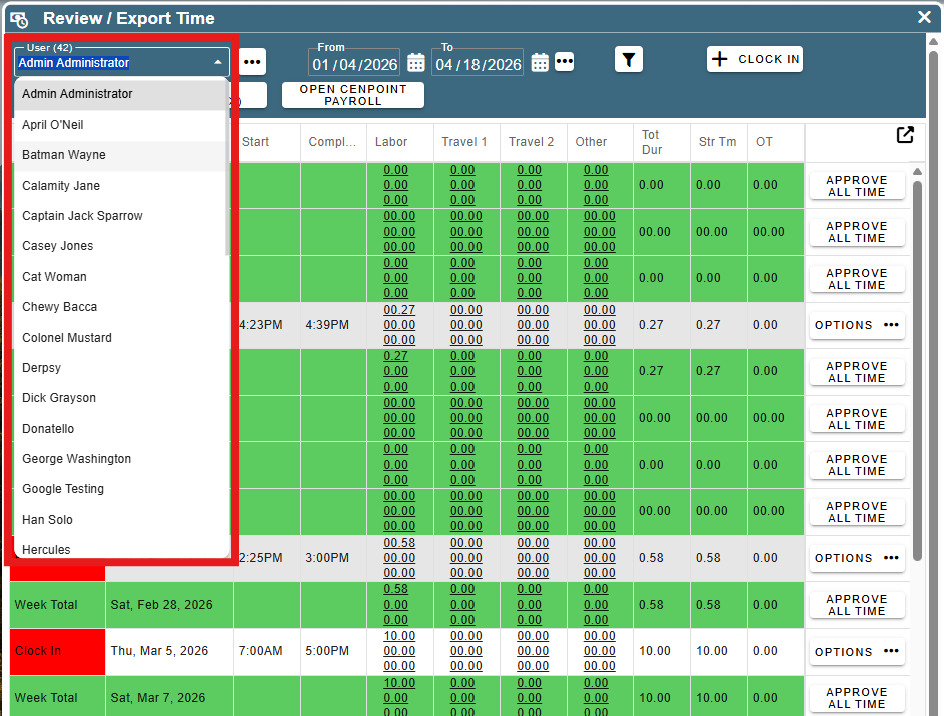
Select the technician whose details you want to view.
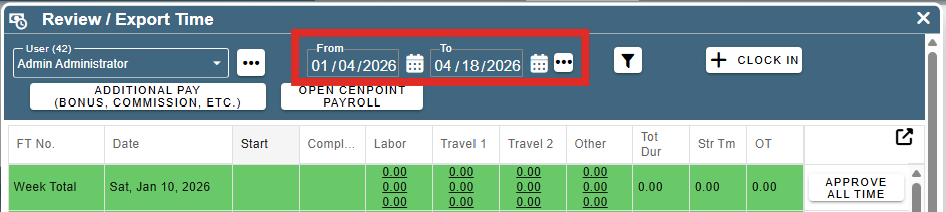
The default view is usually the previous week.
Change the date range if needed to view specific time records.
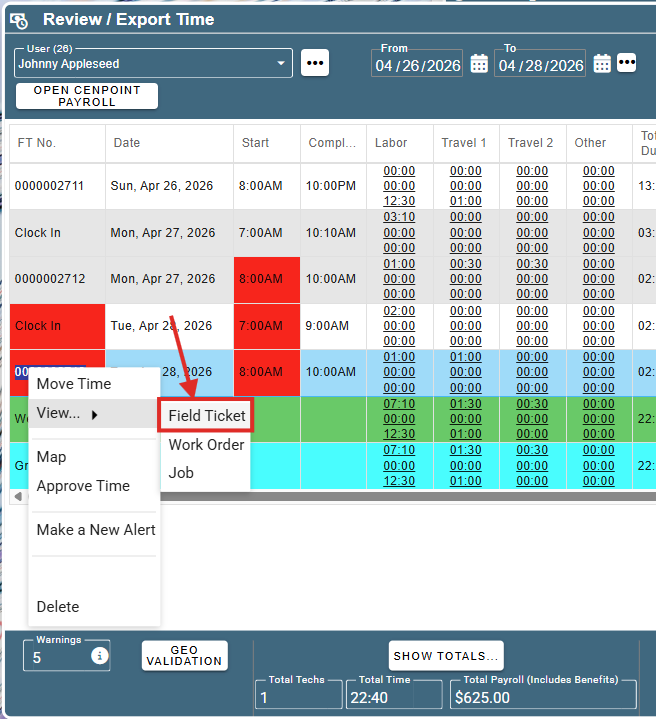
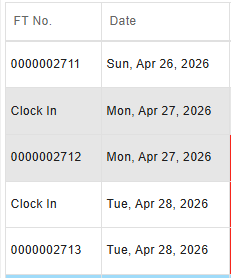
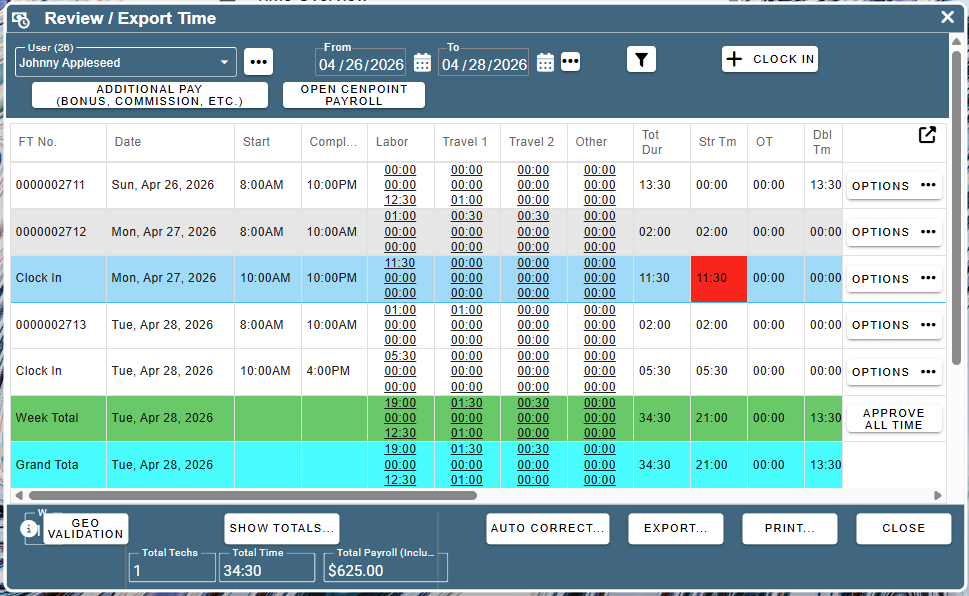
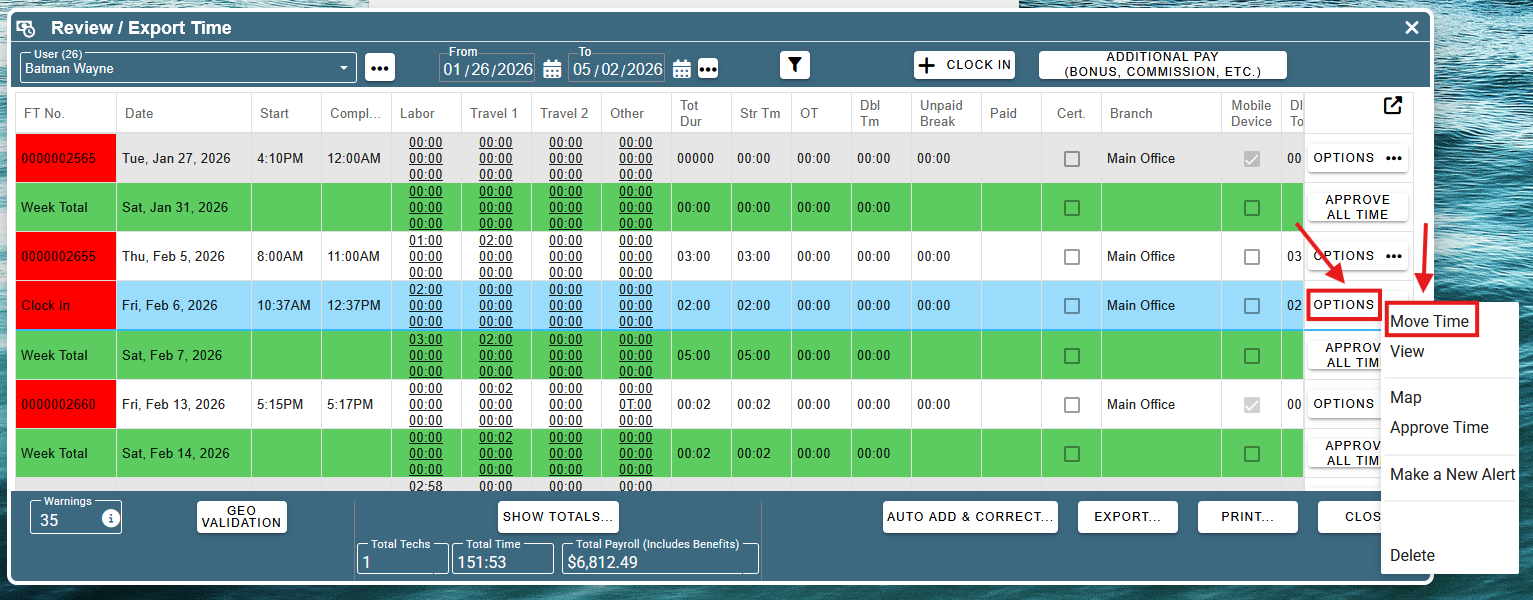
In the image below, there are 4-time records, weekly total and grand total
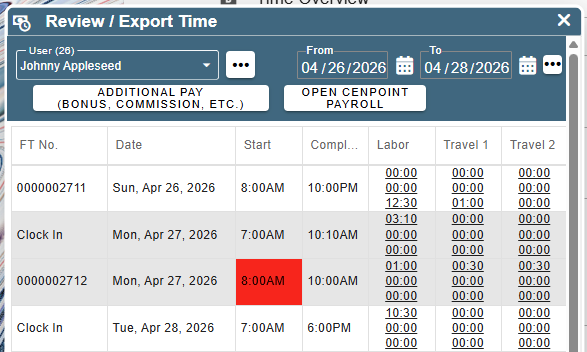
This screen has columns for labor time, travel time, other time, straight time, overtime and double time.
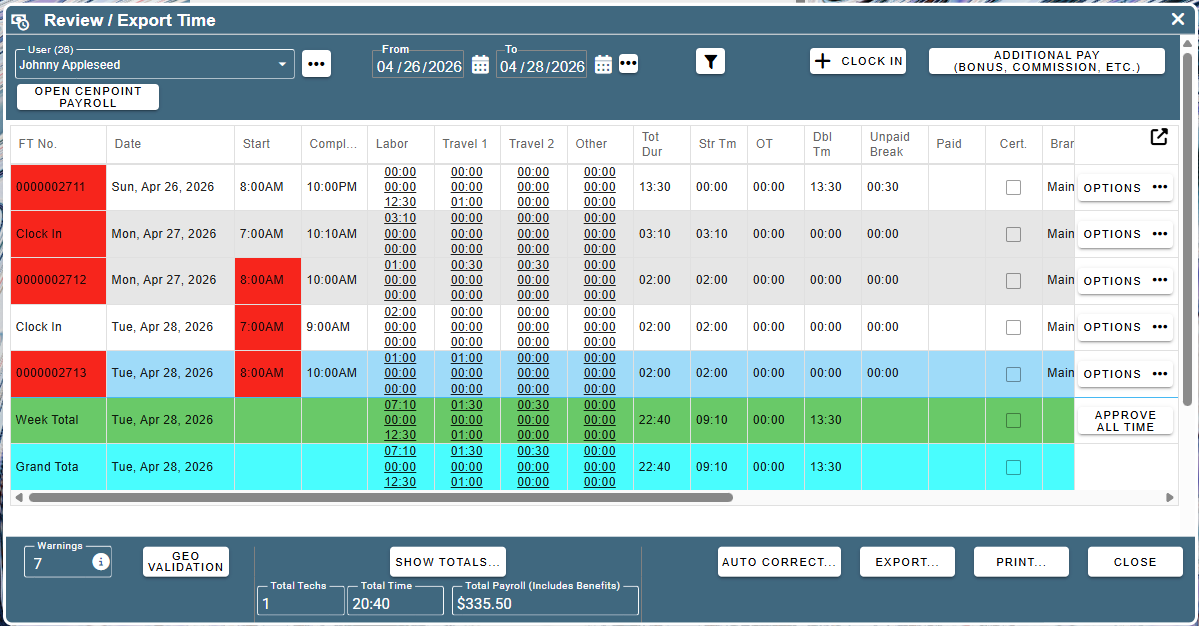
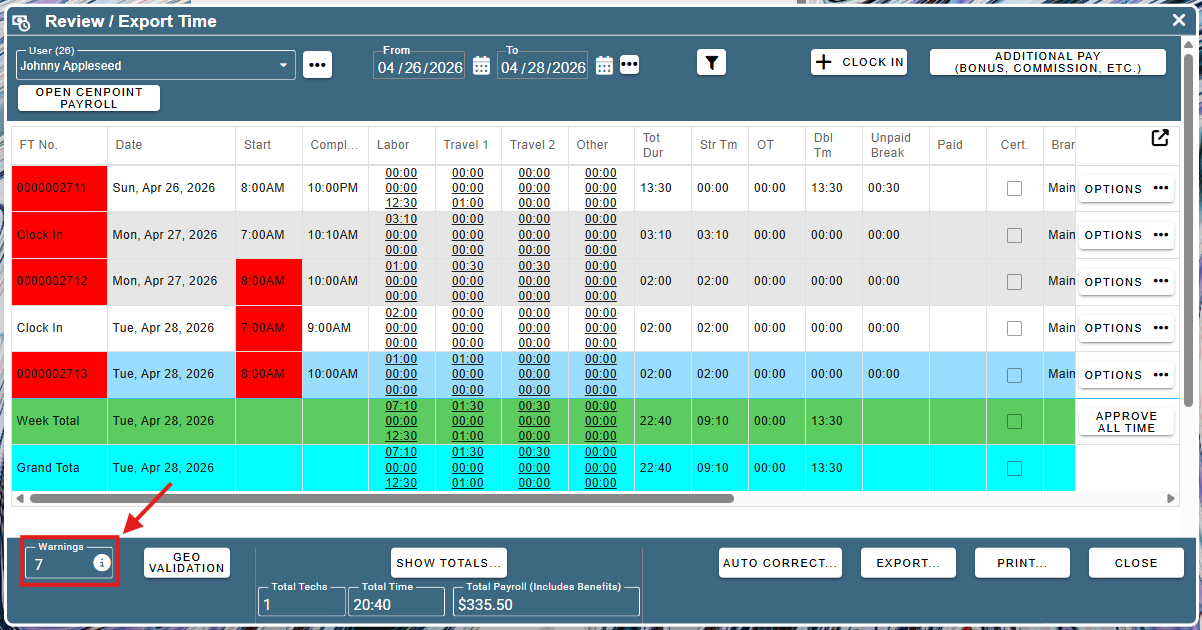
In the Start and FT No. columns, some of the cells are highlighted in red. This means that there are warnings on those cells. To view the active warnings, click the “i” next to the warnings counter. This will show the list of warnings.
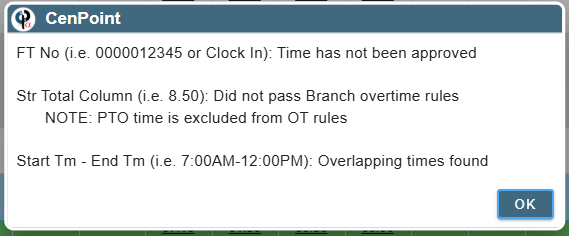
This is the list of all active warnings.
To resolve the warnings in the FT No. column, you need to approve all of the time records that are highlighted in red.
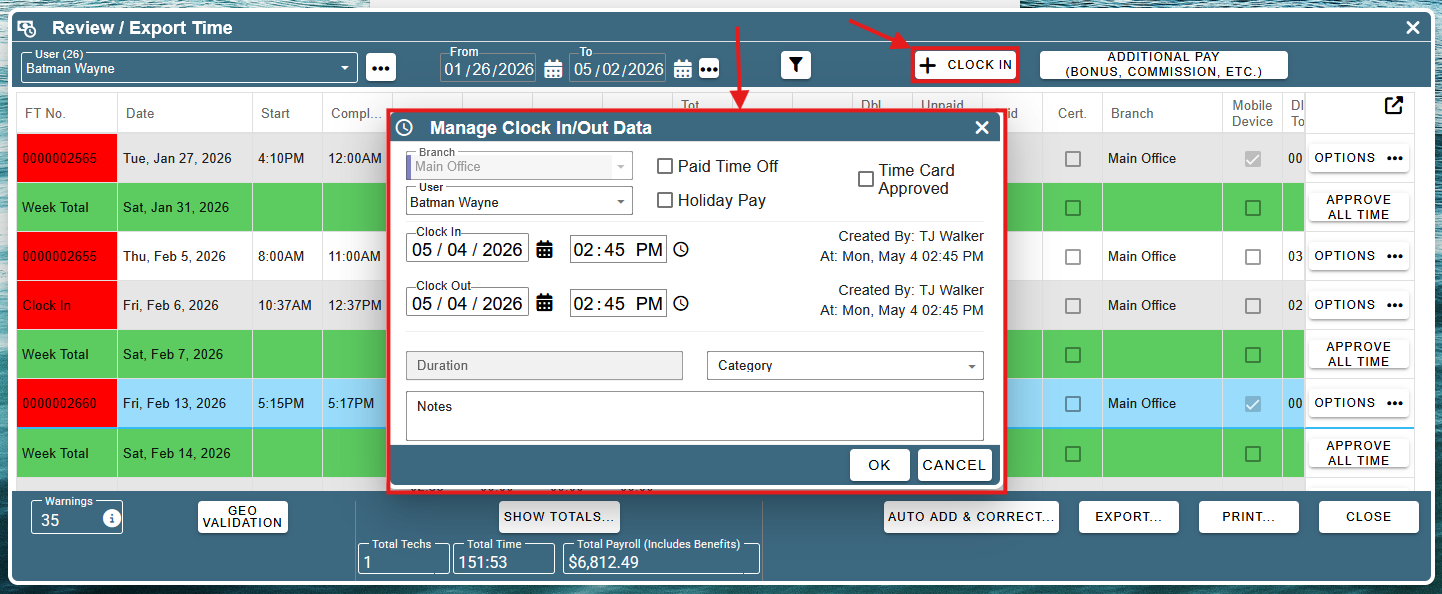
Approving “Clock In” Time Records
You will want to review the time for each Clock In time record to make sure no one forgot to clock out.
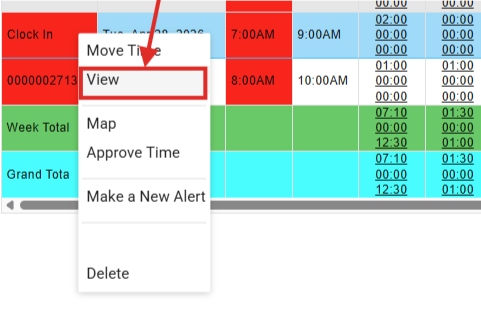
You can review these records by double-clicking on the record and then clicking view.
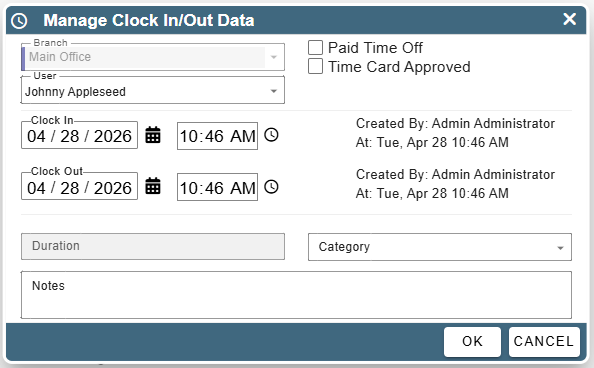
This will open the Manage Clock In/Out Data screen. Here, you can approve an existing time record.
To do so, click the “Time Card Approved” check box and then click OK.
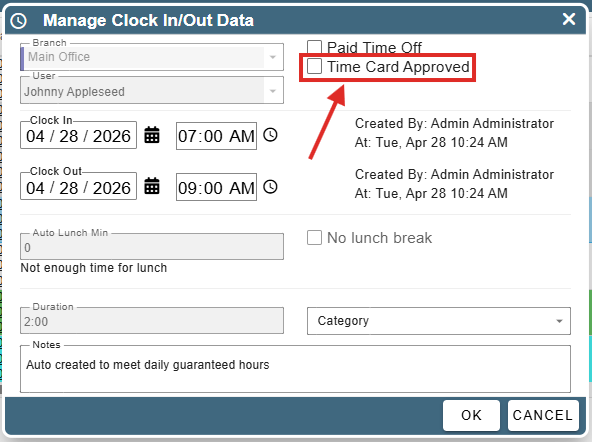
This time record is now approved (it’s no longer red).

Approving Time Records with Field Ticket Numbers
If you double-click the FT No. and click 'View' button, you can choose to view the Field Ticket, Work Order or Job associated with that time entry.
Review the field ticket and click the “Time Card Approved (Entire FT) checkbox. This just means a person physically looked at it and said it looks good. Once it’s checked, the red goes away.
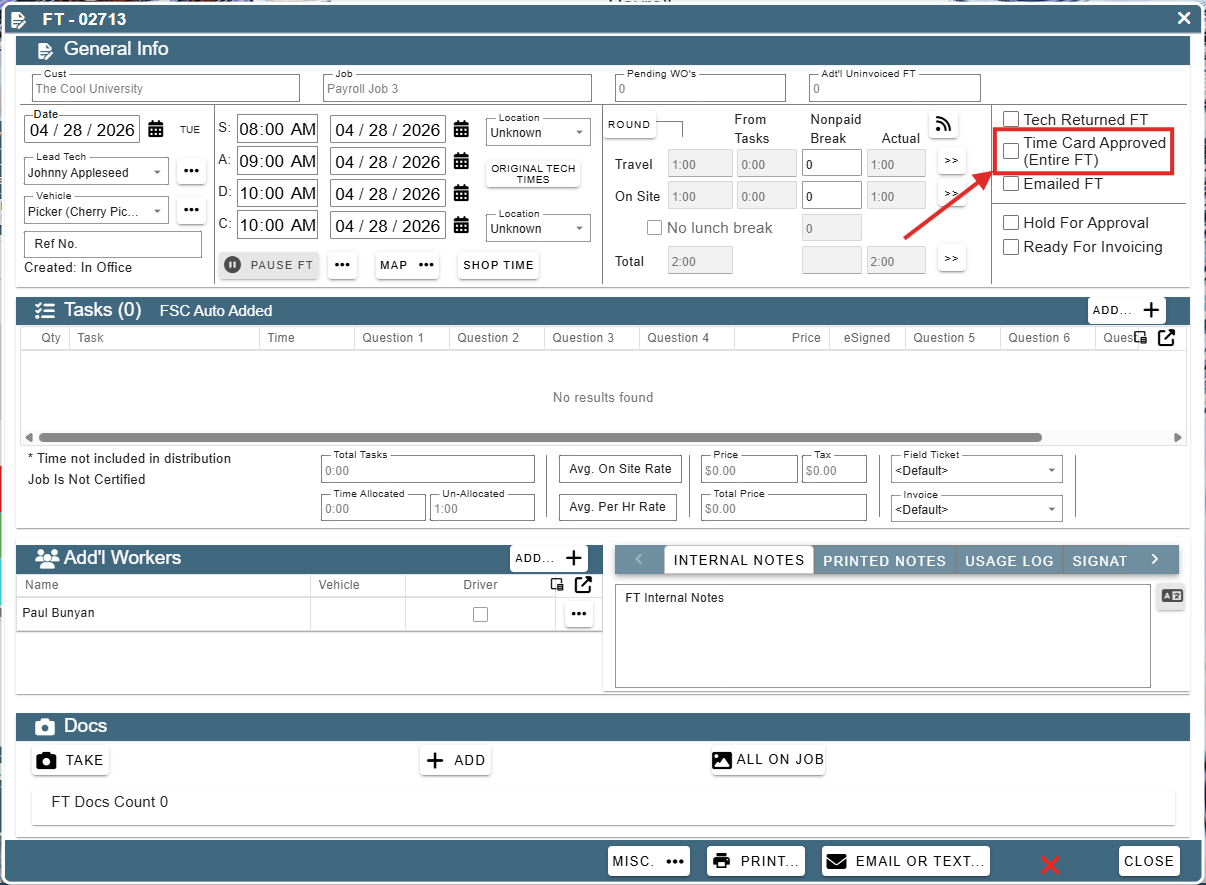
This time record is now approved (it’s no longer red):

Approving All Time Records
To approve all unapproved time records without reviewing them, you can click “Approve All Time”.
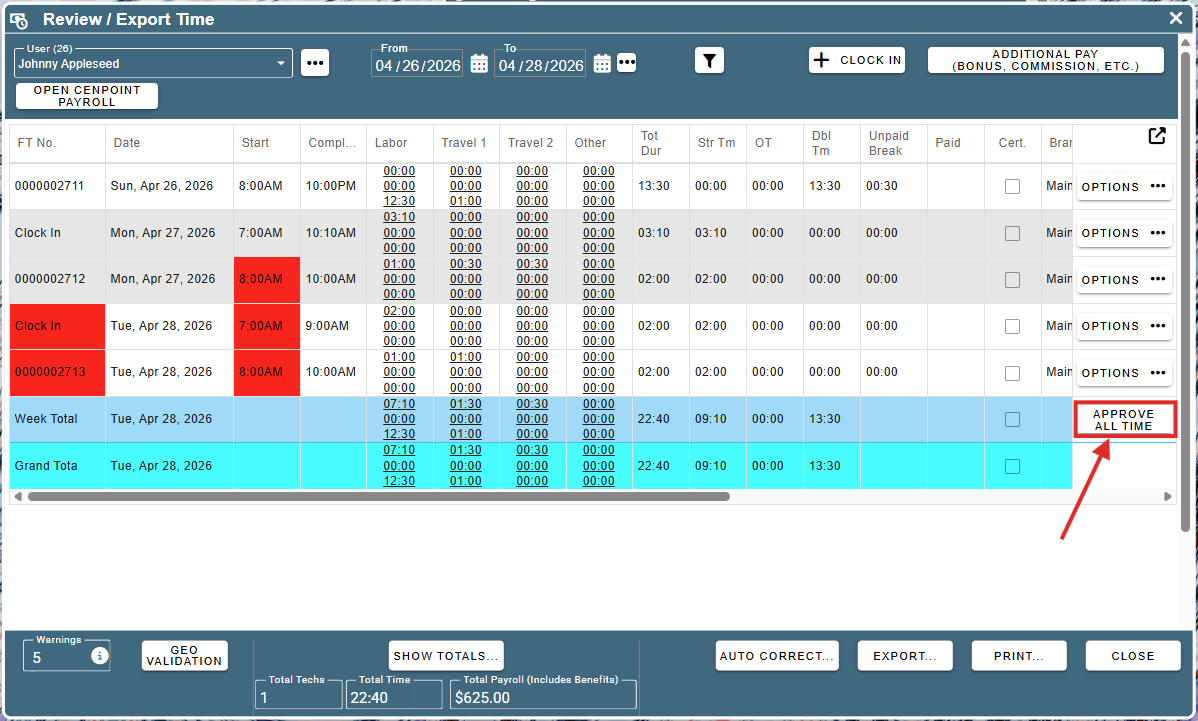
Confirm that you approve of all time records for the selected user(s).
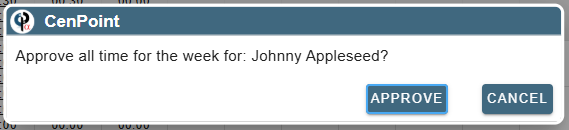
All records are now approved and all of the red in the FT No. column has gone away.
Ensure overlapping times are corrected to maintain accuracy
The cells in the start column are red because the time records are overlapping. The clock-in record goes from 7:00 AM to 10:10 AM, while the field ticket goes from 8:00 AM to 10:00 AM. To get the red to go away, modify either the Clock In or the Field Ticket so that they don’t overlap.
Red cells in the Straight time column indicate overtime rule violations
The cell with 11:30 in the Straight Time column is red because it is overtime. Depending on state laws, after 8 hours of work, you need to apply your overtime rules. To fix this, click on 'Auto Correct' at the bottom and you can correct it for one tech or all. This will calculate and automatically apply overtime rules.
Additional Information: Part two of the video series will cover printing reports and data exports while addressing time display preferences.
Adding a Clock In Time Entry Manually
This screen allows you to add a time entry for a user. After selecting the user, you can enter a clock-in time, clock-out time, a category for the time entry, and any notes related to the time entry.
Part 2
Map Button
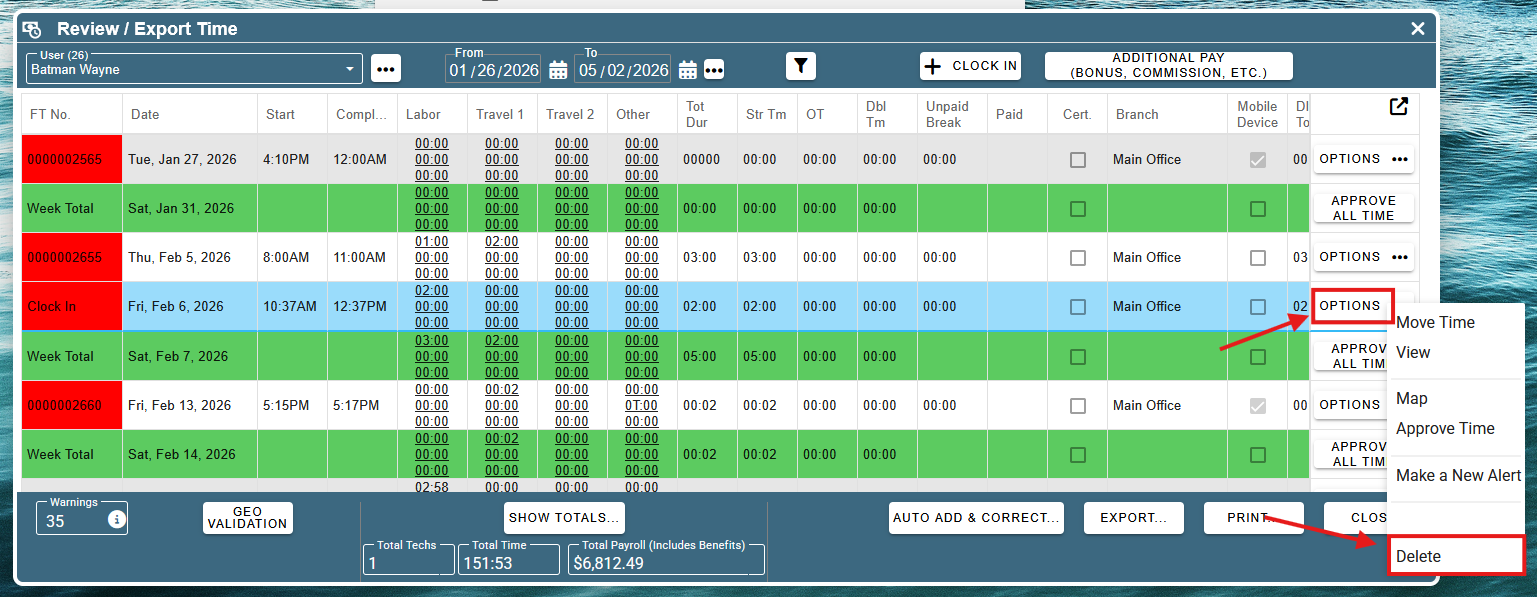
From the “Review / Export Time” page, click on the options button at the left side of that field ticket’s row.
.png)
Then, click the Map button on the drop-down.
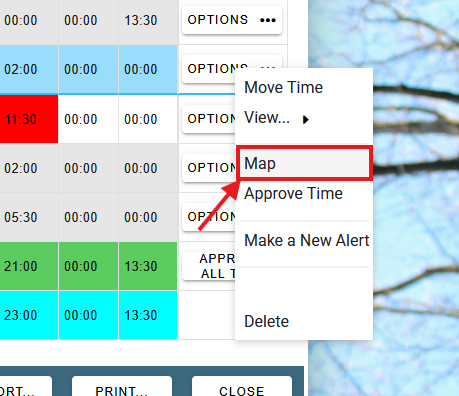
This will open up Google Maps and show you where a tech started, arrived, departed, and completed a field ticket.

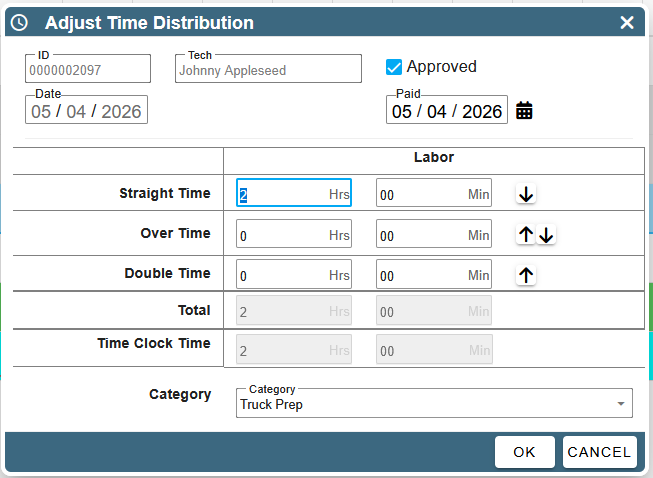
Move Time
Move Time when you want to manually move time from straight time to overtime, double time, etc. You would normally allocate time using overtime rules, but maybe you need to make an exception (holidays, etc.).
To Move Time, click on the options button at the left side of that field ticket’s row and then click “Move Time” to open up the Adjust Time Distribution screen.
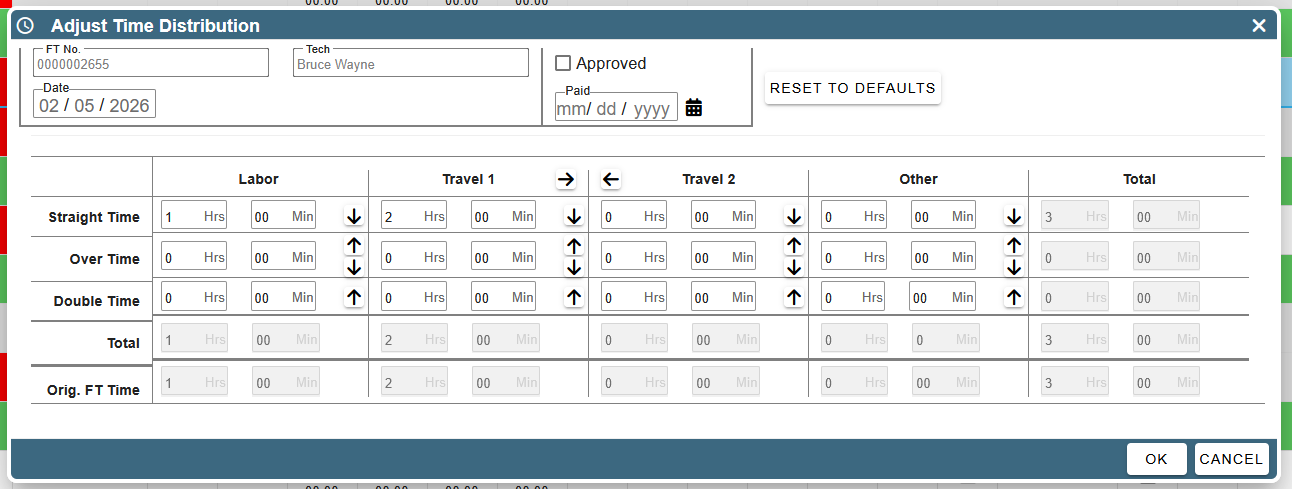
The Adjust Time Distribution screen shows straight time, over time, and double time, the total number of worked hours, and the time originally specified on the field ticket.
Time can be entered under the Labor, Travel 1, Travel 2, or Other categories. You can add or remove time manually by entering it into the fields. You can also shift time between the straight time, over time, and double time categories by clicking the arrow buttons.
Add Clock In Button
Manually add a clock-in record if an employee forgot to clock in.
To do so, click the “Clock In” button. On this screen, set the user, the clock-in and clock-out times, and the category for the clocked time.
When moving time, for a clock-in entry, there is only one column named “Labor”.
Delete Button
To delete a clock-in/clock-out record, click the options button at the end of a “Clock In” record row, then click delete.
You can only delete clock-in records using this method, not field tickets.
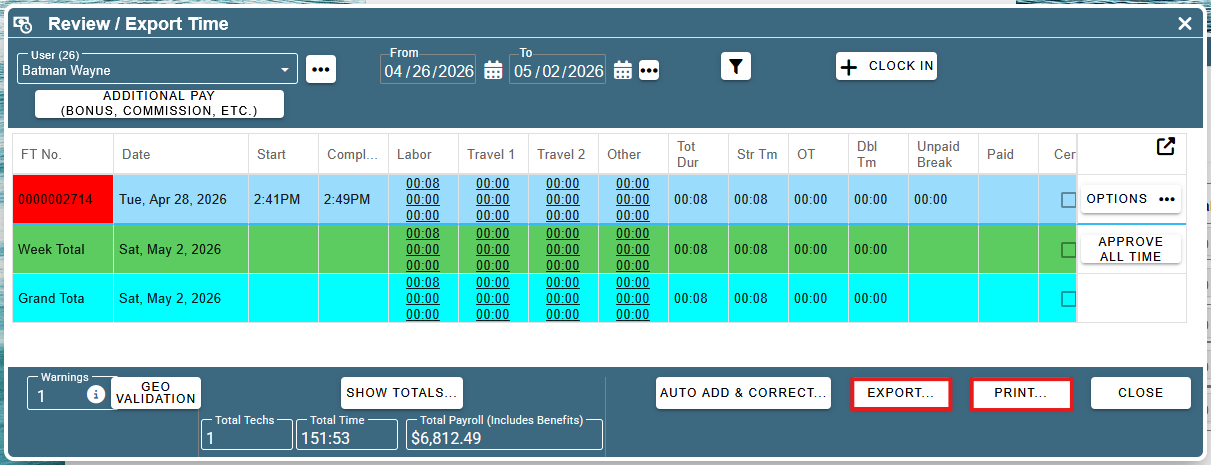
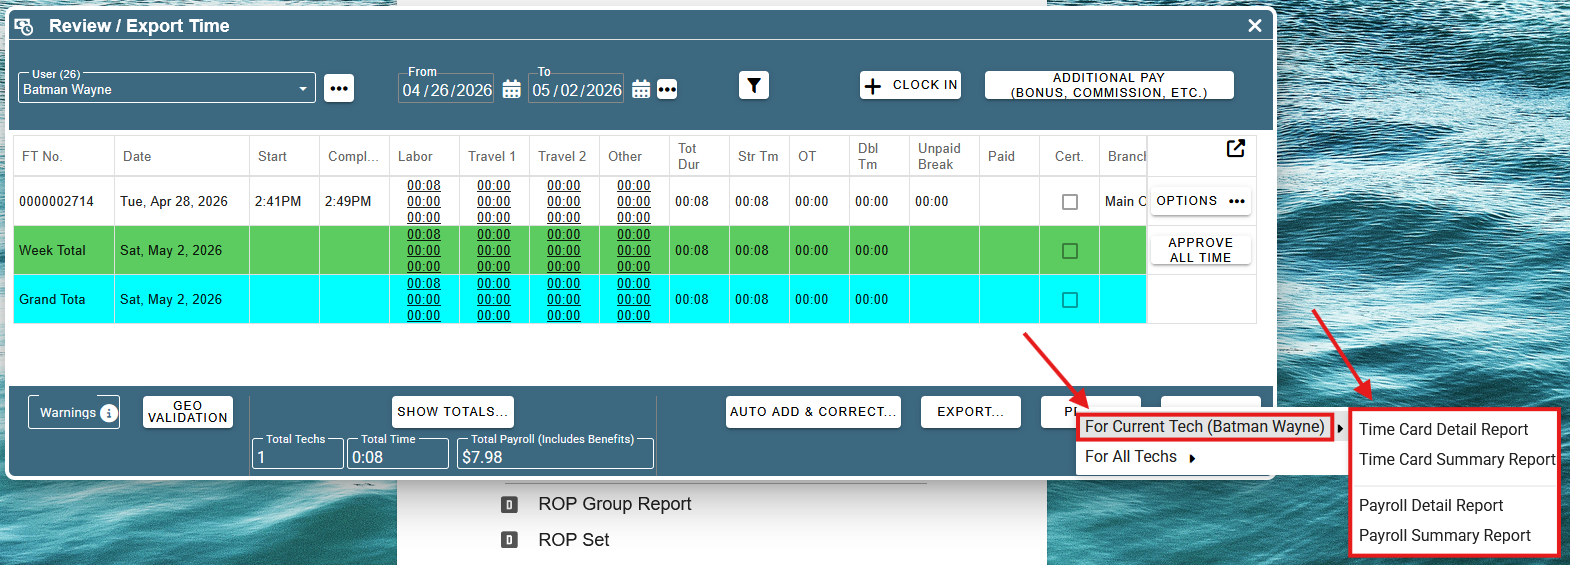
Export and Print Button
To export or print a time report for a user (or all users), click the appropriate buttons at the bottom right corner of the Review / Export time screen.
When clicking the print or export buttons, if there are any warnings concerning branch overtime rules, you will see this dialog box. You can choose to continue or cancel if you want to go back and fix the warnings.

When exporting or printing a time report, you must choose whether to do it for the current tech or all techs. There are 4 different types of reports that you can create: time card detail reports, time card summary reports, payroll detail reports, and payroll summary reports.
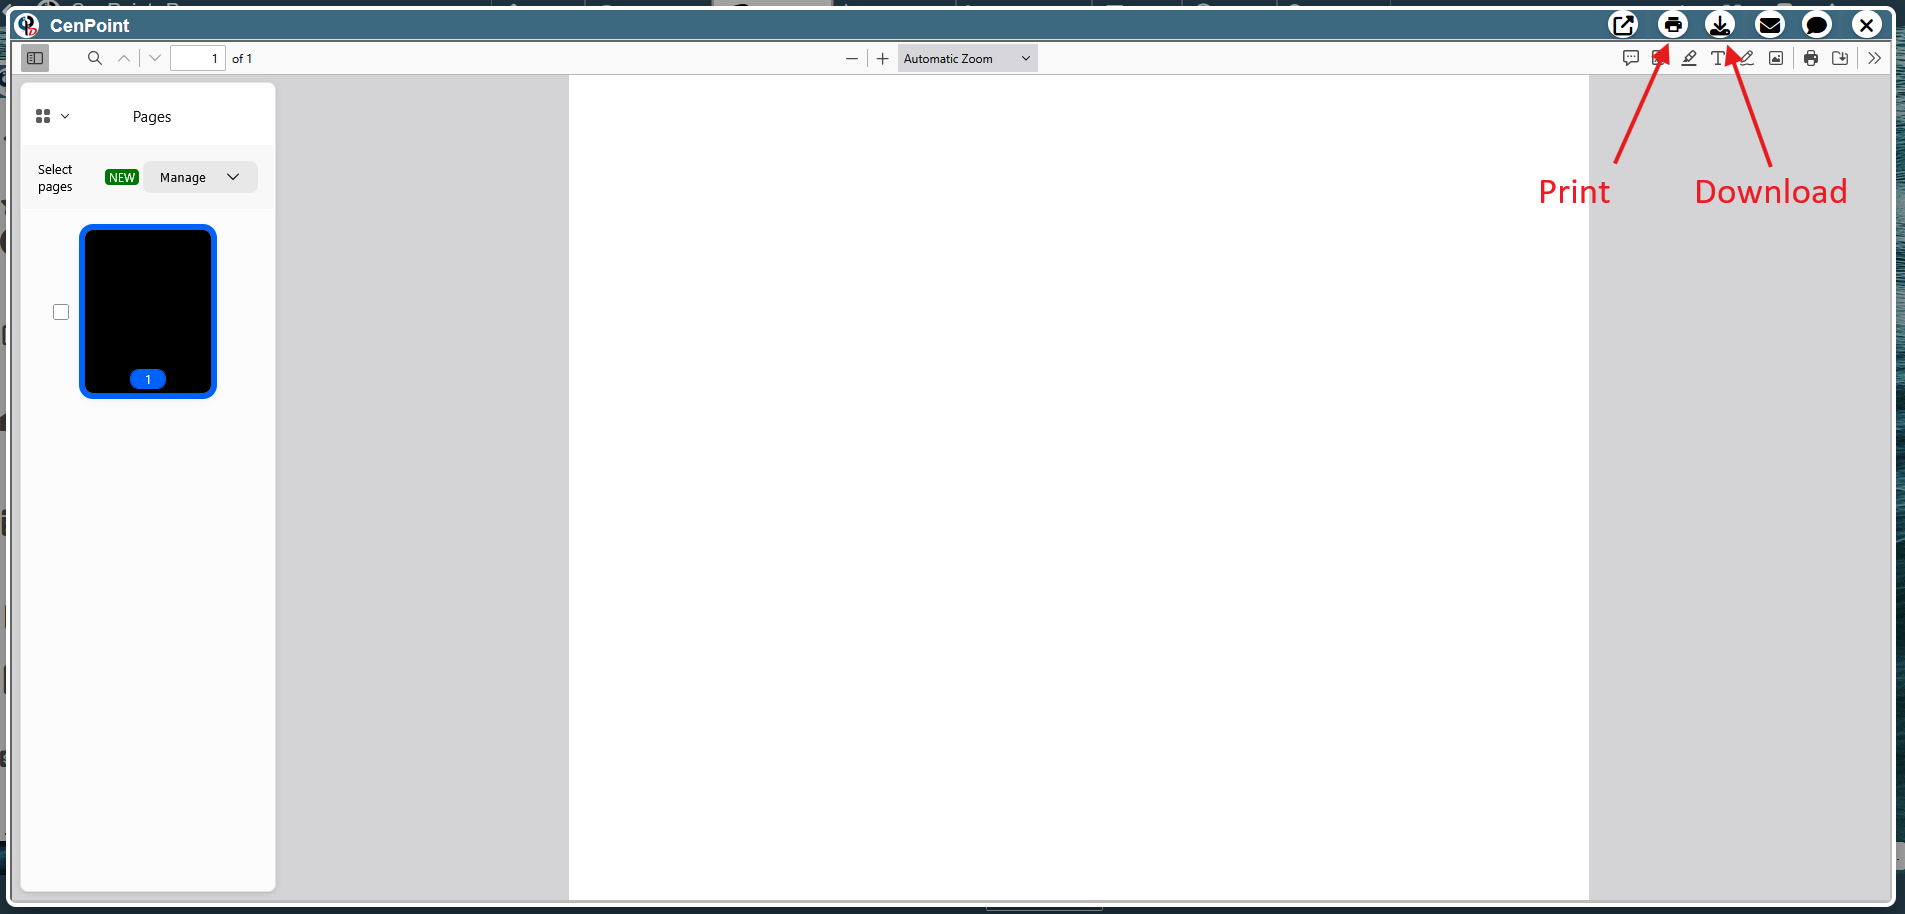
After your report has been generated, a screen will open that allows you to view it. From here, you have the option to view or download the report.
FAQ
Overtime or Double time did not move?
You can always manually move time to OT / Dbl time on any field ticket / clock in record you want. You are not ‘locked’ into how CP calculates OT / Dbl time.
When calculating OT or double time, we go off of the field ticket start date. This makes it so if you work from 8PM to 6AM one day, OT kicks in correctly (i.e. doesn’t reset at midnight and you lose your OT for working more than 8 hours). We also go off of the field ticket start date when it comes to the ‘daily rules’. So, if the FT starts on Saturday and carries over into Sunday, we would not apply Sunday’s Dbl time rule. If the FT starts on Sunday and carries into Monday morning, that entire ‘shift’ would get the double time since it started on Sunday.
Overtime is not working for 1 tech but is for others?
A few things to check
Does the Job have overtime rules different from the branch. The job overtime rules will override the branch settings because certain jobs require different rules from the normal ones you have set up.
Is this tech from another branch. If you are sharing a tech between branches, the overtime rules that apply are the ones from that tech’s home branch.