The full Job screen is seen when modifying an existing Job. If creating a new jobs see Quick Add Job Screen.
Full Job Screen VS Quick Add Job Screen
Difference between Quick Add Job Screen and Full Job Screen :
Quick Add Job Screen | Full Job Screen |
Only appears when you first start a job | Appears every time that you modify a job |
Only allows you to submit 1 job and 1 work order | Has many more fields and/or options |
With it one can create additional work orders |
Modify/Add A Job on Desktop
Two Ways to Modify Existing Job
Click on the Jobs button, find your job, and double click on the job for the modification (Define Job) screen to pop-up
Click on the Jobs button, highlight the job you wish to modify, and click the modify button on the right-hand side of the screen.
Two Ways to Add a New Job
Click on the Jobs button, then click the ‘Add New’ button.
Click ‘New Job’ on the home screen
.png)
Once you are to the Define Job screen, you will need to fill out the information similar to how you would on the Quick Add screen. Such as: Branch, Job Name, Tentative Start time, Expecting Us time, Promised time, Address, and Customer information.
Other informational lines include:
Top Table on Desktop
Status:
Dispatch Notes:
First/Last W.O. Date: These are included to allow you to see how long the job has been going on or how much the time the job will require.
(check box) Active: If a job is deleted, this box gets unchecked.
(check box) Contract/Ongoing: The job will show up in the Contract Progress Report (Located under A/R tab > Contract Progress) if this box is checked.
(check box) Hot List:
(check box) Reviewed: If NOT checked, then the job will show up in the bottom of the Schedule Jobs Screen. If checked, then the job will NOT show up in the Schedule Jobs Screen. Useful if you have one person to create the job and another to review and make work orders for the job as well.
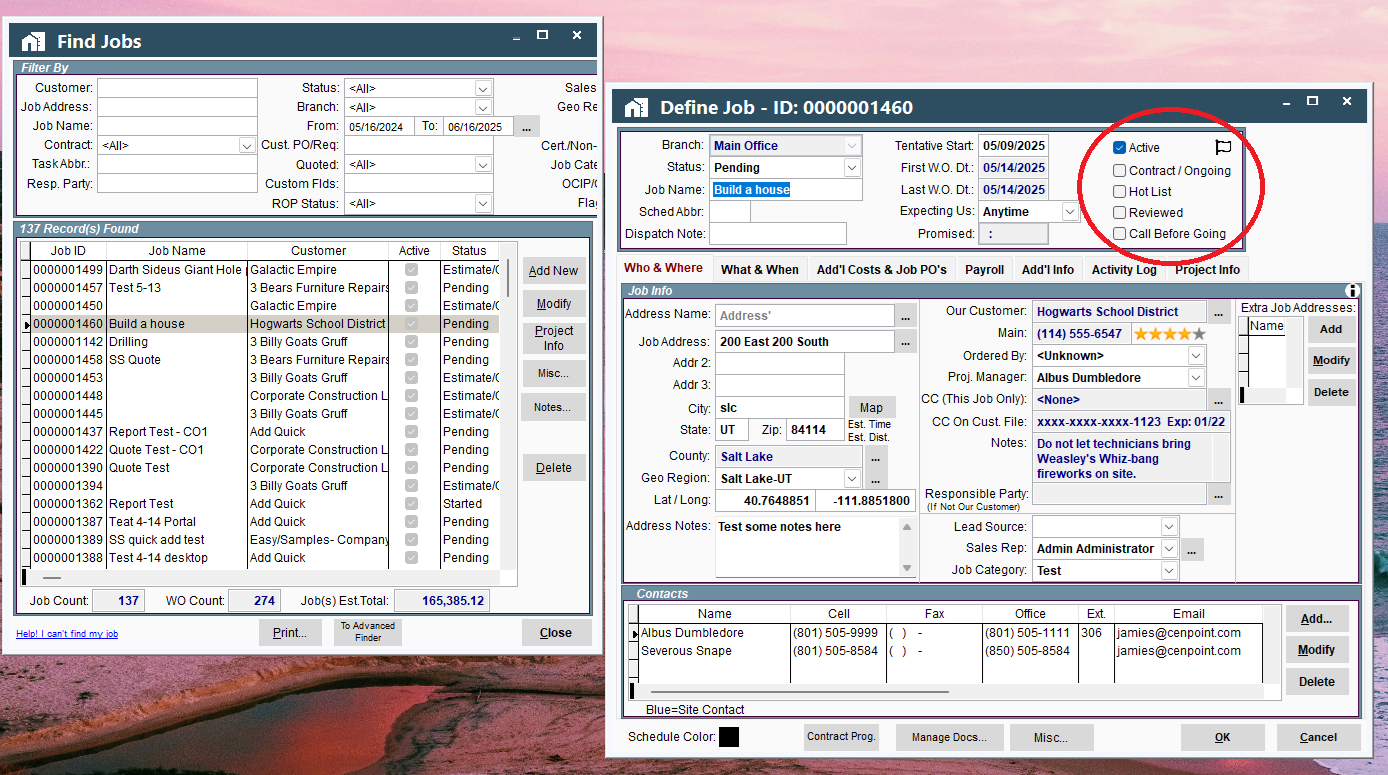
(check box) Call Before Going: If this box is checked, then a red phone notification will appear on every Work Order on the Schedule Jobs Screen. This notification indicates that you need to call the customer before you go to the job.
If red - you have not yet called the customer.
If green - you have completed your call to the customer.
To make the notification turn from red to green, right click on the red notification → click Set Status To Confirmed With Customer, and it will turn the notification green.
Tabs (middle and bottom tables) on Desktop
These tabs are themed and display different middle/bottom table accordingly:
Who and Where Tab on Desktop:
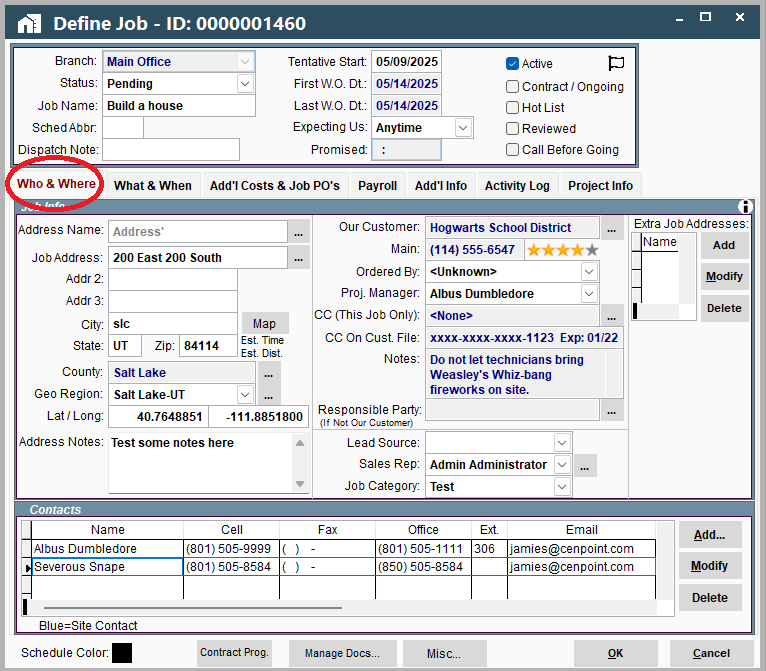
Examples of how to fill out certain informational lines are as follows:
Credit Card
You can add a credit card for this specific job or one that is saved to the customer's file
Notes
This space is available for any specific notes about the customer
Ordered by and/or Proj. Manager
Contacts that are connected to the client will show up here. If you need to add a different contact, follow the following steps:
Go to the bottom table that says "Contacts" > Click Add at the right hand side > Add New Customer Contact
The new contact will now appear under the drop-down menus of the Ordered by and/or Proj. Manager tabs.
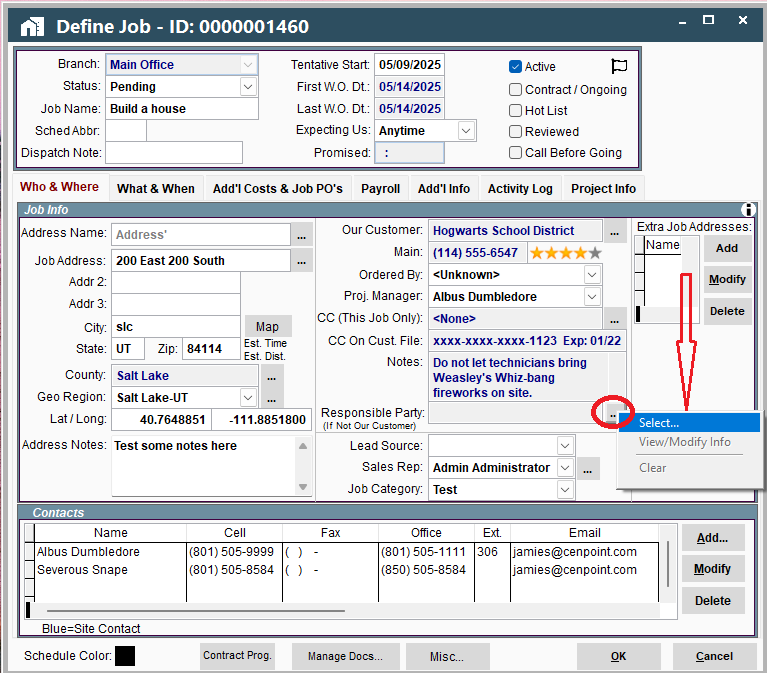
Responsible Party
an individual, such as a General Contractor, can be added here by:
Clicking the (...) button next to the tab > Select > and add them in as you would a customer
Sales Rep
Choose a representative from the drop-down menu OR add multiple sales reps by clicking (...) → Add Sales Rep Not in the List
Address
Extra Job Addresses
This space is useful for placing information for a dump location or a hotel location if the job is out of town.
Contacts:
The name that is highlighted in blue is the Site Contact for the job.
You can change the Site Contact by clicking the Modify button on the right hand side and clicking the check box at the bottom that says Site Contact.
Always make sure to have a Site Contact for your technicians to reference.
What and When:
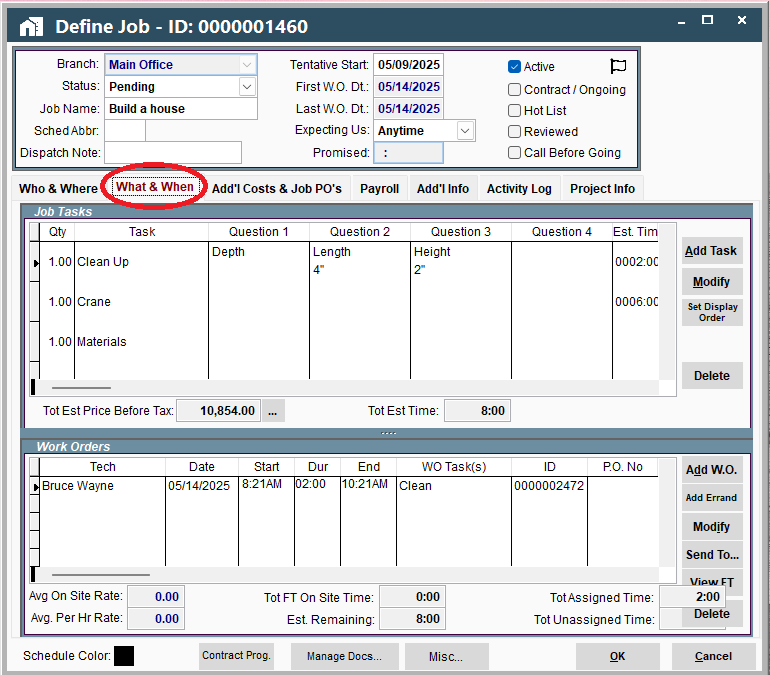
Job tasks:
Contains the entire scope of work for the Job (tasks, quote tabs, quick add tasks, times, prices, etc.).
You can modify tasks (Modify button), add tasks (Add Task button) or delete tasks (Delete button)
You can also select Set Display Order to adjust the order for the tasks.
Work Orders:
This allows you to see all work orders, techs assigned, etc. You can modify as needed
You can also adjust the order and size of the columns if you prefer
Additional Costs & Job PO's
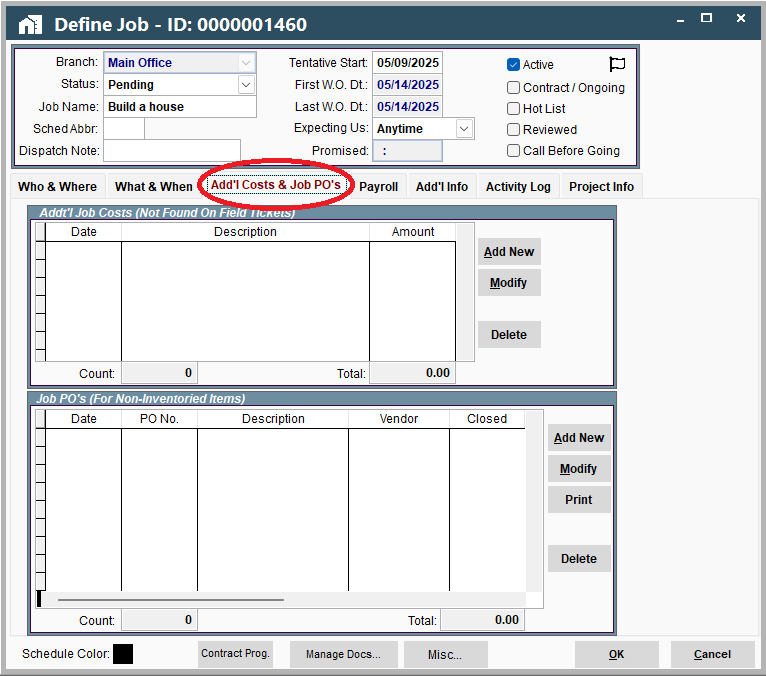
This lets you do 2 things:
1. Generate a P.O. for your customer
Click Add New → insert accurate info → click Save
2. Add in Job costs
Costs that have not submitted already can be submitted here
Click Add New → Fill out additional costs for the job (ex. rental equipment) → click OK
Payroll
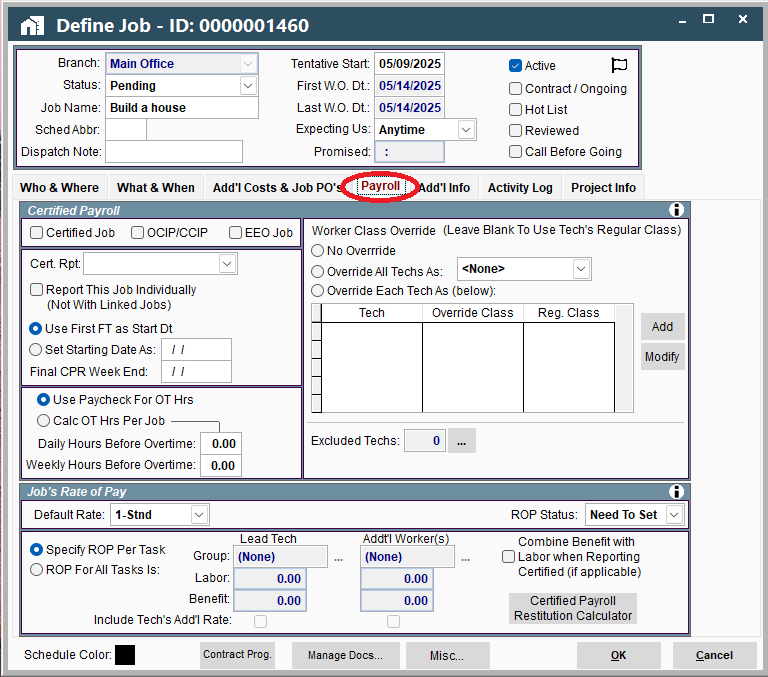
Certified Job: if this is clicked then the job will show up under the Certified Payroll Report
All of the other fields allow you to make adjustments to the Certified Payroll Report just for this particular job
Additional Info
.png)
This is a space to submit any remaining information. The most frequently used fields within this tab are:
P.O. Number
Custom fields (if needed)
Required trainings
You can add/delete as needed. If you add a new training an alert will pop up if you assigned a worker that has not yet passed/has passed that particular training.
Activity Log
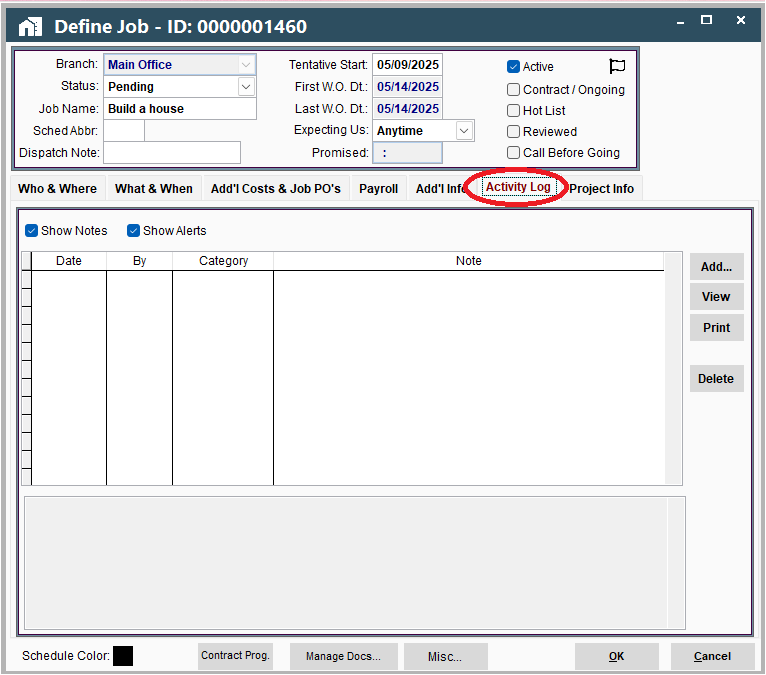
This shows any big changes made to the job, when they were changed, and who made the change.
Project Info
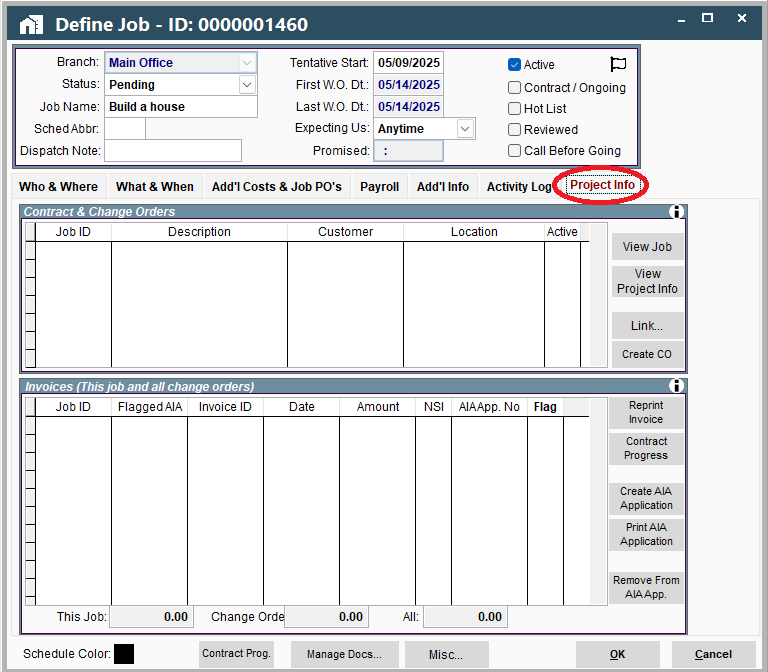
Linked Jobs: This allows you to link jobs together.
This is important if you are dealing with a change order.
With a change order you will then make a new quote, a new job, and link the original and the new job together.
This way allows billing to run them separately, but the reports will be seen as one unit.
Invoices: this allows you to take invoices made in CenPoint and create an AIA Report
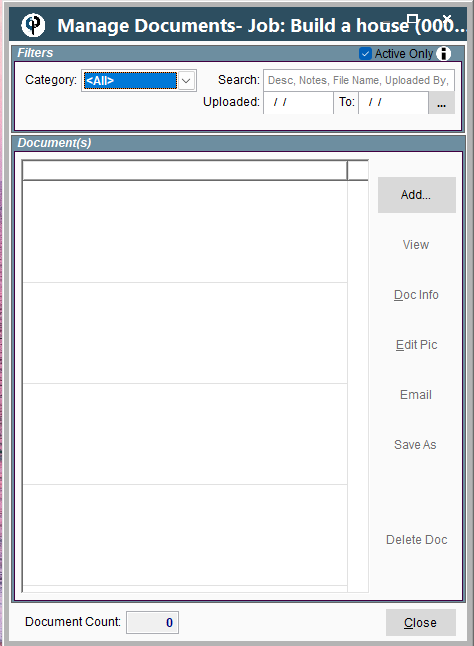
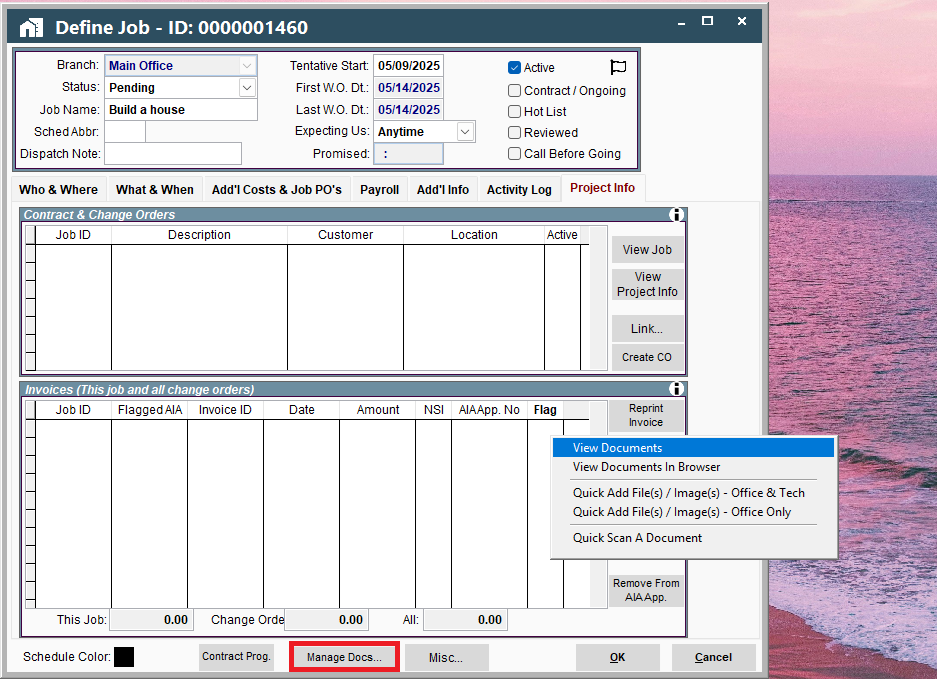
Manage Docs (button on the bottom of the screen): this allows you to save PDF's, files, images, etc. to the job so the technicians can view them if you want, or you can hide them from the Techs if you prefer.
To add, click Manage Docs > View Documents > Add
For more information within each table, click the small i button on the upper right-hand corner of the table to open an article that covers each field in detail.
***Contact us at the following link for any additional questions and we would be happy to help! https://www.cenpoint.com/#/Contact
Modify/Add A Job On Portal
Ways to Modify a Job
Click on ‘Jobs’ to Open the Find Job window. Double click on the desired job for the modification (Define Job) screen to pop-up
Highlight the job you wish to modify and click the ellipsis and then the modify button on the right-hand side of the screen
Ways to Add a New Job
Click on ‘New Job’
Click on 'Jobs’ to open the Find Job window. Click ‘Add’.
.png)
Once you are to the Define Job screen, you will need to fill out the information similar to how you would on the Quick Add screen. Some information you may wish to enter would be the Branch, Job Name, Tentative Start time, Expecting Us time, Promised time, Address, and Customer information.
Other informational lines include:
Top Table (General Info) on Portal
.png)
Status:
Dispatch Notes:
First/Last W.O. Date: These are included to allow you to see how long the job has been going on or how much the time the job will require.
(check box) Active: If a job is deleted, this box gets unchecked.
(check box) Contract/Ongoing: The job will show up in the Contract Progress Report (Located under A/R tab > Contract Progress) if this box is checked.
(check box) Hot List:
(check box) Reviewed: If NOT checked, then the job will show up in the bottom of the Schedule Jobs Screen. If checked, then the job will NOT show up in the Schedule Jobs Screen. Useful if you have one person to create the job and another to review and make work orders for the job as well.
(check box) Call Before Going: If this box is checked, then a red phone notification will appear on every Work Order on the Schedule Jobs Screen. This notification indicates that you need to call the customer before you go to the job.
If red - you have not yet called the customer.
If green - you have completed your call to the customer.
To make the notification turn from red to green, right click on the red notification > click Set Status To Confirmed With Customer, and it will turn the notification green
Tabs (Middle and Bottom Tables) on Portal
Who and Where Tab on Portal
.png)
If you scroll down a little further, you will find a place to upload and view documents associated with the job.

Examples of how to fill out certain informational lines are as follows:
Address Notes
This space is available for any specific notes about the customer and/or their address
Ordered by and/or Proj. Manager
Contacts that are connected to the client will show up here. If you need to add a different contact, follow the following steps:
Go to the bottom table that says "Contacts" → Click Add at the right-hand side → Add New Customer Contact
The new contact will now appear under the drop-down menus of the Ordered by and/or Proj. Manager tabs.
Responsible Party
an individual, such as a General Contractor, can be added here by:
Clicking the (...) button next to the words “Responsible Party” → Select → and add them in as you would a customer
Sales Rep
Choose a representative from the drop down menu OR add multiple sales reps by clicking (...) > Add Sales Rep Not in the List
Address
Extra Job Addresses
This space is useful for placing information for a dump location or a hotel location if the job is out of town.
Contacts:
The name that is highlighted in orange is the Site Contact for the job.
You can change the Site Contact by clicking the Modify button on the right-hand side and clicking the check box at the bottom that says Site Contact.
Always make sure to have a Site Contact for your technicians to reference.
Docs:
this allows you to save PDF's, files, images, etc. to the job so the technicians can view them if you want, or you can hide them from the Techs if you prefer.
What and When
.png)
Job tasks:
Contains the entire scope of work for the Job (tasks, quote tabs, quick add tasks, times, prices, etc.).
You can modify tasks (click on the three dots (...) -> Modify, add tasks (Add button to the upper right of Tasks) or delete tasks (click on the three dots (...) -> Delete)
You can also select Set Display Order to adjust the order for the tasks.
Work Orders:
This allows you to see all work orders, techs assigned, etc. You can modify as needed
Additional Costs & Job PO's
.png)
This lets you do 2 things:
1. Generate a P.O. for your customer
Click Add → insert accurate info → click OK
2. Add in Job costs
Costs that have not submitted already can be submitted here
Click Add → Fill out additional costs for the job (ex. rental equipment) → click OK
Payroll
.png)
Certified: if this is clicked then the job will show up under the Certified Payroll Report
All of the other fields allow you to make adjustments to the Certified Payroll Report just for this particular job
Additional Info
.png)
This is a space to submit any remaining information. The high-important fields within this tab are:
P.O. Number
Custom fields (if needed)
Required trainings
You can add/delete as needed. If you add a new training an alert will pop up if you assigned a worker that has not yet passed/has passed that particular training.
Activity Log
.png)
This shows any big changes made to the job, when they were changed, and who made the change.
Project Info
.png)
Linked Jobs: This allows you to link jobs together.
This is important if you are dealing with a change order.
With a change order you will then make a new quote, a new job, and link the original and the new job together.
This way allows billing to run them separately, but the reports will be seen as one unit.
Invoices: this allows you to take invoices made in CenPoint and create an AIA Report
For more information within each table, click the small i button on the upper right-hand corner of the table to open an article that covers each field in detail.
***Contact us at the following link for any additional questions and we would be happy to help! https://www.cenpoint.com/#/Contact
