Top Fields on Desktop
Branch
.png)
Branch is specified when selecting a customer. Whichever branch the customer belongs to, will be entered here. If the customer belongs to multiple branches, you will be prompted to select a branch.
You can filter by branch on the Find Jobs screen.
.png)
If you made an incorrect selection, and need to correct the branch see Move a Job to a Different Branch
Status
.png)
The status can be used to filter your jobs on the Job Finder screen.
.png)
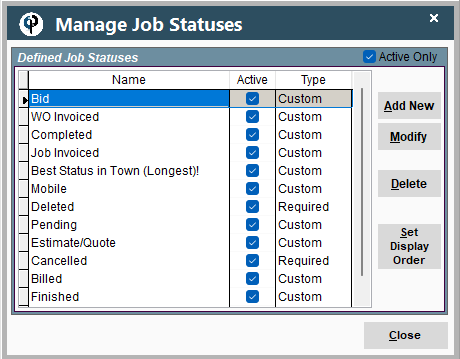
Statuses can also trigger specific actions such as deactivating a Job, or hiding a Job from the scheduler. (Jobs with a Canceled or Deleted status do not show on the scheduler and are deactivated.)
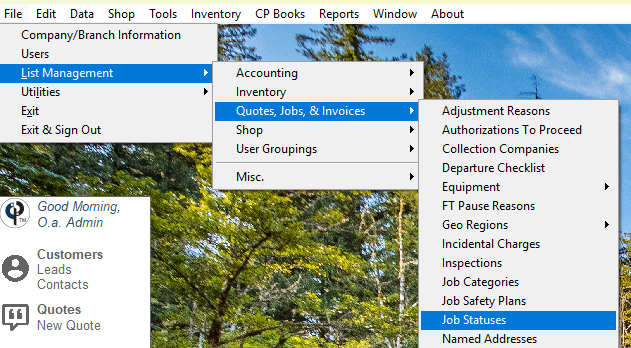
To customize these actions and available statuses, go to File → List Management → Quotes, Jobs, & Invoices → Job Statuses. Here you can add and remove items and customize their actions.


Job Name
.png)
The Job name will display on schedulers, field tickets, and invoices.
You can search for jobs by Job name on the Job Finder Screen.
.png)
Schedule Abbreviation
.png)
Displays when there is not enough room for the full Job name (optional).
Dispatch Note
.png)
A note to help the dispatcher. Displays on the Work Order, and scheduler, when the Work Order is highlighted.
.png)
.png)
Dates
.png)
A tentative start date can be set before an official date.
First work order date, and last work order date help give an overview of Job activity.
Expecting us/Promised
.png)
Helps the dispatcher assign work orders within the appropriate timeframe. If you select promised, you can enter a specific promise time below.
Active checkbox
.png)
If a Job is deleted, it is simply deactivated. In other words this box becomes unchecked. A Job can be reactivated, by checking this box.
To find a deactivated Job, go to the Job Finder screen, and uncheck the "active only" box in the top right corner.
.png)
Contract/Ongoing
.png)
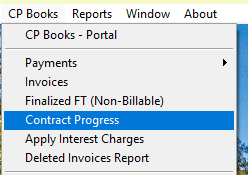
The contract progress report will only display jobs marked as Contract/Ongoing. To access said report go to CP Books → Contract Progress

Reviewed
.png)
Jobs that have not been marked as reviewed, will display under the "Needs Review" tab on the scheduler. Once they have been reviewed, you can open the Job and check the reviewed box. (This is great for jobs that have been entered in the system, but not scheduled yet)
.png)
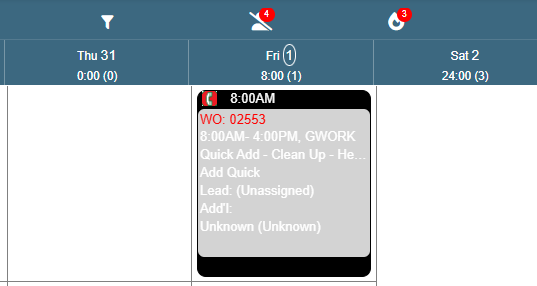
Work orders belonging to an unreviewed job will display with red text on the scheduler.
.png)
Call Before Going
.png)
Causes the Work Order to display a red phone on the scheduler, for customers that like to receive a phone call before we meet them at the jobsite.
.png)
Once the customer has been called, you can right-click on the Work Order, and click "Set Status to: Confirmed with Customer".
.png)
This changes the icon to a green phone, which will then be replaced by the truck when the technician begins driving.
.png)
Top Fields on Portal
Branch
.png)
Branch is specified when selecting a customer. Whichever branch the customer belongs to, will be entered here. If the customer belongs to multiple branches, you will be prompted to select a branch.
You can filter by branch on the Find Jobs screen.
If you made an incorrect selection, and need to correct the branch see Move a Job to a Different Branch
Status
.png)
The status can be used to filter your jobs on the Job Finder screen.
.png)
Statuses can also trigger specific actions such as deactivating a Job, or hiding a Job from the scheduler. (Jobs with a Canceled or Deleted status do not show on the scheduler and are deactivated.)
To customize these actions and available statuses, go to More → List Management → Quotes, Jobs, & Invoices → Job Statuses. Here you can add and remove items and customize their actions.
.png)
Job Name
.png)
The Job name will display on schedulers, field tickets, and invoices.
You can search for jobs by Job name on the Job Finder Screen.
Schedule Abbreviation
.png)
Displays when there is not enough room for the full Job name (optional).
Dispatch Note
.png)
A note to help the dispatcher. Displays on the Work Order. Also displays on the scheduler when you hover over the work order.
.png)
.png)
Dates
.png)
A tentative start date can be set before an official date.
First work order date and last work order date help give an overview of Job activity.
Expecting us/Promised
.png)
Helps the dispatcher assign work orders within the appropriate timeframe. If you select promised, you can enter a specific promise time below.
Active checkbox
.png)
If a Job is deleted, it is simply deactivated. In other words this box becomes unchecked. A Job can be reactivated by checking this box.
To find a deactivated Job, go to the Job Finder screen and uncheck the "active only" box in the top right corner.
.png)
Contract/Ongoing
.png)
Reviewed
.png)
Once jobs have been reviewed, you can open the Job and check the reviewed box. (This is great for jobs that have been entered in the system, but not scheduled yet)
Call Before Going
.png)
Causes the Work Order to display a red phone on the scheduler, for customers that like to receive a phone call before we meet them at the jobsite.
