
General Tab Overview
To access a user go to More -> Users
.png)
Select user then click the Ellipsis -> Modify
.png)
It will take you to a window like this:
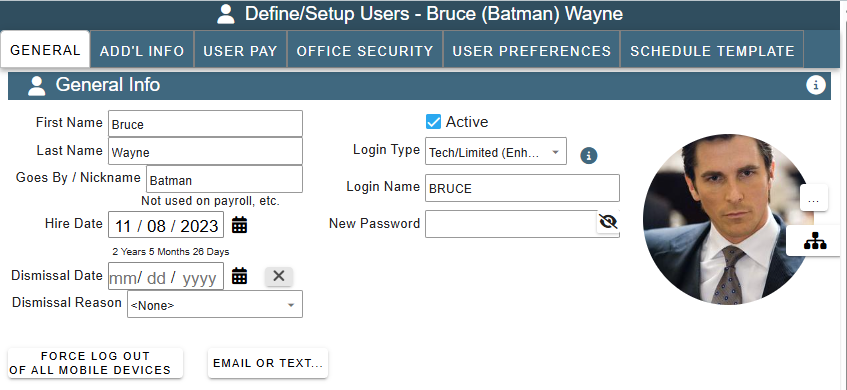
Add a User: First and Last Name
Nickname: Nickname that the user prefers
Hire Date: Date User was hired
Dismissal Date: Date User was Dismissed
Dismissal Reason: Reason for employee leaving - you can view all the dismissal reasons for employees to track your turnover on the Users screen in the grid
You will need to uncheck the 'Active Only' box on the users screen to see all the dismissal reasons and export the grid for a Sudo report. You can change the dismissal reasons list by going to More->List Management->Misc.->Pick List data and selecting the 'User Dismissal Reasons' category.
Login Type: Choose the users login clearance either Tech, Office, or Not Allowed
Login Name: Choose a Login Name for that user
Password: Choose a password up to 24 characters
Force Log Out will log that user out of all sessions of CenPoint on Mobile Devices
Email or Text: Shows the Email and the phone number for the user
.png)
Branch: Select the Users Main Branch and follow the line over to Can also access-> check the box of other branches they are allowed access.
Department : Select what department the user is in. To create a Department in Portal Go to->More->List Management->Users->Departments
Crew Lead: Select what Crew the user is the Lead. To create a Crew in Portal Go to->More->List Management->Users->Crews
Dflt Vehicle: Choose the default vehicle for the user, this will fill in on the Work Order. To add a Vehicle in Portal Go to->More->List Management->Shop->Vehicles
Takes Vehicle Home: Check the box if they are allowed to take their vehicle home
Unpaid Morning Commute: Takes vehicle home box must be checked and fill in their unpaid commute time.
Click on the following link for more on unpaid morning commute. Unpaid Morning Commute
Worker Class: Assign a worker class this will be used on Certified Payroll. To add a Worker Class in Portal Go to-> More->List Management->Misc-> Picklist Data, then select Worker Classification as your category to edit.
Work Group: Assign a work group if applicable, this will show up on the Weekly Scheduler. To add a Work Group in Portal Go to-> More -> List Management-> Users -> Work Group
Receive Alerts: Check what departments that user will receive alerts. When a task is scheduled that has an alert, they may receive an alert. To set up an alert in Portal go to File->List Management -> Quotes, Jobs, & Invoices -> Task Options-> Tasks, then select the tab Auto Alerts.
For an alert not tied to a task in Portal Go to Home -> Additional -> Make New Alert.