
"Taxes" Text Version
In some areas, services or tasks can have a tax applied to them. City or state taxes can also apply.
How to set up your taxes:
Taxes on Desktop
Step 1: Set up tax rate
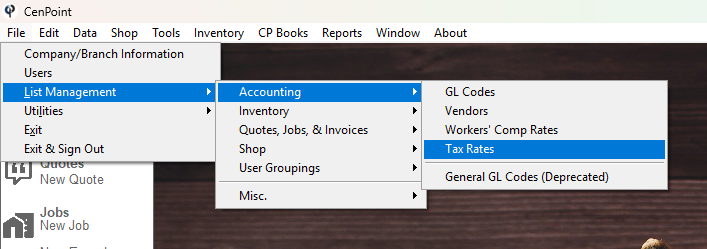
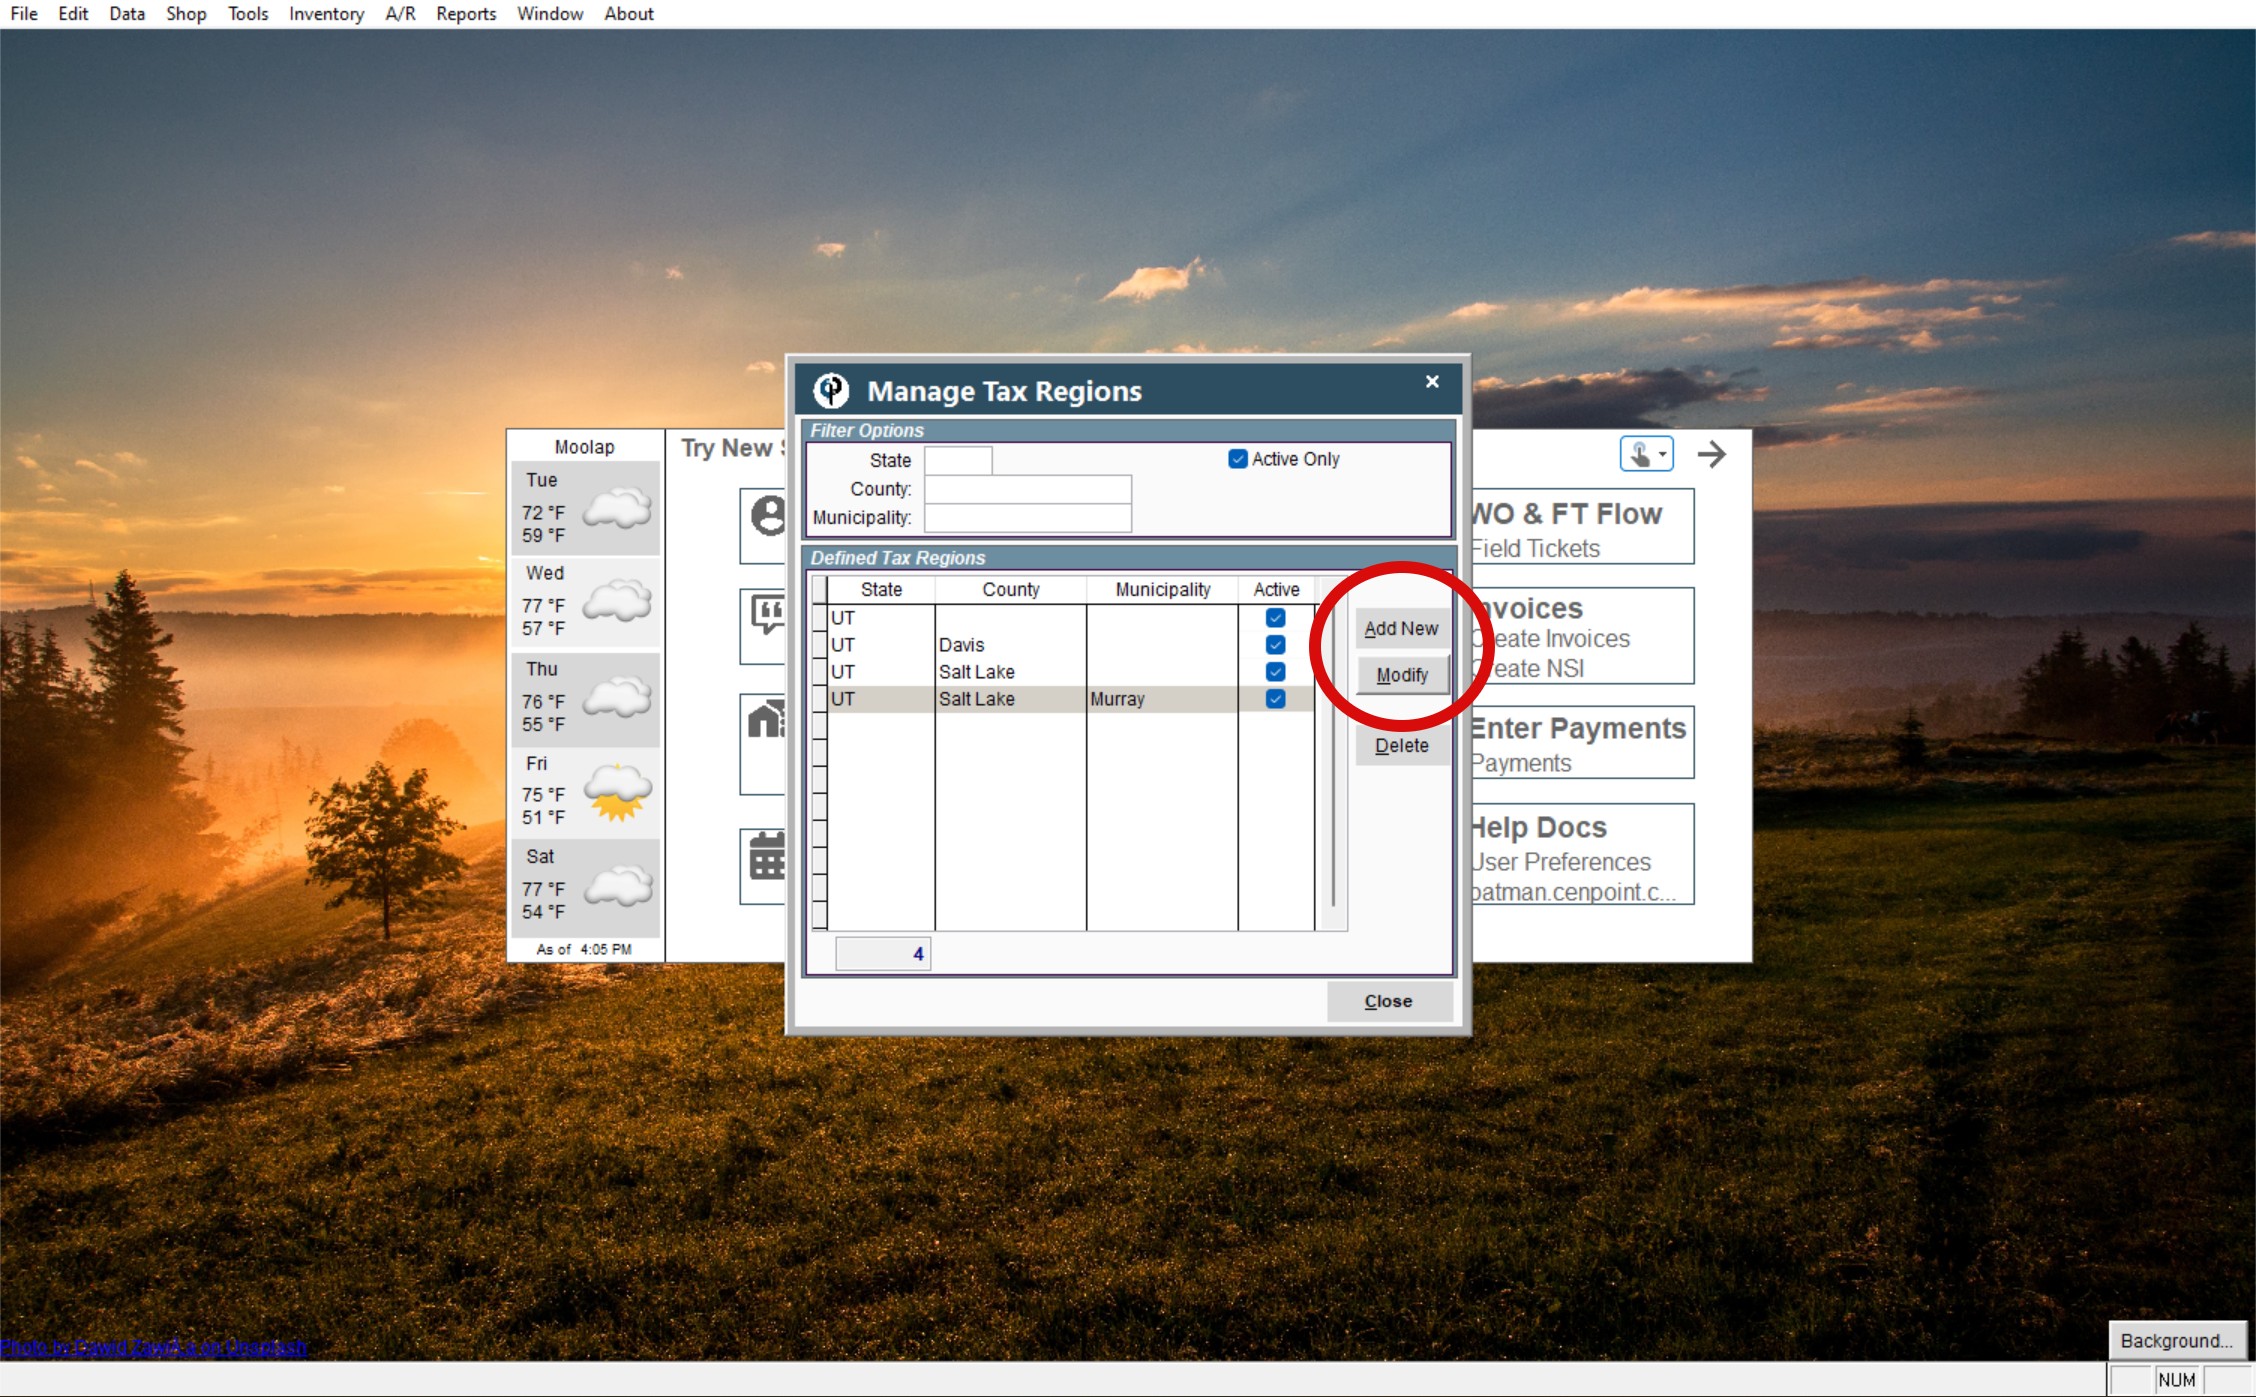
Go to File → List Management → Accounting → Tax Rates
You can set up taxes for your state, county, and city/town as is applicable to you.
First, fill in the correct information for State, County, and Municipality (as needed) and click Add.
Then, a tab will pop-up for you to fill out the information for the Effective start date and Tax rate. Then click OK.
You can add as many Counties and Municipalities as you need to account for all areas in which you will work.
If there is no Municipality, County, or State involved with the job then it will default to a non-taxable job.
To edit tax rates that you have already completed, hit Modify.
Step 2: Mark tasks as taxable
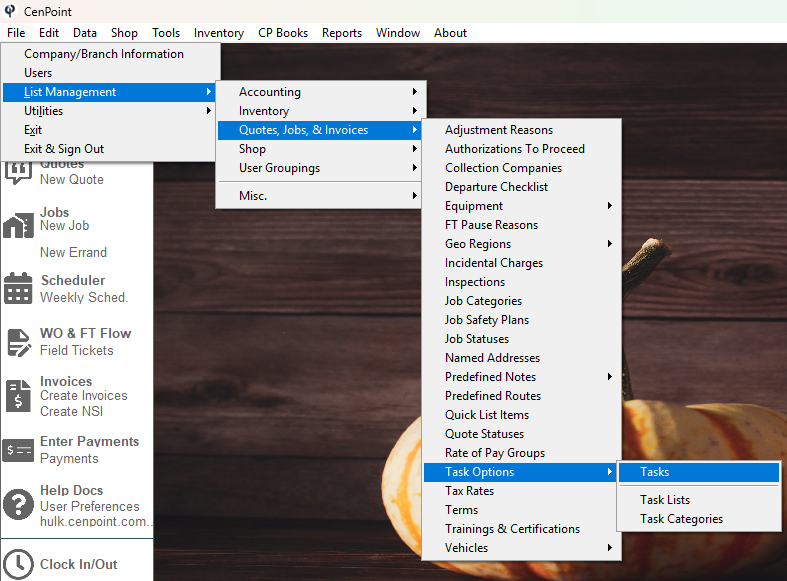
Go to the Manage tasks screen by going to File → List Management → Quotes, Jobs, & Invoices → Task Options → Tasks
Click the task that you want to mark as taxable → click Modify → then click the Taxable box in the upper right hand corner → click OK when finished.
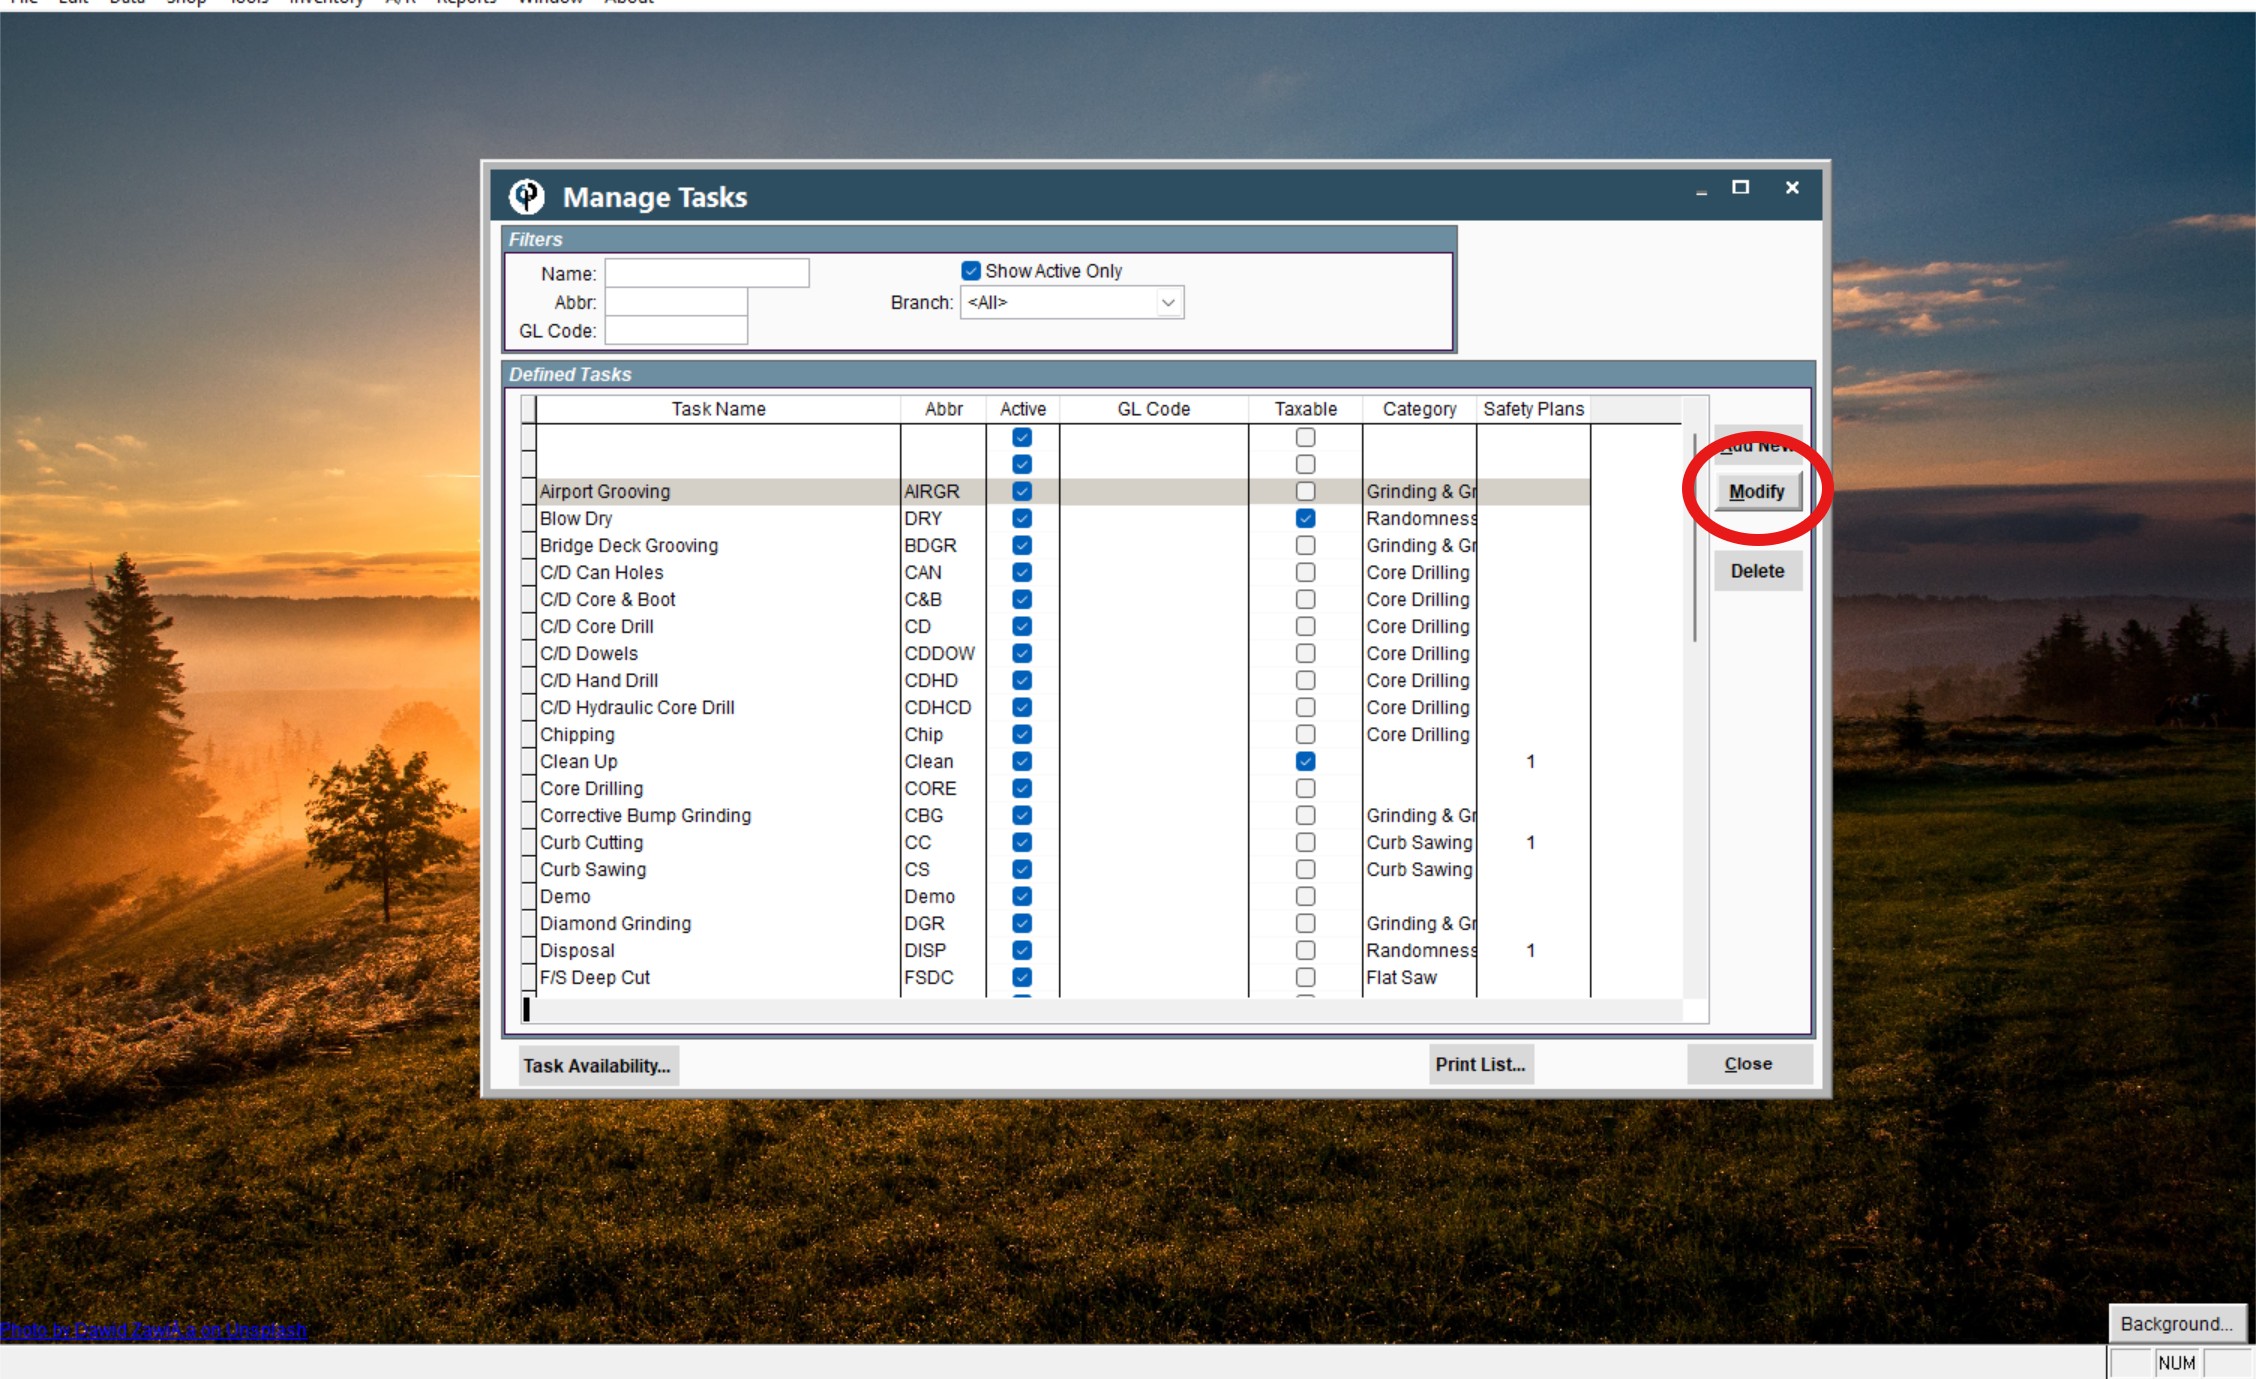
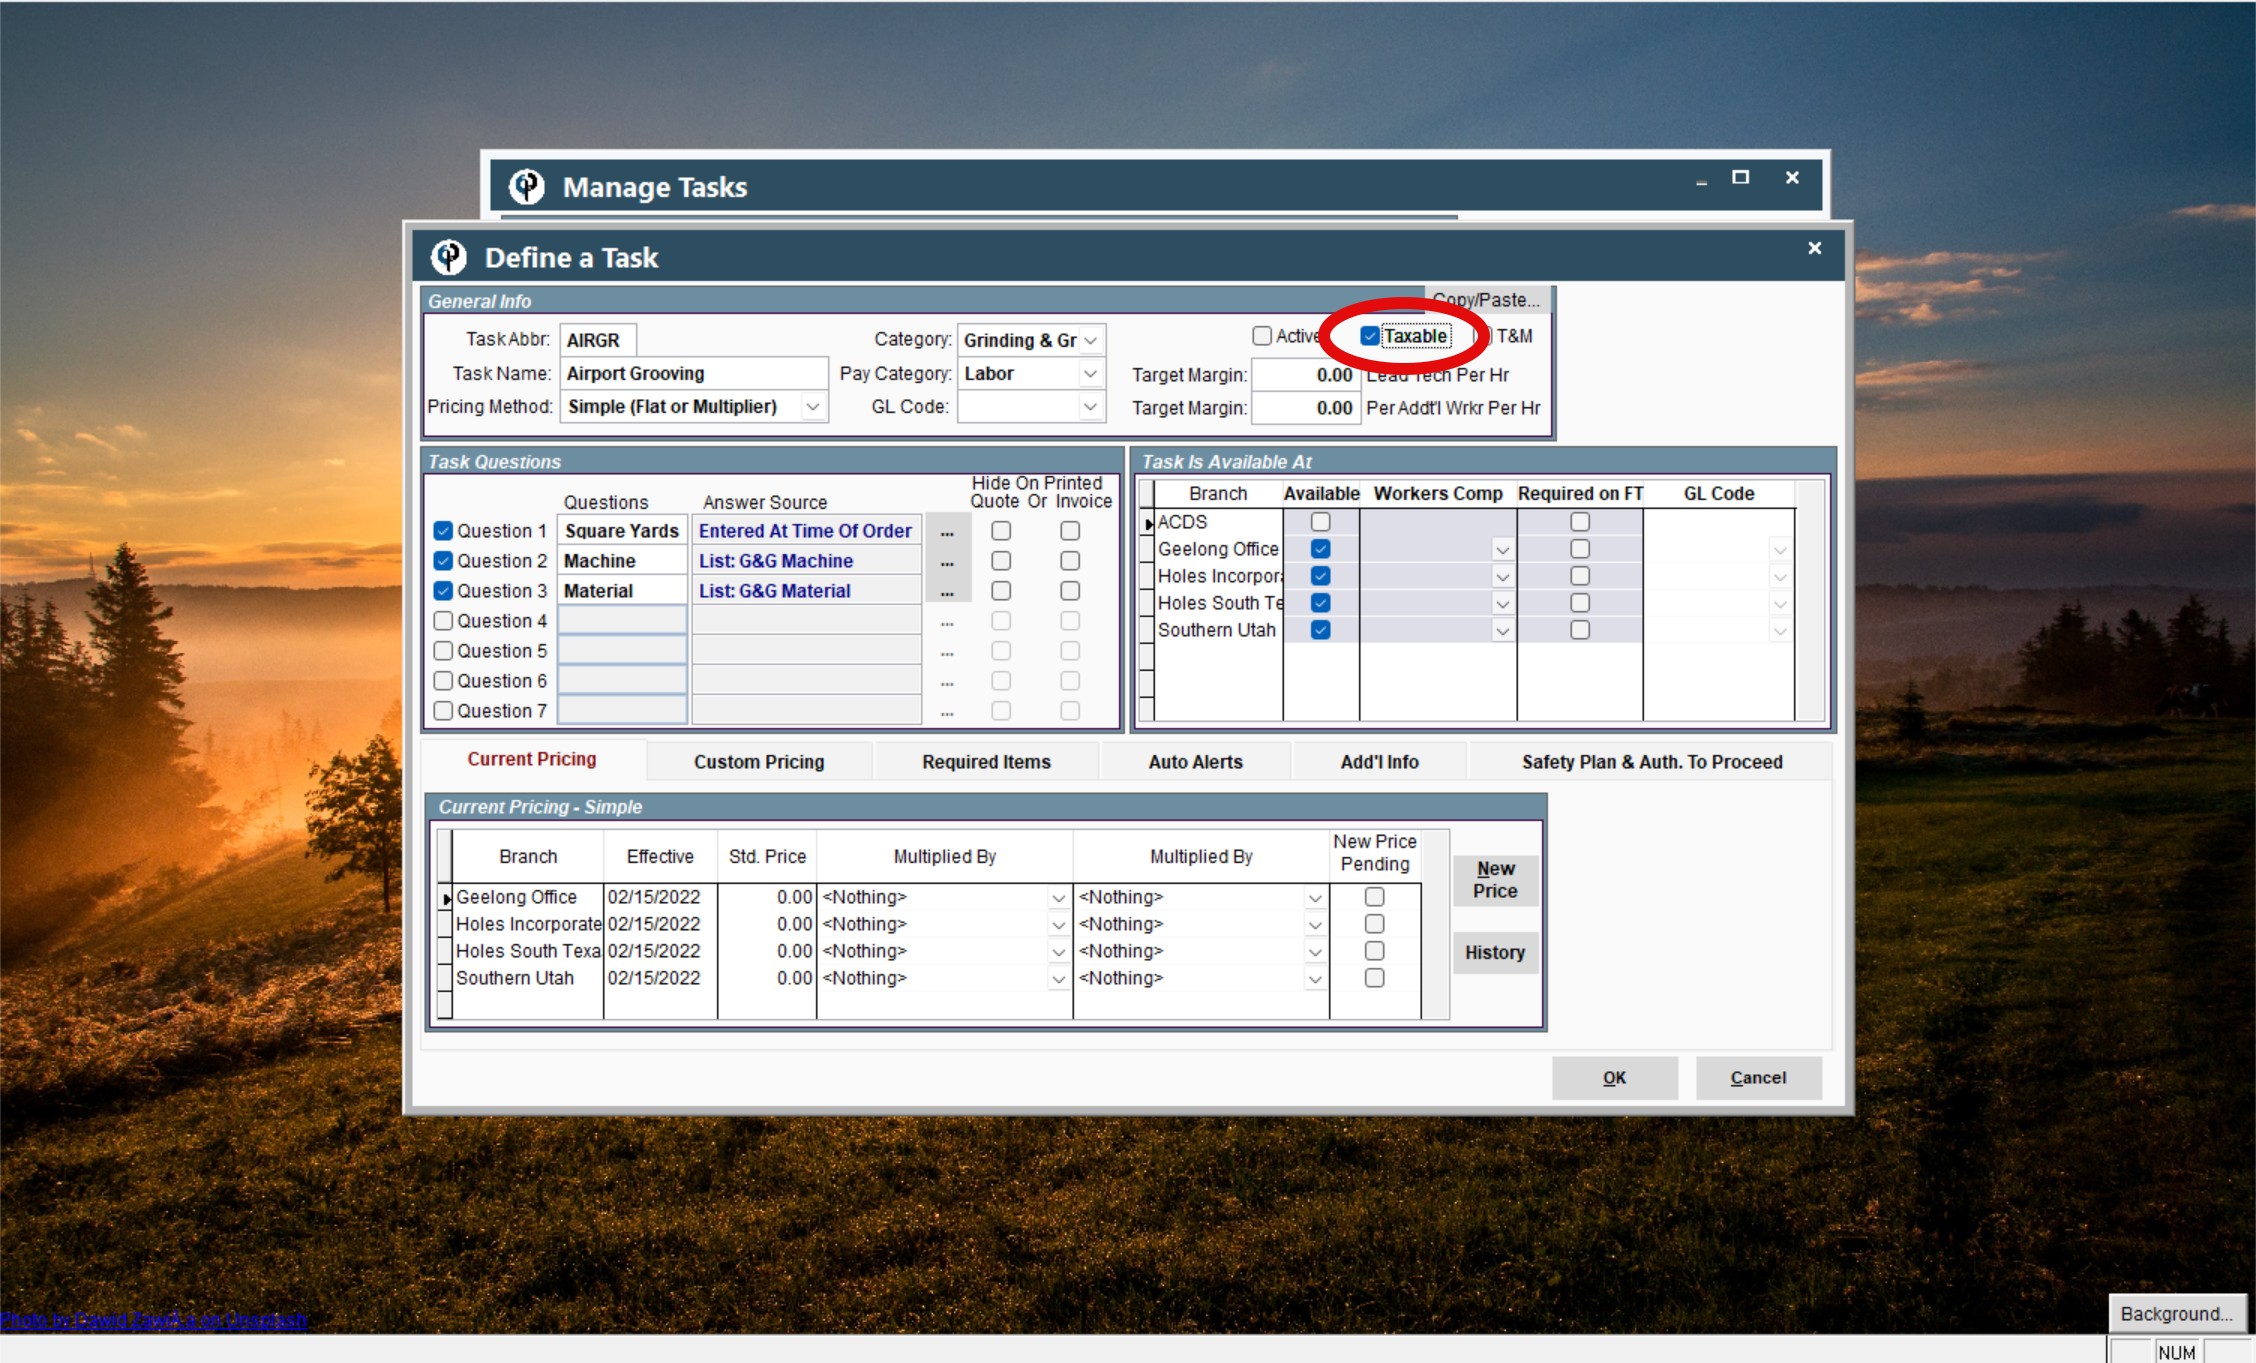
Now that task should show up on the Manage Tasks screen with a checked box under the Taxable column. You can see all taxable tasks within this column.
When the taxable tasks are selected for a job, the address will pull from that job and fill in with the appropriate tax rate for those tasks and/or services.
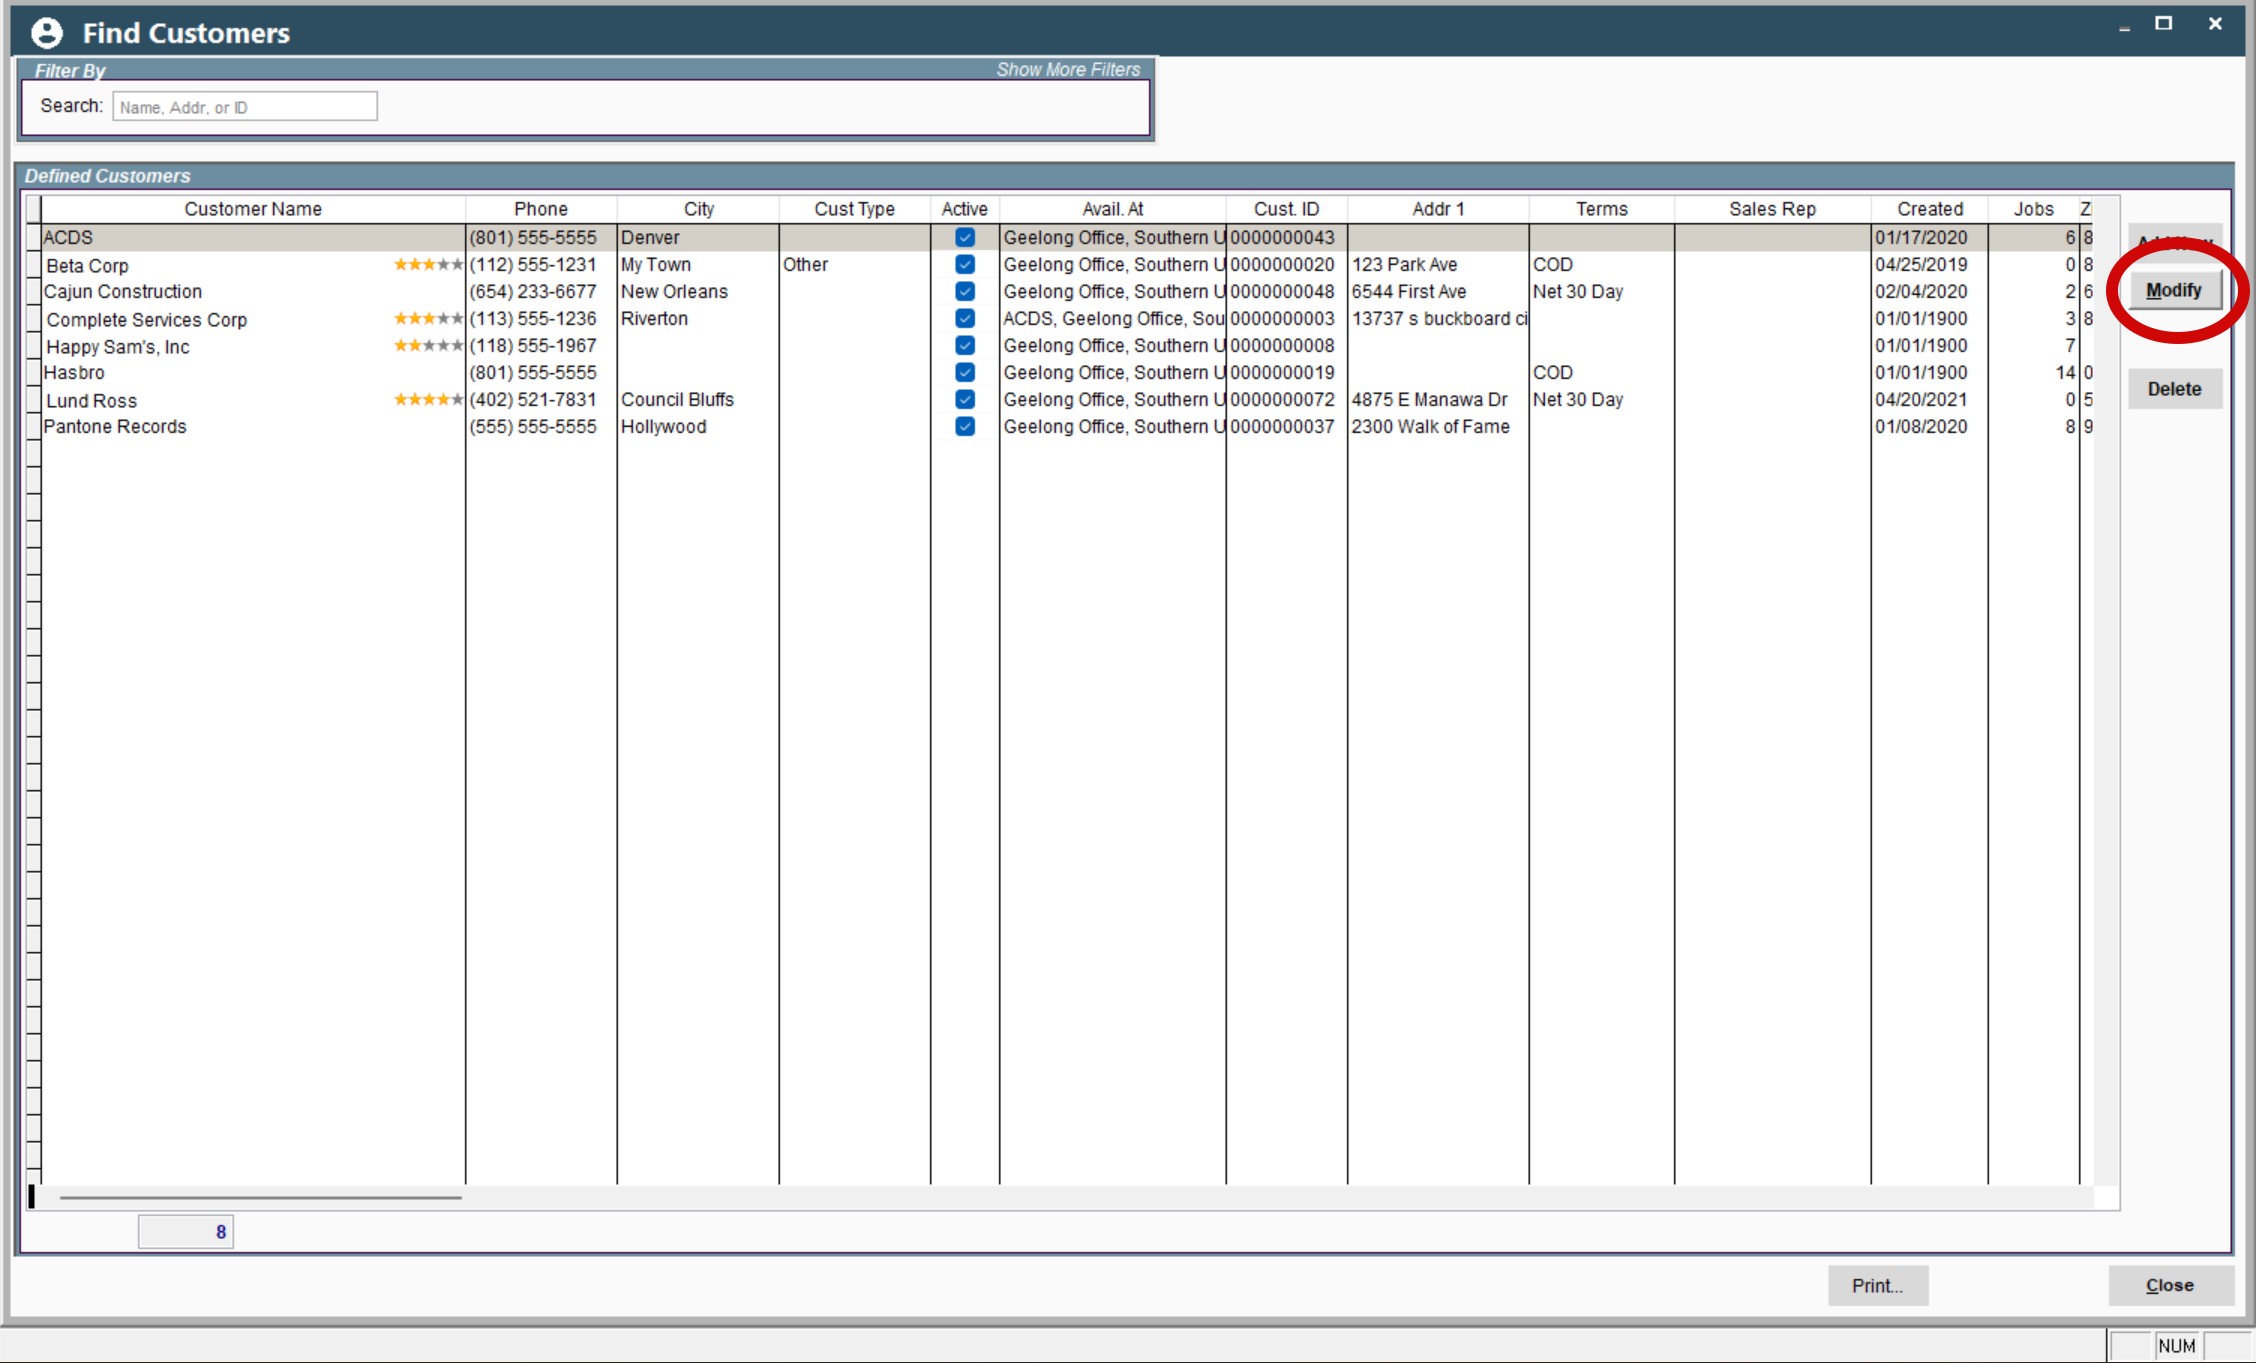
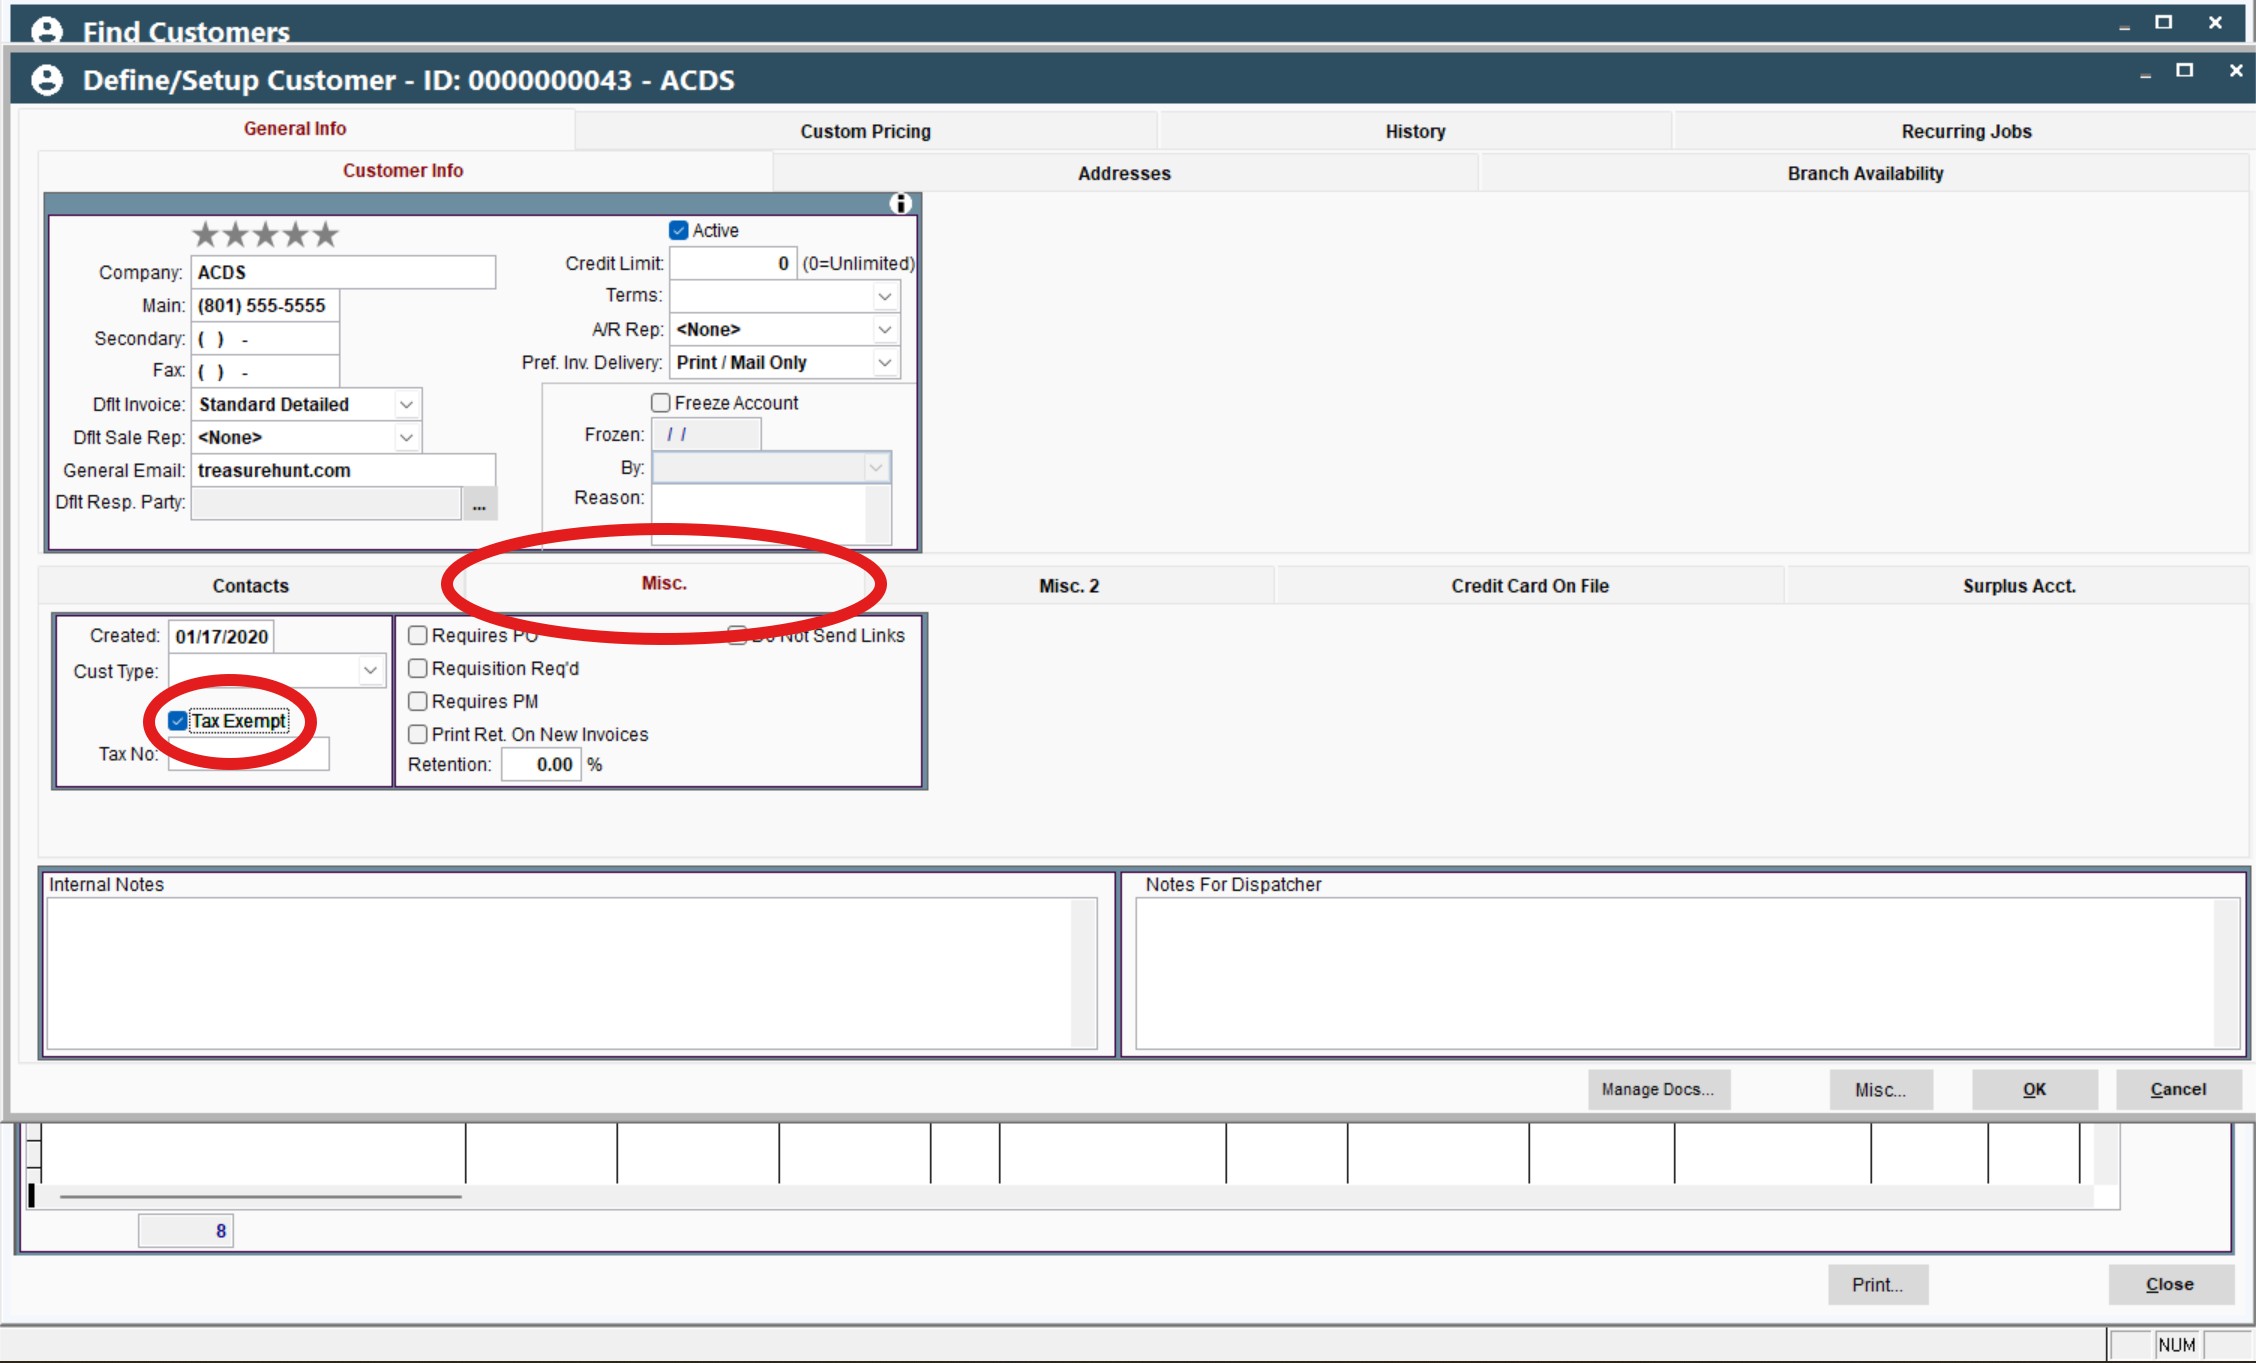
Step 3: If you have a tax-exempt customer
Click Customers from the main screen → Click on the tax-exempt customer → Click modify
On the Define/Setup Customer screen, click the Misc. Info tab in the center of the page → Click the “Tax Exempt” box in the middle column → Click OK when finished.
Step 4: Setup taxes for a Job
To setup taxes for a job from start-to-finish, begin by clicking on Jobs from the main page
Click Modify → Click the Add'l Info tab in the middle → click Rate to see all of the predefined options OR click the (...) button for more information on applying the correct tax rates.
If the job is tax-exempt, click the box in the same section that says This Job is Tax Exempt → select a Reason for the exemption if applicable to you.
.png)
.png)
Step 5: Field Ticket adjustments
On the "Define Job" screen, click the What and When tab → and in the bottom right side of the screen click View FT → click your desired task to make tax changes → click Modify
A screen that says Assign Task to a Field Ticket will pop up. In second box down on the left side there is a check-box that says Taxable. Click that box as needed and add in the appropriate percentage.
(***NOTE: The information on the Field Ticket is the FINAL SAY! Even if you put a different % rate or put the job as non-taxable on previous pages, whatever is documented within the Field Ticket will override everything else that is set up. This will also flow through on Invoicing, Reporting, etc.)
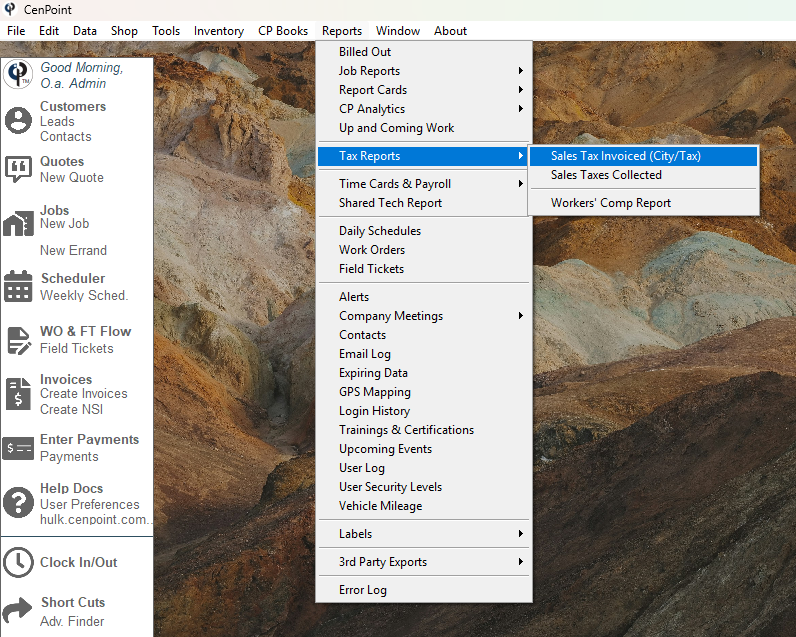
Step 6: Reporting
1. Sales Tax Invoiced (City/Tax) Reporting
On the tabs along the top of the CenPoint screen, click Reports → Tax reports → Sales Tax Invoiced (City/Tax)
Adjust the time within the Invoiced From boxes to see your desired tax reports within a certain time period.
Click your desired City Tax Report(s) > then click Print
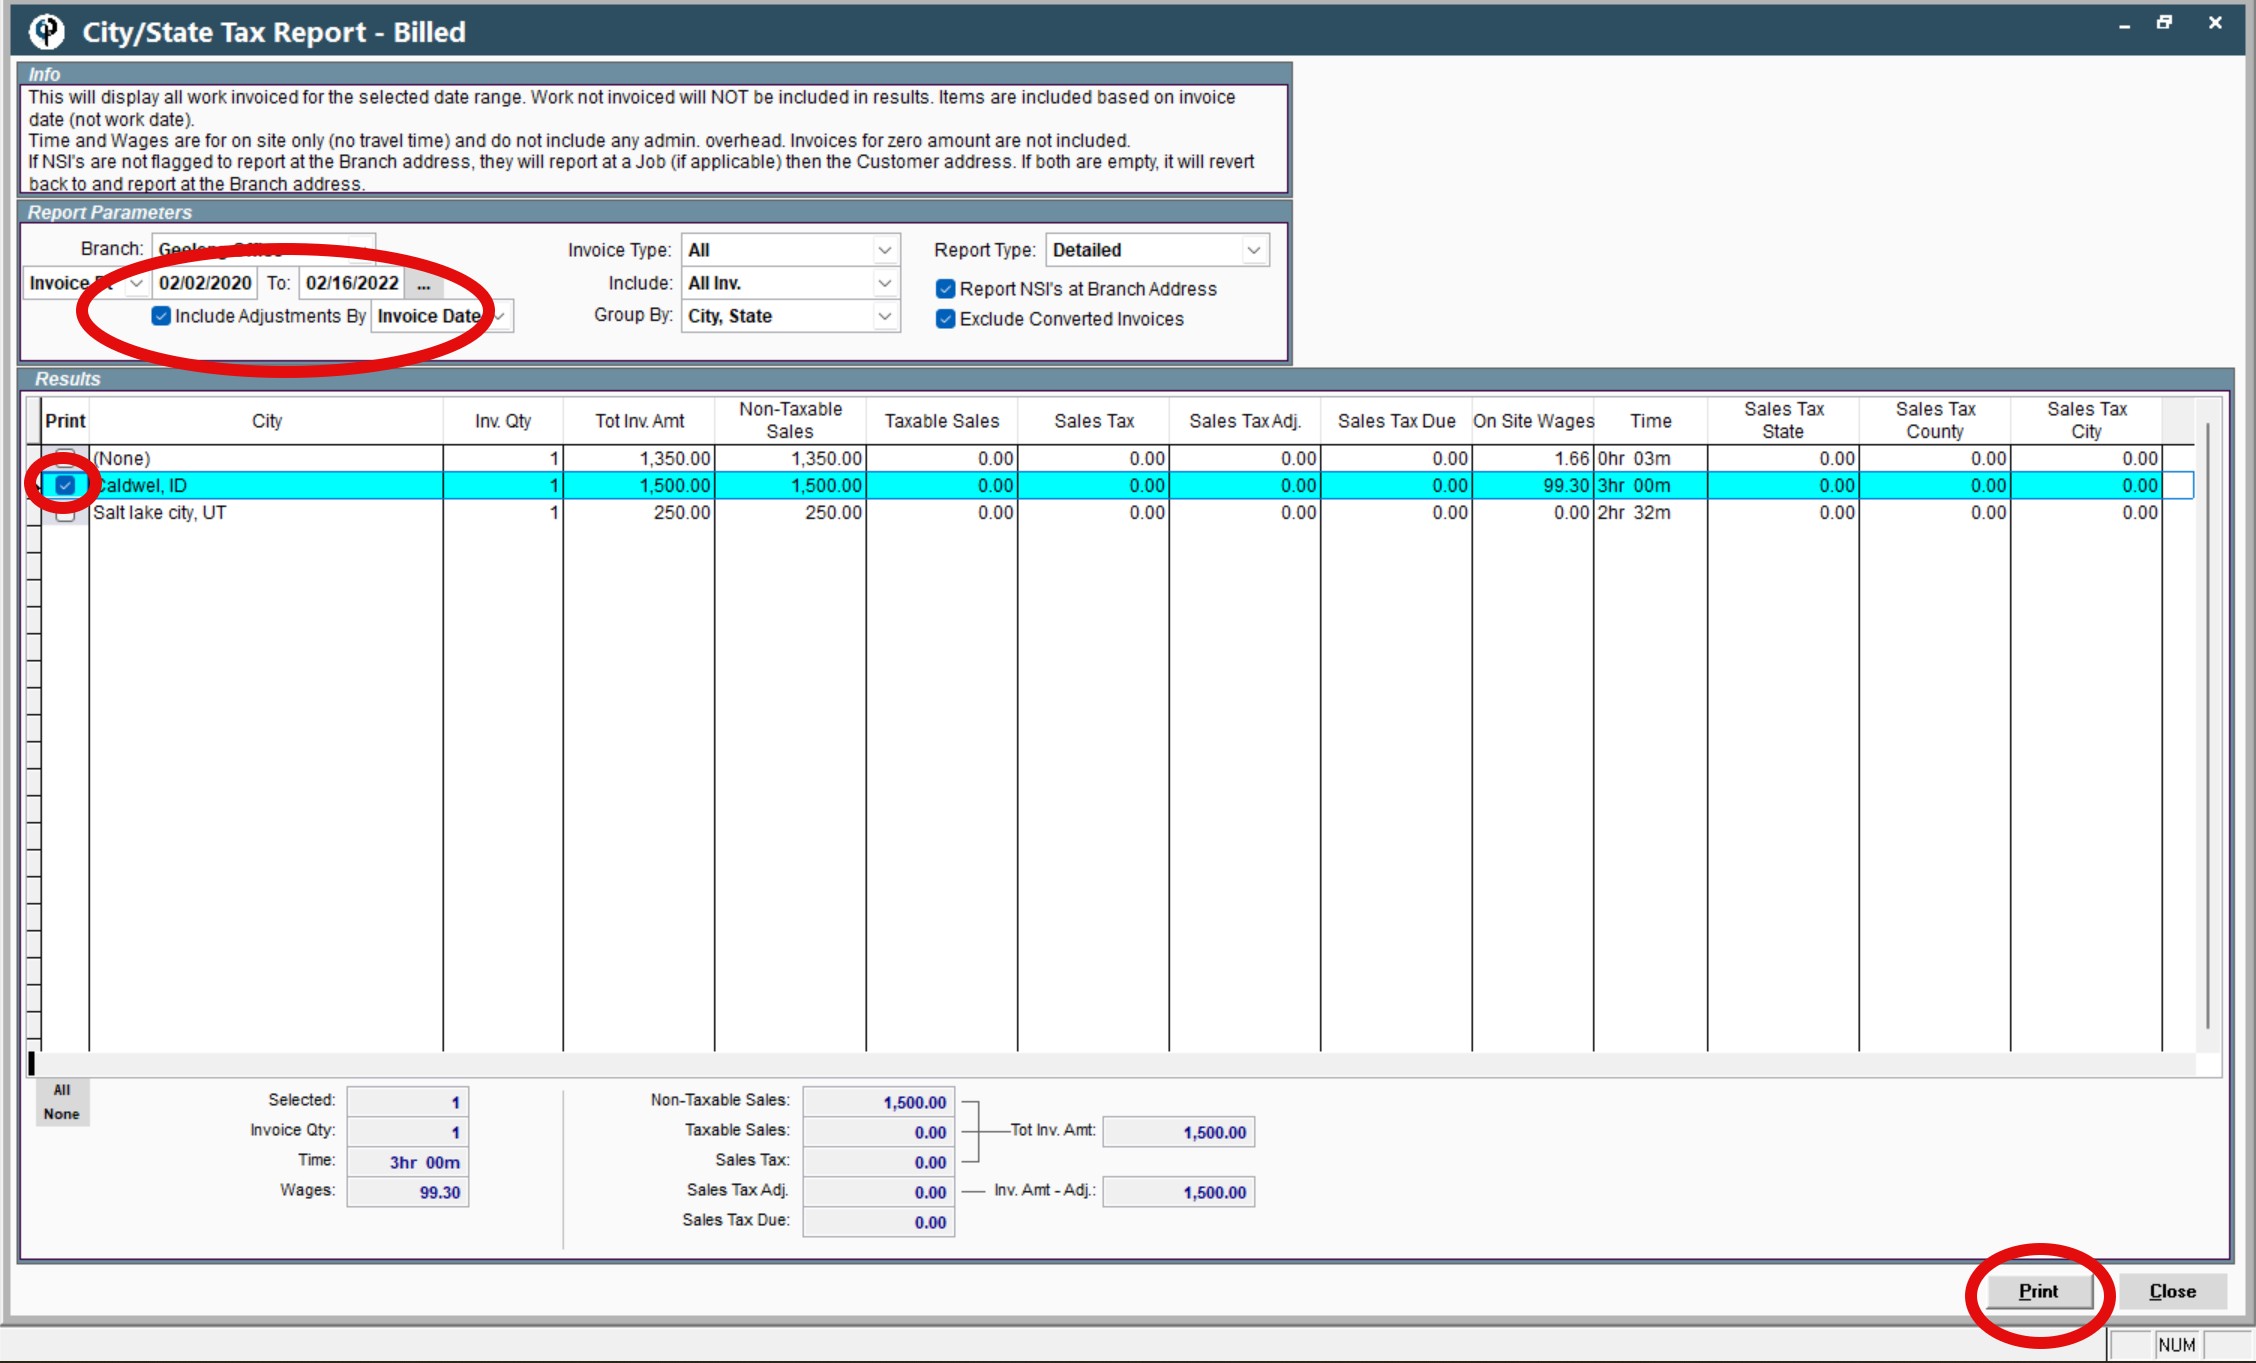
This sheet will show you how much work you have done in each city and where your taxes are coming from. In accounting terms this is called an Accrual.
.jpg)
2. Sales Tax Collected Reporting
On the CenPoint main screen, at the top of the page, Click Reports → Tax Reports → Sales Tax Collected
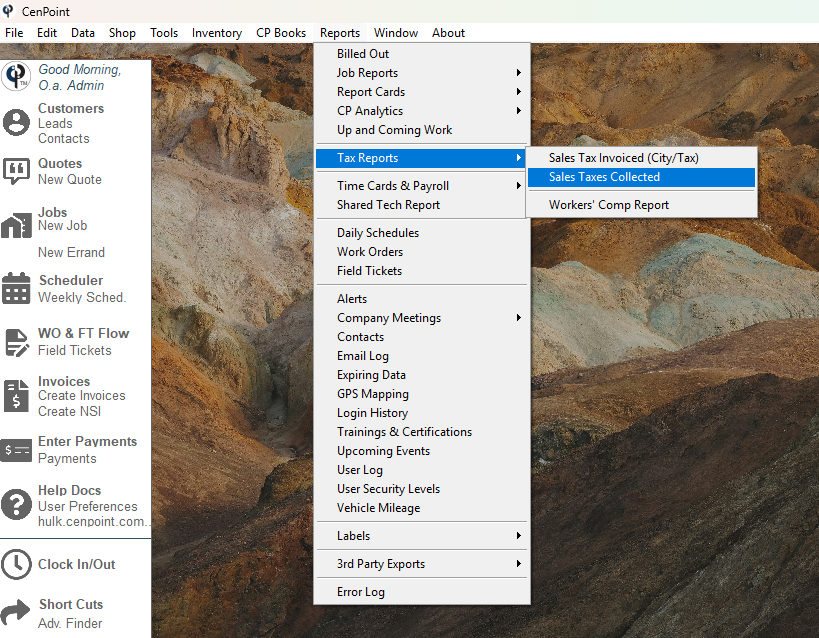
Select your desired report → click print
This sheet will show you the amount of tax that needs to be paid by the company. In accounting terms this is called Cash Basis.
Step 7: Review
You can now see the taxes show up on your invoices.
From the main screen, click Invoices → select your desired Invoice → select Print
.png)
You can see on this page that there is a tax column where you can see that fill in for certain services/tasks that are taxable.
Taxes on Portal
Step 1: Set up tax rate
Go to More → List Management → Accounting → Tax Rates
.png)
You can set up taxes for your state, county, and city/town as is applicable to you.
First, fill in the correct information for State, County, and Municipality (as needed) and click Add.
Then, a tab will pop-up for you to fill out the information for the Effective start date and Tax rate. Then click OK.
You can add as many Counties and Municipalities as you need to account for all areas in which you will work.
If there is no Municipality, County, or State involved with the job then it will default to a non-taxable job.
To edit tax rates that you have already completed, click on the ellipsis → Modify.
.png)
Step 2: Mark tasks as taxable
Go to the Manage tasks screen by going to More → List Management → Quotes, Jobs, & Invoices → Task Options → Tasks
.png)
Click the task that you want to mark as taxable → click Modify → then click the Taxable box in the upper right hand corner → click OK when finished.
.png)
.png)
Now that task should show up on the Manage Tasks screen with a checked box under the Taxable column. You can see all taxable tasks within this column.
When the taxable tasks are selected for a job, the address will pull from that job and fill in with the appropriate tax rate for those tasks and/or services.
Step 3: If you have a tax-exempt customer
Click Customers from the main screen → Click on the tax-exempt customer → Click on the Ellipsis → Modify
.png)
On the Define/Setup Customer screen, click the Misc. Info tab in the center of the page → Click the “Tax Exempt” box in the middle column → Click Close when finished.
.png)
Step 4: Setup taxes for a Job
To setup taxes for a job from start-to-finish, begin by clicking on Jobs from the main page
Click Modify → Click the Add'l Info tab in the middle → click Rate to see all of the predefined options OR click the (...) button for more information on applying the correct tax rates.
If the job is tax-exempt, click the box in the same section that says This Job is Tax Exempt → select a Reason for the exemption if applicable to you.
.png)
.png)
Step 5: Field Ticket adjustments
On the "Define Job" screen, click the What and When tab → and in the bottom right side of the screen click View FT → click your desired task to make tax changes → click Modify
A screen that says Assign Task to a Field Ticket will pop up. In second box down on the left side there is a check-box that says Taxable. Click that box as needed and add in the appropriate percentage.
(***NOTE: The information on the Field Ticket is the FINAL SAY! Even if you put a different % rate or put the job as non-taxable on previous pages, whatever is documented within the Field Ticket will override everything else that is set up. This will also flow through on Invoicing, Reporting, etc.)
Step 6: Reporting
This report is coming soon to Portal, thank you for your patience!
Step 7: Review
You can now see the taxes show up on your invoices.
From the main screen, click Invoices → click the ellipsis next to your desired invoice → View → select “Invoice Only” or “Invoice & FTs”
.png)
You can see on this page that there is a tax column where you can see that fill in for certain services/tasks that are taxable.