
User Pay Overview:
There are 3 places to remember when defining User Pay:
Pay Rate labels in Branch Settings
This is where you can name your different rates of pay that your company uses like Standard, Hazard, Union Rate 1, Union Rate 2, ect…
Individual User Rate of Pay
This is where you can assign a wage specific to that user for each of your different labels for rates of pay defined in your Branch Settings (See no. 1 above)
Rate of Pay Groups
Assigning several different rates of pay to each user can get pretty tedious. Rate of Pay groups were created so you can assign a rate of pay to multiple users at once.
Rate of Pay Groups can be really useful for Union rates of pay or Apprentice/Intern rates of pay where you have a group of people that are all being paid the same amount.
Be aware that when creating this Rate of Pay group that it will still apply to only one of the Pay Rate labels you will find in Branch settings. This means that a single user can belong to many different Rate of Pay groups.
User Pay
User Pay Branch Settings
Go to More → Company/Branch Info
.png)
Then double click on your branch or select the Ellipsis→ Modify
.png)
Go to the User Pay tab
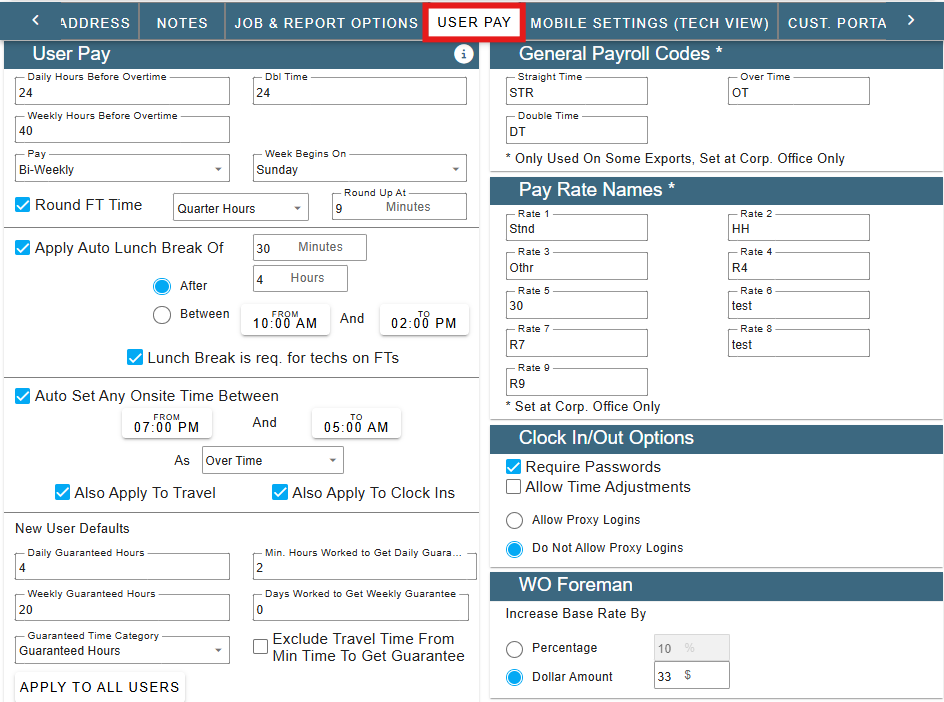
User Pay Rules
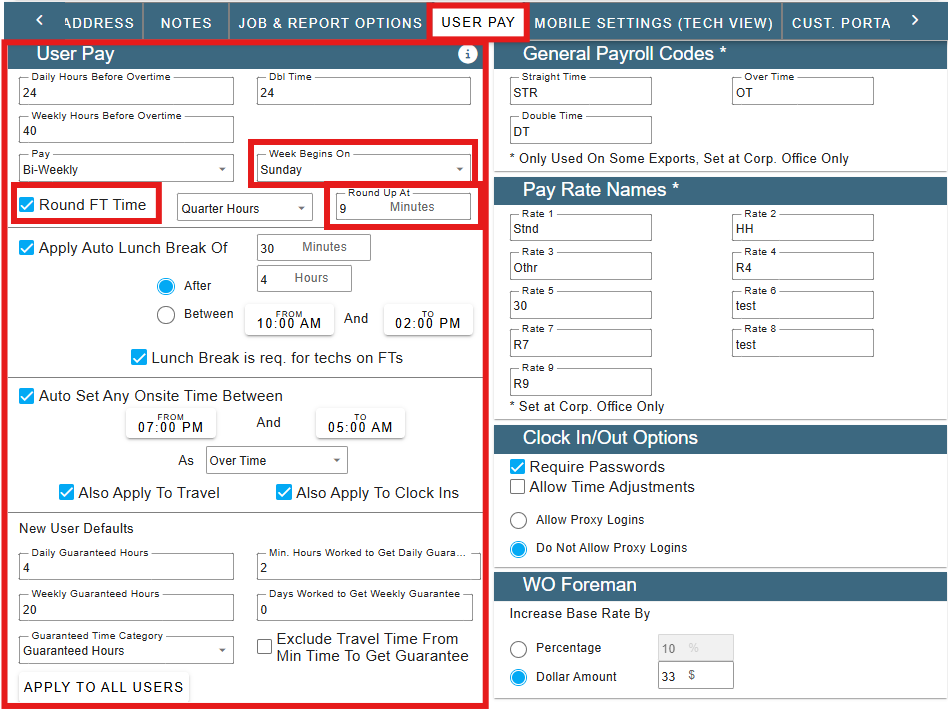
Set all your user pay amounts and the day the week begins,
Choose if you want to round Field Ticket time by the quarter hour and rounding after so many minutes.
Round Field Ticket Time
Round Field ticket time by going into the Field Ticket, click Round, then Round.
This will use the rules from User Pay setting.
.png)
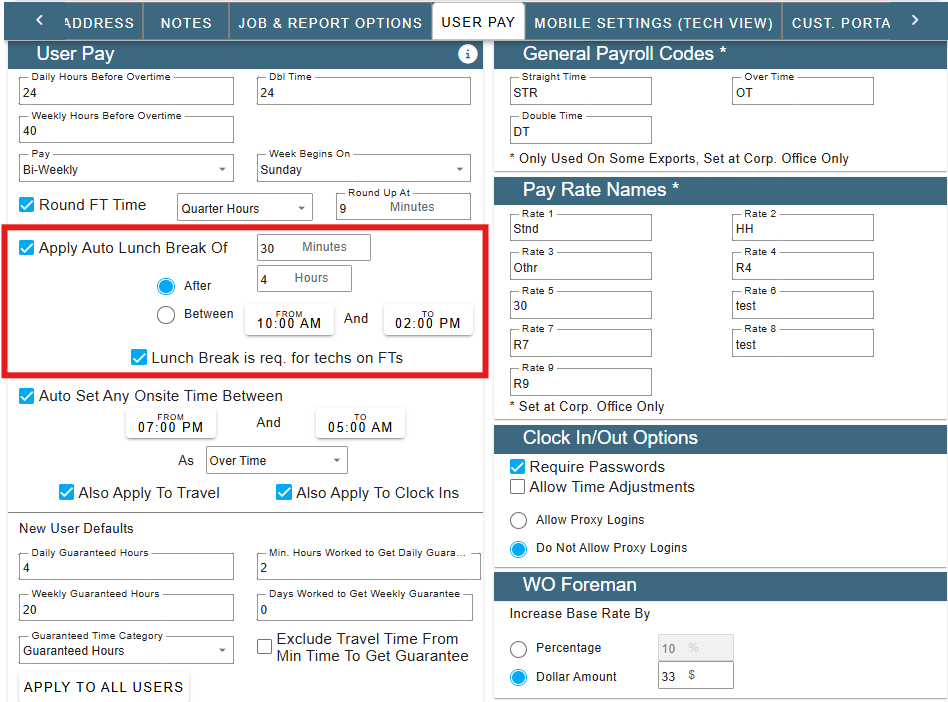
Lunch Break on Portal
Lunch break can either be after working so many hours or between specific hours.
Breaks are deducted from ‘Onsite’ time. If you were to have a day of ‘Travel’ time an unpaid break would have to be manually entered.
You may also select ‘Lunch Break is req. (required) for techs on FT’s. This is helpful when you state law requires a lunch break.
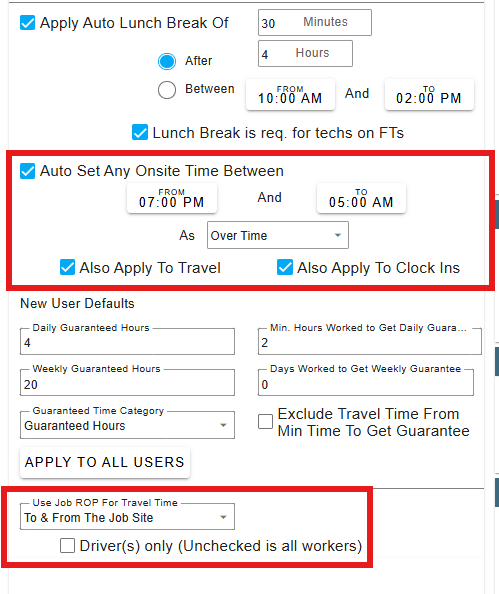
Set any onsite time like night work for a different rate of pay.
Easily set Night Work to Over Time/Double Time by checking 'Auto Set any onsite time between' and adding your night work hours.
Check the boxes Apply to travel, and or apply to clock-ins if applicable.
‘Use Job Rate of Pay for Travel Time’ has a dropdown with multiple options as well as choosing only drivers by checking the box.
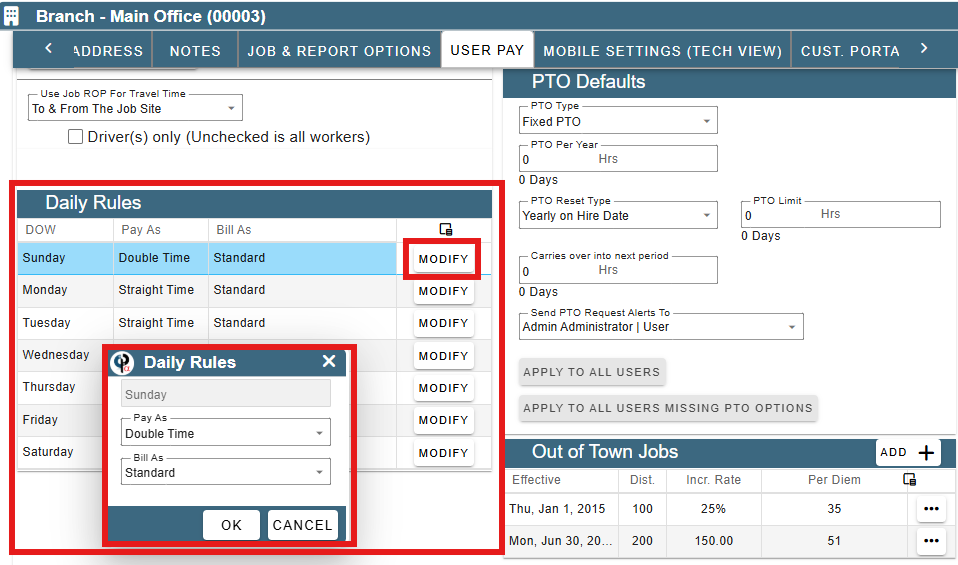
Daily Rules
Select the day of the week and the pay rate, also bill as rate.
Bill as rate is defined on the task by using the Pricing Matrix
Pay Rate Names (Labels) in Branch Settings
Pay Rate Names will be used when defining pay for a specific user or on a job.
The Pay Rate names are just a convenient label to differentiate why someone has different rates of pay and the User’s pay will be defined under their specific settings. See this link for more information: User’s Rate of Pay Groups
Inside each Job you will select which rate of pay should apply based on that job’s unique circumstances. See this link for more information: Job Rate of Pay
Multiple rates of pay allow you to differentiate pay based on things like working conditions. This way you can pay a user different rates like hazard pay for dangerous work, different pay based on distance from the office, pay as an Apprentice, etc…
.png)
Clock In/Out Options
There are some customizable options for setting clocking records like being able to require a password when clocking in and out or allowing the users to be able to adjust their own time.

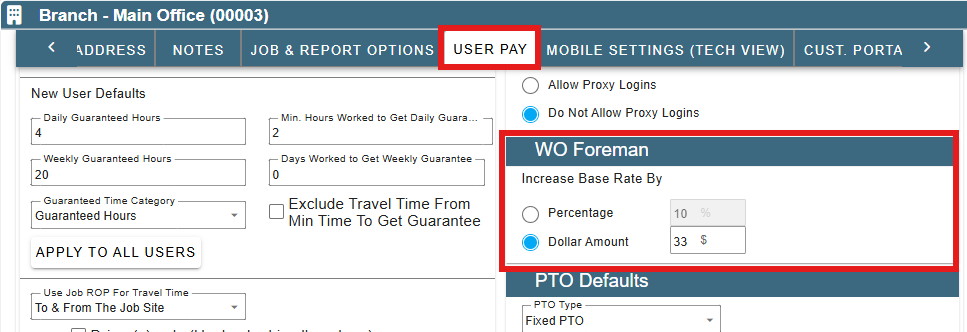
Forman's Pay on Portal
Pay a Forman a percentage or dollar amount more when marked as a foreman on the job.
Coming Soon:
Inside the Work Order click on the ellipsis to assign the Lead Tech the role (and associated pay benefits) of Foreman.

Out of Town Jobs
Easily add costs for jobs marked out of town, by defining the miles,
increased percentage, or the dollar amount and per diem for your technicians.
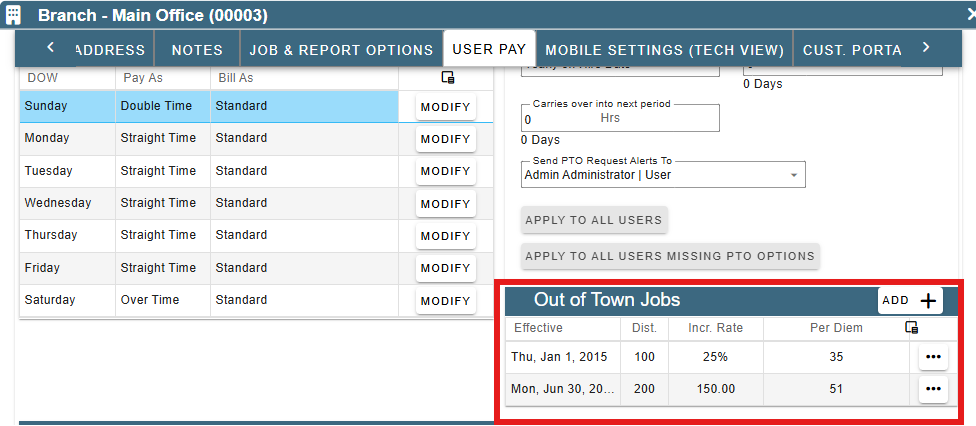
Inside the Job itself under the Add’l Info tab check the “Out of Town Job” to to apply this setting for that job

Individual User Settings
Individual User Rate of Pay
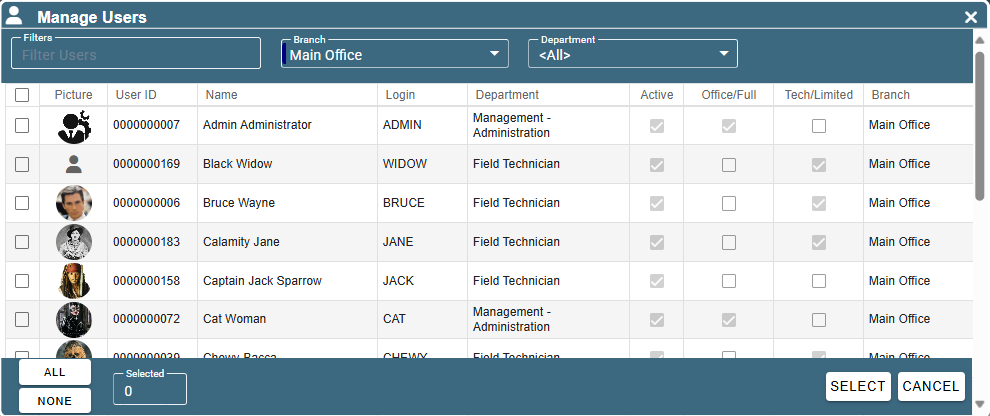
To access a user to define their individual rate of pay go to More → Users
.png)
Find your user and then double click on them or click the Ellipsis → Modify
.png)
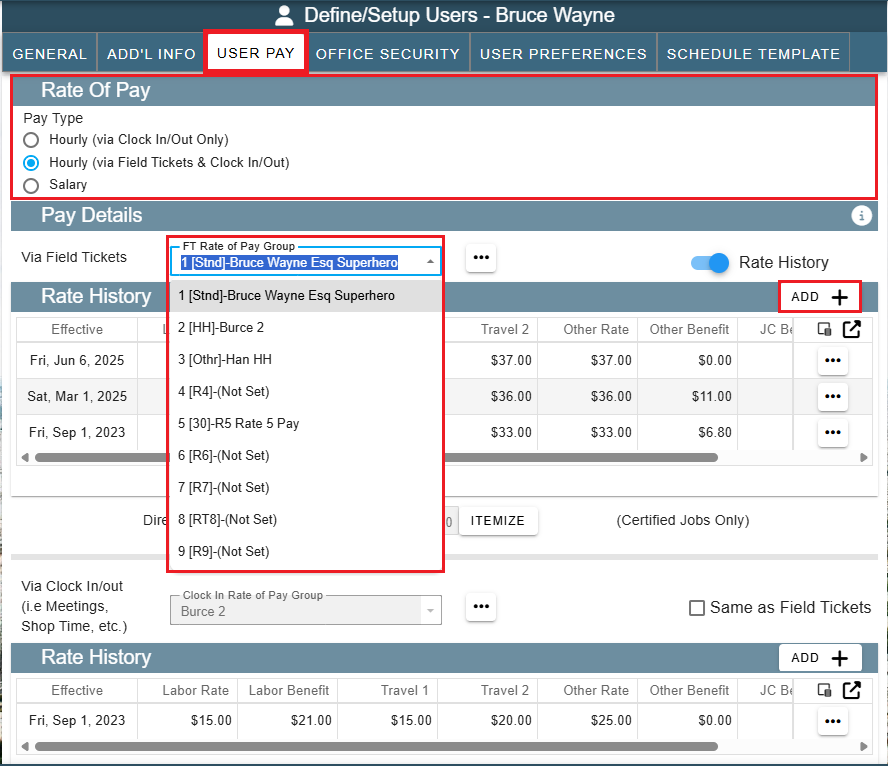
Go to the User Pay tab, find the Rate of Pay table, and select the Pay Type of that user.
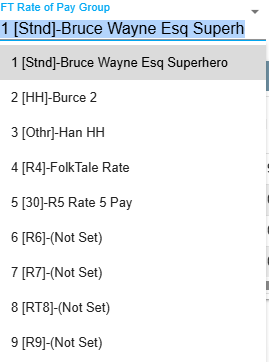
In the Pay Details table you can specify that user’s pay rate for each Field Ticket Rate of Pay Group.
Please note that each ‘FT Rate of Pay Group’ option in the dropdown you see correlates with the “Pay Rate Names” you saw mentioned in the Branch Settings earlier in this article.
Simply select one of the FT Rate of Pay Group options from the dropdown and click the ‘Add’ button on the right-hand side of the screen.
See the Manage Rate of Pay Groups section for more details on how to do this for multiple users at once.
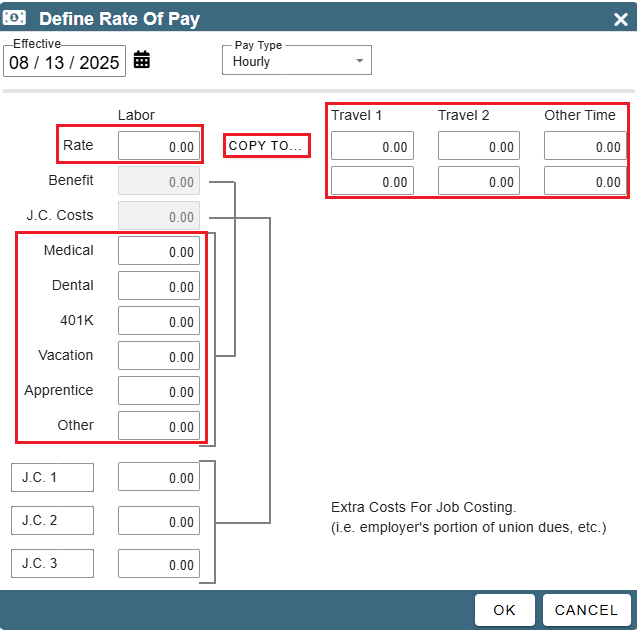
Upon clicking ‘Add’ a window like this will appear.
Input the different travel rates, the Labor Rate, and the various benefits (if applicable) associated with this new rate of pay.
The date in the upper left corner is when this rate of pay will become active.
The ‘Copy To’ button allows you to paste the Labor Rate into the Travel times and Other Time.
When you are finished, click ‘OK’ to save your changes and close the window.
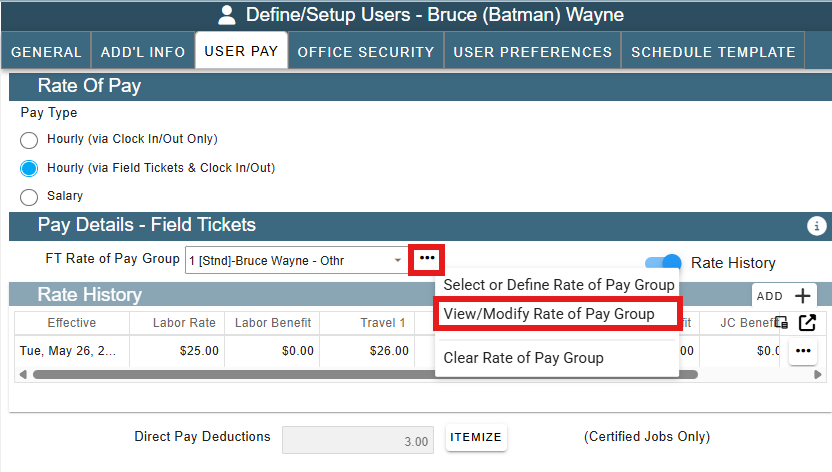
Manage Rate of Pay Groups from A User’s ‘User Pay’ Tab
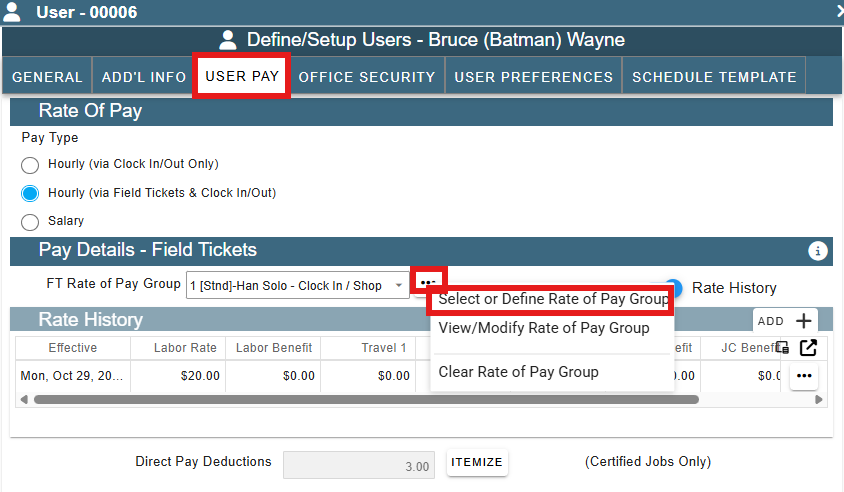
From the User Pay tab inside the Define/Setup Users window click the ellipsis and you can create or modify a Rate of Pay Group.
You can assign a user to an existing group or create a new group and assign one or more users to it.
Simply click on the ellipsis by the ‘FT Rate of Pay Group’ and select one of the options. Each of the options is explained below.
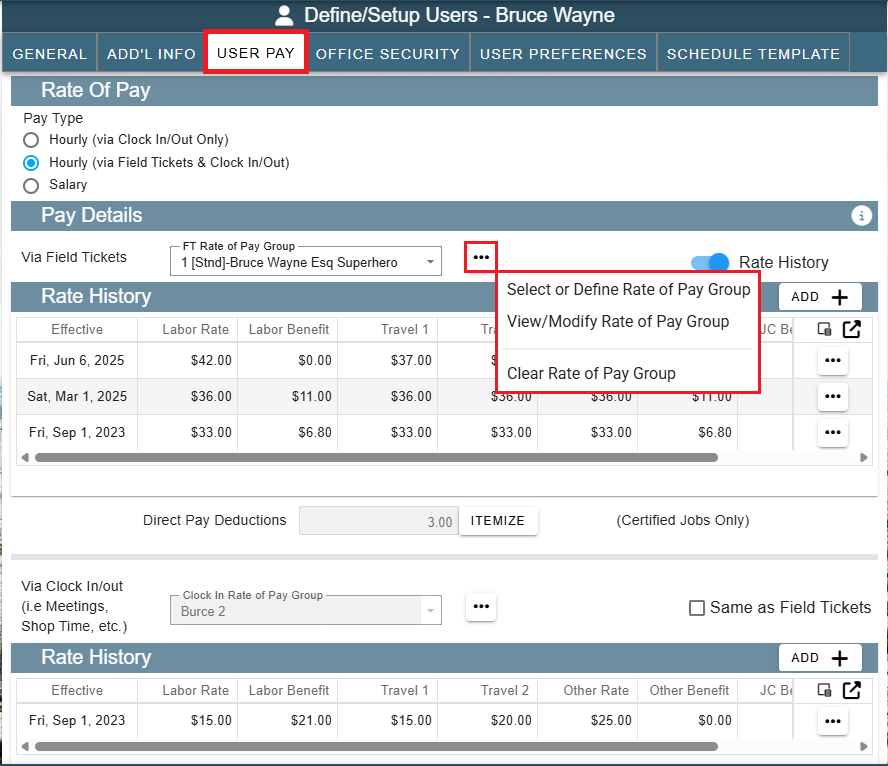
Clear Rate of Pay Group:
This option removes the user from that Rate of Pay group. The user’s ROP group in question is now blank and ready to be assigned a new ROP.
Select or Define Rate of Pay Group:
Clicking “Select or Define Rate of Pay Group” will open will open the ‘Manage Rate of Pay Groups’ window.
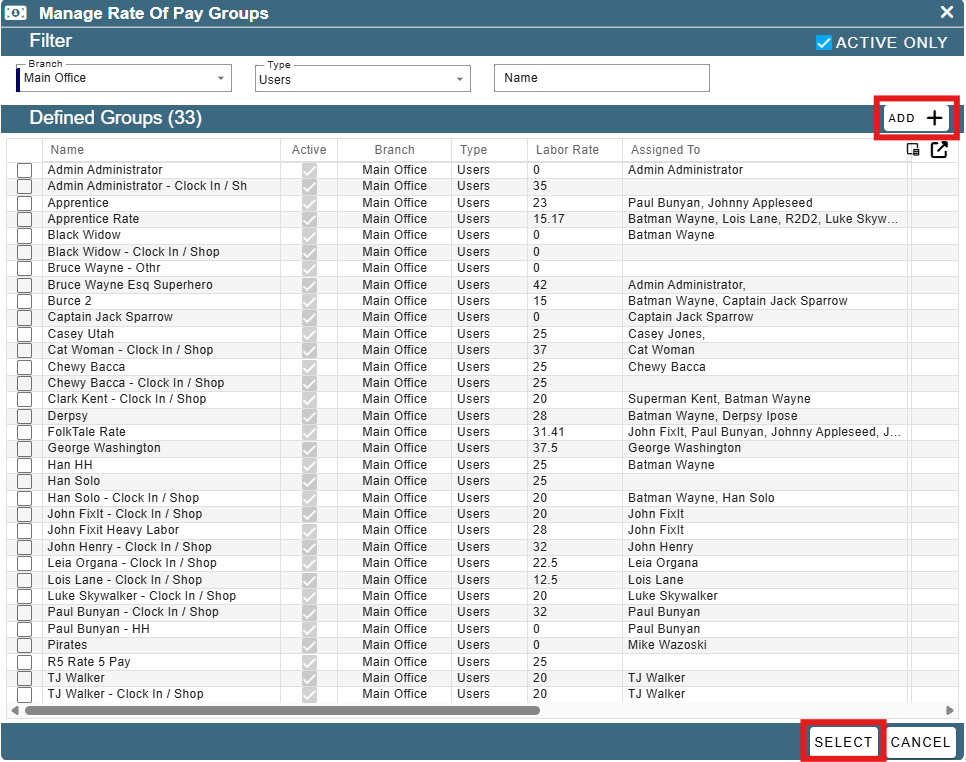
Click ‘Select’ to assign your user to that Rate of Pay Group. The window will close and take you back to the Users Define/Setup page you were on a moment ago. The Rate History and Pay Details tables will update with the information found inside your selected Rate of Pay Group.
Add a new Rate of Pay Group
Click ‘Add’ to create a new Rate of Pay Group.
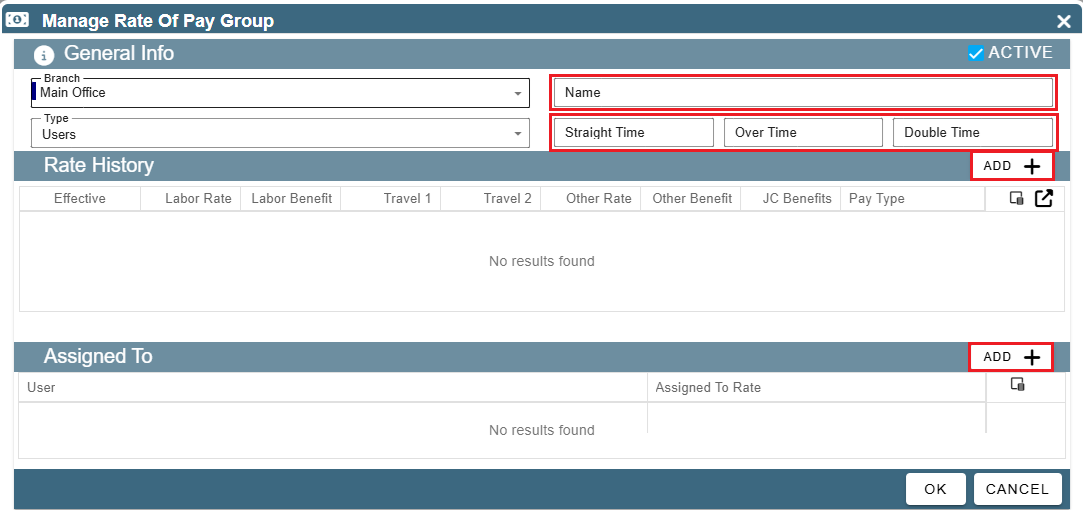
Name your Rate of Pay Group.
Straight Time, Over Time, and Double Time: These are the LABELS for your different rates of pay in this group. If I wrote up there the words “Normal Pay” in the Straight Time segment the rate of pay would show elsewhere in CenPoint the phrase “Normal Pay” when referring to the pay rate of people in this group. Please remember that actual salary numbers do not go in the top highlighted box but instead get entered in the Rate History table.
Click ‘Add’ to the right of the Rate History table to define a pay rate. It will open a window like this:

Input the different travel rates, the Labor Rate, and the various benefits (if applicable) associated with this new rate of pay.
The date in the upper left corner is when this rate of pay will become active.
The ‘Copy To’ button allows you to paste the Labor Rate into the Travel times and Other Time.
When you are finished, click ‘OK’ to save your changes and close the window.
Click the ‘Add’ next to the Assigned To table to assign people to this ROP group.
Please note that after selecting a user in order to assign them to this ROP group this window will appear:

This allows you to select which Rate of Pay label (see Branch Settings) this ROP group should be applied to in the User’s ROP options.
View/Modify Rate of Pay Group:
Clicking “View/Modify Rate of Pay Group” will modify the selected Rate of Pay Group for that user.
This will open the “Manage Rate of Pay Group” window.
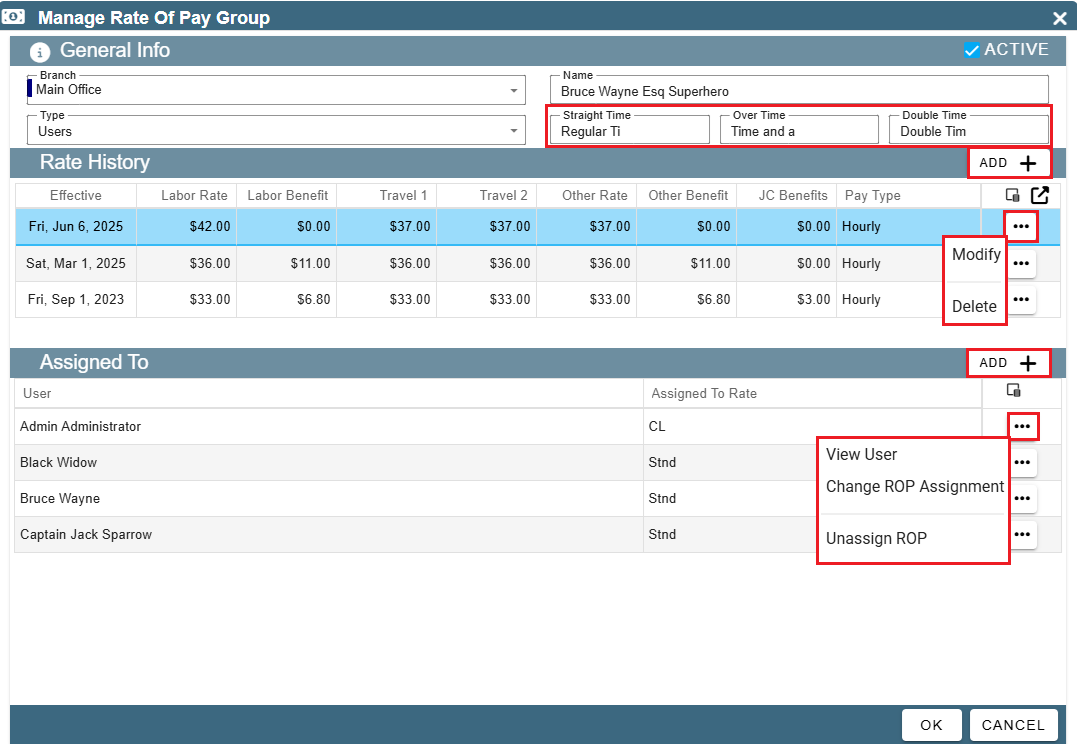
Breakdown of this window from Top to Bottom:
Straight Time, Over Time, and Double Time: These are the LABELS for your different rates of pay in this group. If I wrote up there the words “Normal Pay” in the Straight Time segment the rate of pay would show elsewhere in CenPoint the phrase “Normal Pay” when referring to the pay rate of people in this group. Please remember that actual salary numbers do not go in the top highlighted box.
Add Rate History: To add a new Pay rate for this Rate of Pay Group, click the ‘Add’ next to the Rate History table
Assigned To: To assign this rate of pay to multiple people, click the Add next to the Assigned To table.
Alter Assigned To: To alter who this ROP is assigned to, click the ellipsis next to the user’s name in the Assigned To table.
Change ROP Assignment: moves the user to another ROP group
Unassign ROP: removes that user from this ROP group.
View User: Let’s you view this user’s settings and information. This is useful to determine which ROP Groups this user is already a part of.
IMPORTANT NOTE:
When adding a user to the ROP Group, this window will appear:

This allows you to select which Rate of Pay label (see Branch Settings) this ROP group should be applied to.
In the screenshot above, Pay rate number 3 is selected. That means that in the screenshot below the user’s pay rate number 3 (From the ‘User Rate of Pay’ Tab) would get replaced by the new ROP group.
Manage Rate of Pay on Portal
You can go to More → List Management → User Groupings → Rate Of Pay Groups
.png)
The ‘Manage Rate of Pay Groups’ window will appear.
.png)
Click ‘Delete’ to remove the Rate of Pay Group.
Click ‘Modify’ to edit the Rate of Pay Group.
Click ‘Add’ to create a new Rate of Pay Group.
Upon clicking Add or Modify, the ‘Manage Rate of Pay Group’ window will appear:
.png)
Name your Rate of Pay Group.
Straight Time, Over Time, and Double Time: These are the LABELS for your different rates of pay in this group. If I wrote up there the words “Normal Pay” in the Straight Time segment the rate of pay would show elsewhere in CenPoint the phrase “Normal Pay” when referring to the pay rate of people in this group. Please remember that actual salary numbers do not go in the top highlighted box but instead get entered in the Rate History table.
Add a new Rate of Pay Group
Clicking the ‘Add’ button to the right of the Rate History table will allow you to define a new rate of pay.

Input the different travel rates, the Labor Rate, and the various benefits (if applicable) associated with this new rate of pay.
The date in the upper left corner is when this rate of pay will become active.
The ‘Copy To’ button allows you to paste the Labor Rate into the Travel times and Other Time.
When you are finished, click ‘OK’ to save your changes and close the window.
Clicking the ‘Add’ button next to the Assigned To table will allow you to assign users to this ROP. Click Select to assign them.
IMPORTANT NOTE:
When adding a user to the ROP Group, this window will appear:
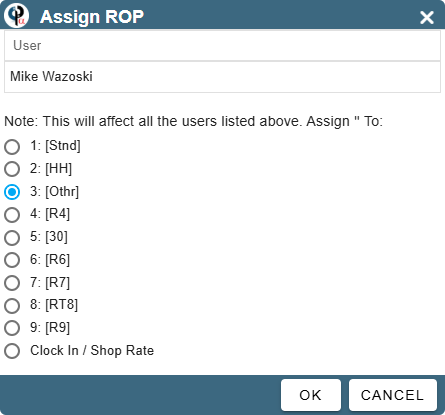
This allows you to select which Rate of Pay label (see Branch Settings) this ROP group should be applied to.
In the screenshot above Pay rate number 3 is selected. That means that in the screenshot below the user’s pay rate number 3 would get replaced by the new ROP group.

Rate of Pay for Individual Job
Job’s Rate of Pay
You can alter the Rate of Pay applied to the techs on an individual job if desired.
.png)
You can select a default Rate of Pay from the dropdown.
This correlates with the User’s defined Rates of Pay. See the following link for more information on what a User’s defined rate(s) of pay are: User Rate of Pay
If desired, the Rate of Pay may be manually set for all tasks on the job in the Job’s Rate of Pay table.
.png)