This article covers the following in inventory inside the CenPoint:
Create, manage, and define parts
Create Purchase Orders, to order new parts and inventory
Receive parts from the vendors
Transfer the inventory in between trucks and warehouses
Track your inventory usage on your field tickets
Define the Warehouse
Start by going to File-> List Management-> Inventory-> Warehouses
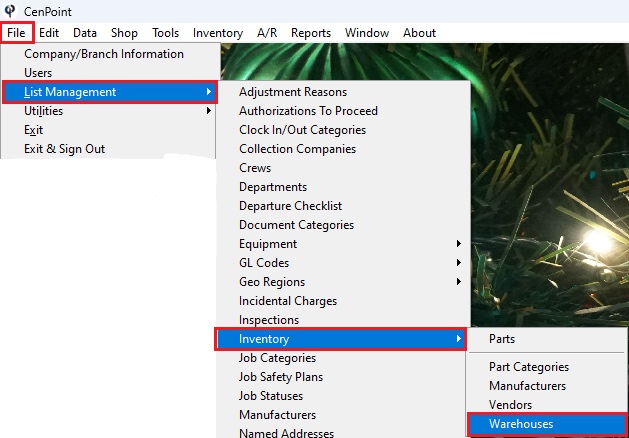
Click ‘Add New’ -> Name the Warehouse -> Choose the branch -> Click OK
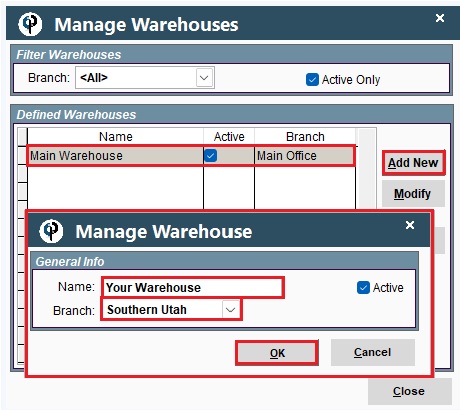
Add in and Manage Parts
Inventory -> Manage Parts You can see couple of examples on the picture.
*Use the filters in the Filter Parts box to narrow down the results.
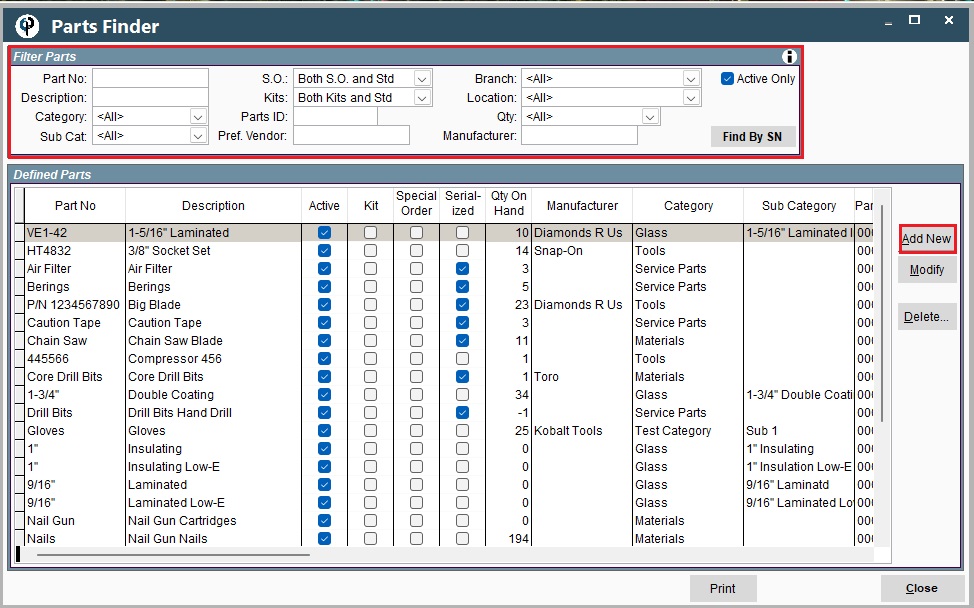
Add New -> Fill out the General Info
(*In the category selection, there is a few built in, you can customize your own by following)
File -> List Management-> Inventory -> Part Categories -> Add New -> Write Category Name -> Add in Subcategories -> Click Add
When you fill out current inventory box, if it is bolded, you can type into the grid.
.jpg)
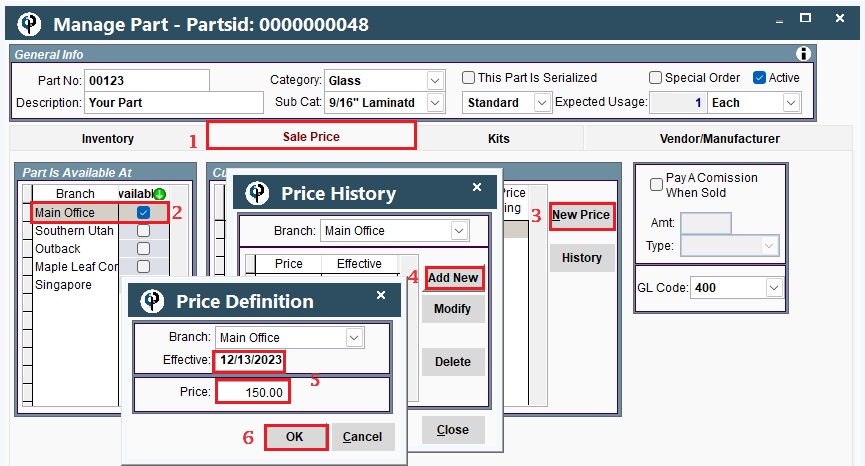
Sales Price
Sale Price: You charge when you assign or take the inventory. Let's assign a price below
Click Sale Price -> Select the Branch -> Click New Price -> Add New -> Select the Date and Price -> Click OK
Vendor/Manufacturer
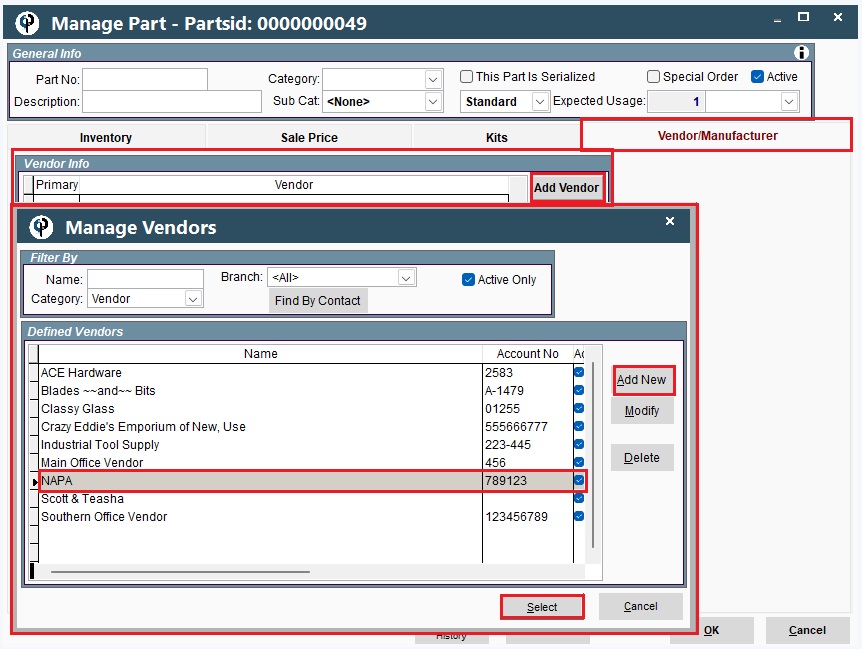
Click Vendor/Manufacturer -> Add New -> Add a Vendor -> Highlight NAPA and Click Select -> Write the price -> You can also Add Vendor -> if it is not on the list, Add New -> Define the Vendor
Inventory Part 2
How to Order a Part from a Vendor
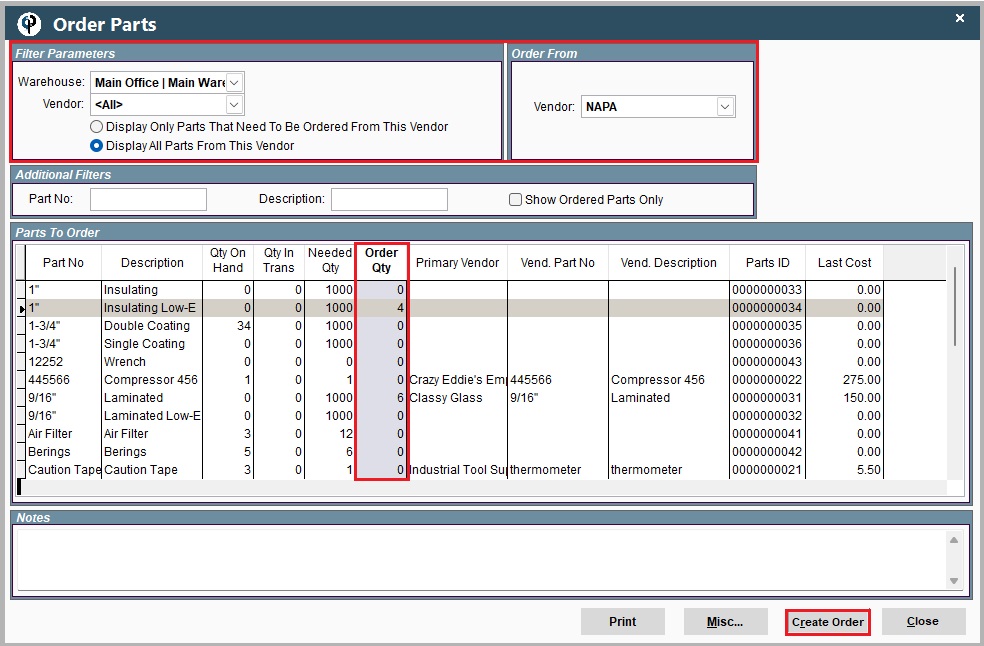
Start by going to Inventory -> Order Parts From Vendors -> Fill out the Filter Parameters -> Write Order Qty -> Click Create Order. This will create a Purchase Order
How to Receive the Part
Start by going to Inventory -> Receive Parts From Vendors -> Select your Vendor -> Click Find P.O. -> Highlight one of them -> Click Select -> Write Cur Cost -> Click an empty box on QRT Rcvd column (Receive Part Box will pop up) -> Write the actual received quantity. Now this will add to the system. To check it, Inventory ->Click Manage Parts
.jpg)
Add Part Not Ordered or To Set Up the Beginning Inventory
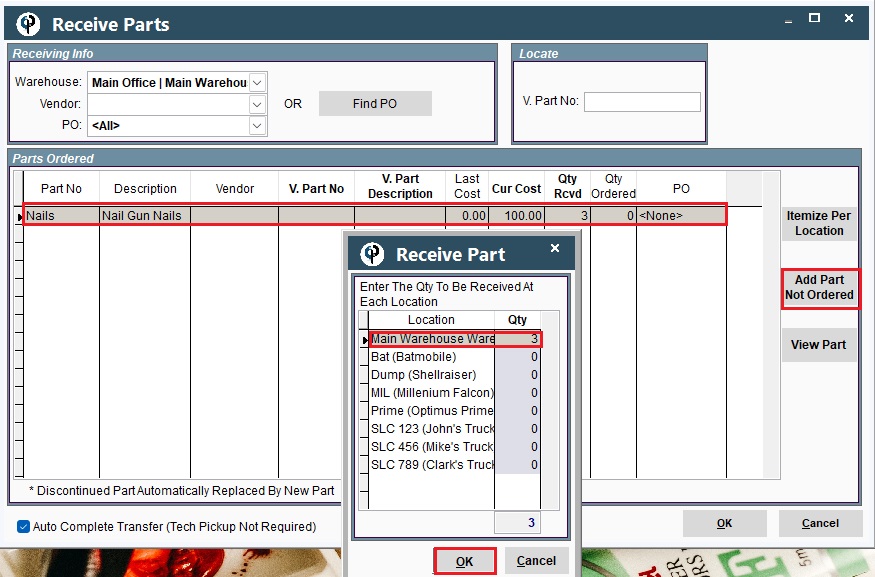
Inventory -> Receive Parts From Vendors -> Click Add Part Not Ordered -> Highlight one of them -> Click Select (You will see it on Receive Parts) -> Put the Current Price -> Update the Qty Rcvd -> Click OK
Transferring Parts among Different Locations
There are 2 ways to transfer parts inside CenPoint: One-Part Transfer and Two-Part Transfer
1 Part Transfer - You transfer a part to a warehouse or truck, and it is automatically there.
Example: You transfer Diamond Blade 123 to John’s truck, now in CenPoint Diamond Blade 123 now shows as inventory on John’s truck.
2 Part Transfer - You transfer a part to a warehouse or truck, then the part must be received by that warehouse or truck.
Example: You transfer Diamond Blade 234 to John’s truck, now John must sign into CenPoint and receive the Diamond Blade 234 for inventory on his truck.
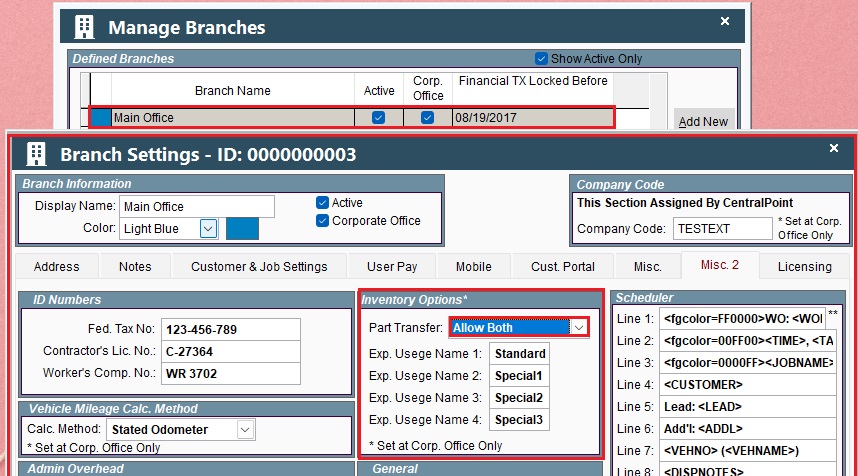
Allow Both - There will be an option where you can check and say I want it to be
To Set Part Transfer Options go to: File -> Company/Branch Information -> Click Main Office twice -> Click Misc. 2 ->
Inventory Options box, Part Transfer-> Click OK
Transfer Parts
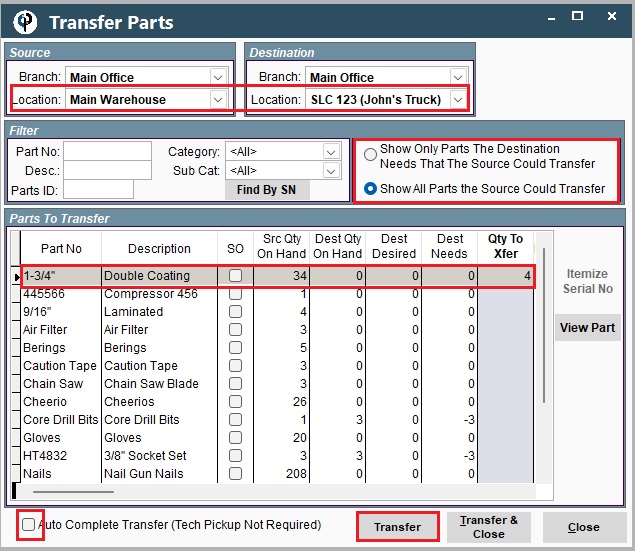
Transfer Parts by going to Inventory -> Transfer Parts ->
Choose Source Location and Destination Location
Click the radio button for either ‘Show Only Parts the Designation Needs’ or ‘Show All Parts’
Choose the Part you want and the quantity to transfer.
Check the Auto Complete Transfer box if you want the part to automatically transferred, otherwise check the box for 2-part transfer.
Click ‘Transfer’ or ‘Transfer and Close’ if you are done transferring parts.
2 Part Transfer→ Parts Pickup
The tech receiving the parts would sign into CenPoint and go to Inventory→Parts Pickup
.png)
They would then type in the quantity received, click OK, and the parts would be transferred.
.png)
Make Kits
Inventory -> Make Kits -> Specify Location -> Write the Qty Made -> Click OK
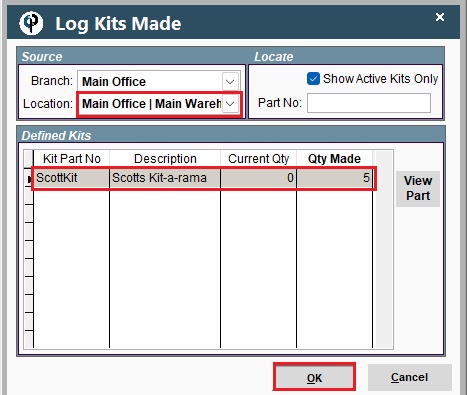
For more information on how to make Kits, Click https://help.cenpoint.com/v1/docs/kits
Recording the Usage of the Inventory Out on the Job Site
Field Ticket -> Set the date -> Select one on the list and open a field ticket -> Click Add Task -> Under Parts/Mat, Click Itemize -> Add New -> Click By Location -> Double click John's Truck (Whatever yours is)
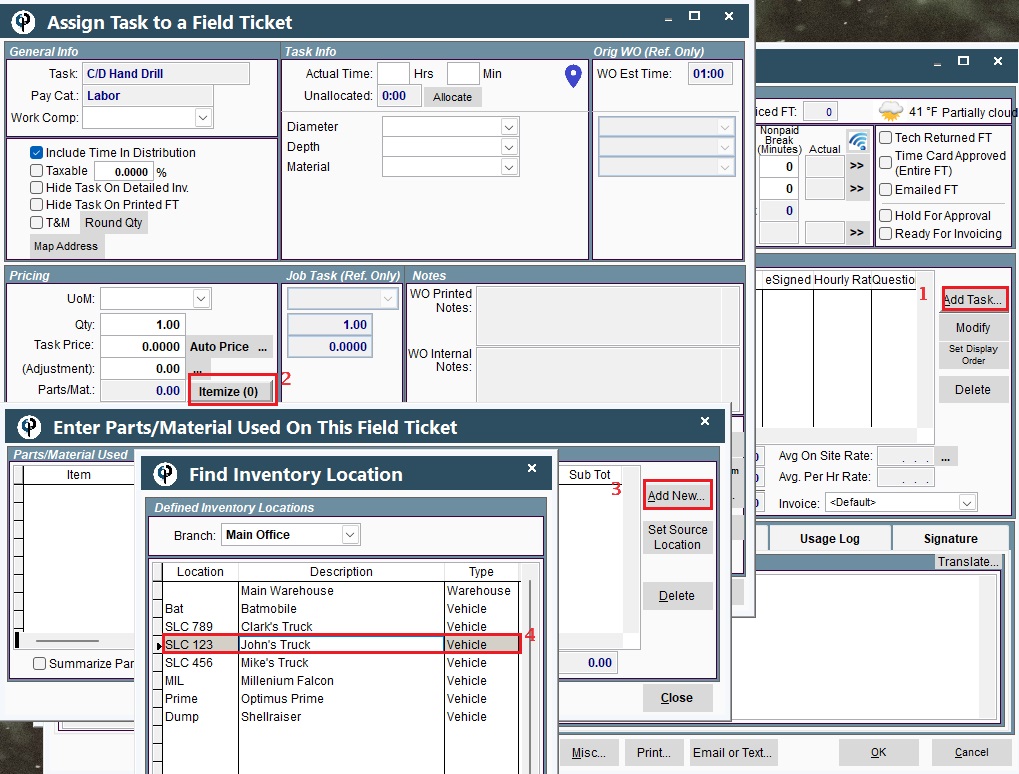
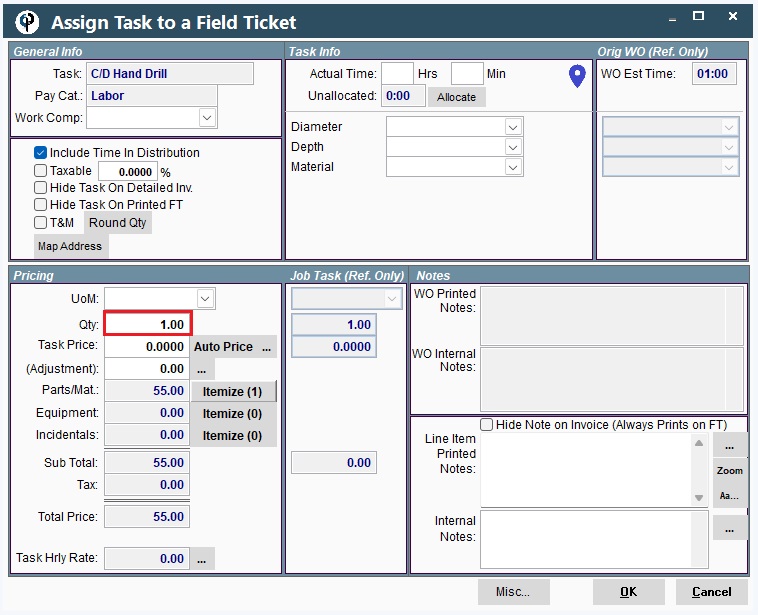
Highlight the one you need and click Select -> Write the Qty and Click Close. It updated the quantity.
FAQ
1. Adjust quantity of a part (this only works to decrease the quantity and the part cannot be serialized).
Modify the part and click the 'Misc' button, and select 'Adjust Qty On Hand(Non-Serialized only)
.jpg)
Add the new quantity and click OK.
.jpg)
The quantity on hand total will be updated.
.jpg)
2. Add parts without a PO
Go to Inventory->Receive Parts from Vendors
.jpg)
Click the 'Add Part Not Ordered' button and select your part and click in the 'Qty Rcvd' field.
.jpg)
Add the Quantity and click OK.
.jpg)
Now when you go back to manage parts the quantity should be updated.
Inventory costs flow into QuickBooks
Inventory marked as Billable on a Field Ticket and is considered revenue (GL Code) will flow though to QuickBooks.
Inventory that is considered a Cost will not push over to QuickBooks.