
Older Video
CenPoint has undergone a facelift since the recording of this video. However, all concepts remain the same.
The quick add Job screen is seen when first entering a Job, and simplifies new Job entry. When modifying an existing Job, you will see the full Job screen.
Quick Add Job Screen on Desktop
This screen was created to make putting jobs in the system incredibly easy.
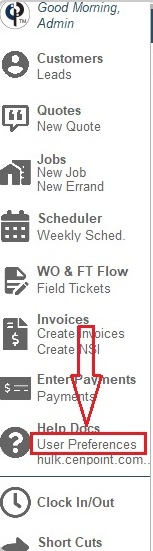
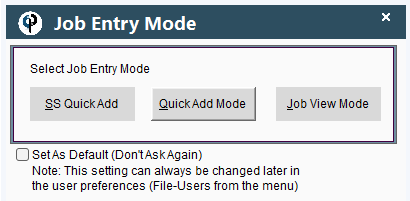
Alter Job Preferences to "Quick Add" on Desktop
User Preferences → Job Add Mode → Job Quick Add → Click OK
.png)
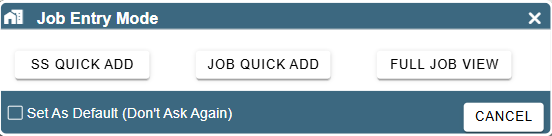
Tip: If you leave your Job Add Mode on Prompt it will always give you the choice between SS Quick Add, Job Quick Add, and Full Job View Mode.
When set to prompt this popup would appear every time you click New Job.
Step 1: Creating a job on Desktop
To add a new job, click the new job button
Either click the “New Job” button or click on Jobs → Add New
.png)
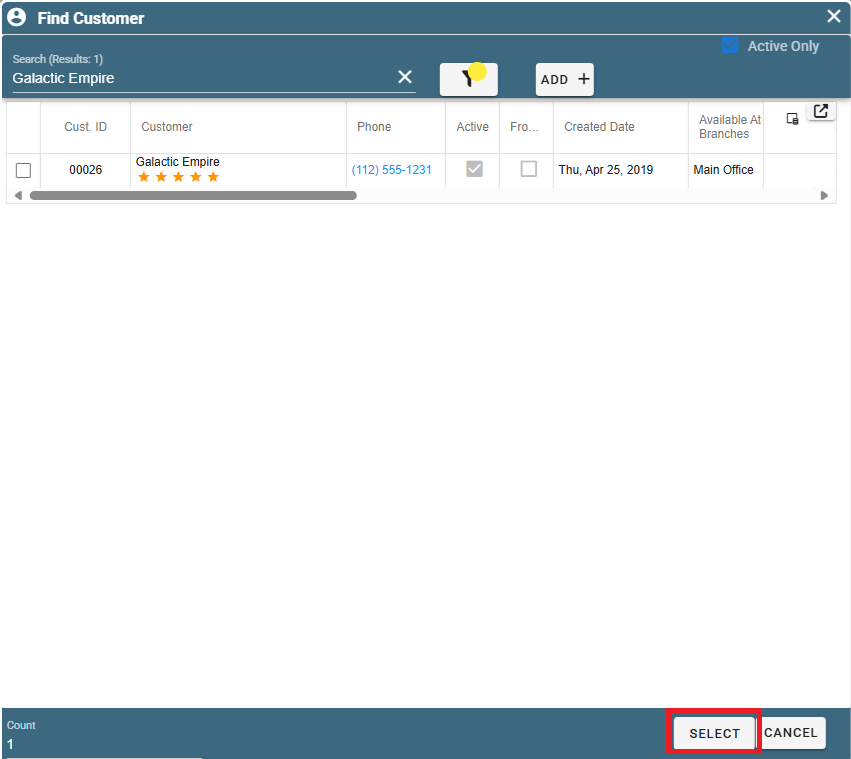
Select your customer
Find your desired customer. Click on them then click select. You may use the search bar to find them more quickly.
.png)
(Example shown in the video): If a pop-up box appears to notify that this particular customer already has a job setup. Please verify that you want to submit another job for the same customer OR add onto the existing job that is already in place.
**NOTE: Any message with a “Do not show this again” checkbox are notifications to help you learn how to use the system. Once you feel comfortable with the system, you can dismiss those checkboxes.
Step 2: Top Table- First column on Desktop
From the Quick Add Job Screen, start by entering the correct:
Branch
Job name
Start date for the designated job, and
Time of day in which the work will begin
Time of day can be entered as AM, PM, a specific time frame, or you can select “promised” and type in an exact time in which the work is promised to begin.
***This information is useful for dispatchers to keep track of schedules and expected arrivals.
Job address
Enter in the location/address of the job.
Please add a name to associate with the address if you so choose.
This allows you to be able to type in the designated name instead of the full address for future projects taking place at the same location.
Step 3: Top Table- Second Column on Desktop
Our Customer tab
Presents the customer’s name
To see more available information on your customer, click the (...) button at the end of the “Our Customer” tab and select “Open Customer Info.”
.png)
Customer’s main phone number
Customer rating
Ordered By:
Allows you to see all of the available contacts for that specific customer through the drop-down menu
If the contact you are looking for is not in the drop-down menu, click the (...) button on the right of the drop-down arrow and select “Add New Customer Contact” to fill out the new contact’s information.
Click the box for “Site Contact same As Ordered By” if it applies to your job.
Proj. Manager:
Repeat the steps used when filling out the “Ordered By” information box.
Sales Rep:
This box will default to yourself unless you specify otherwise.
Tax Rate:
Pick a tax rate via this drop-down menu if that is applicable to you
****If further notes/information are required for the job dispatcher, please enter it into the “Dispatch Note” box***
Step 4: Top Table- Third Column on Desktop
Check boxes:
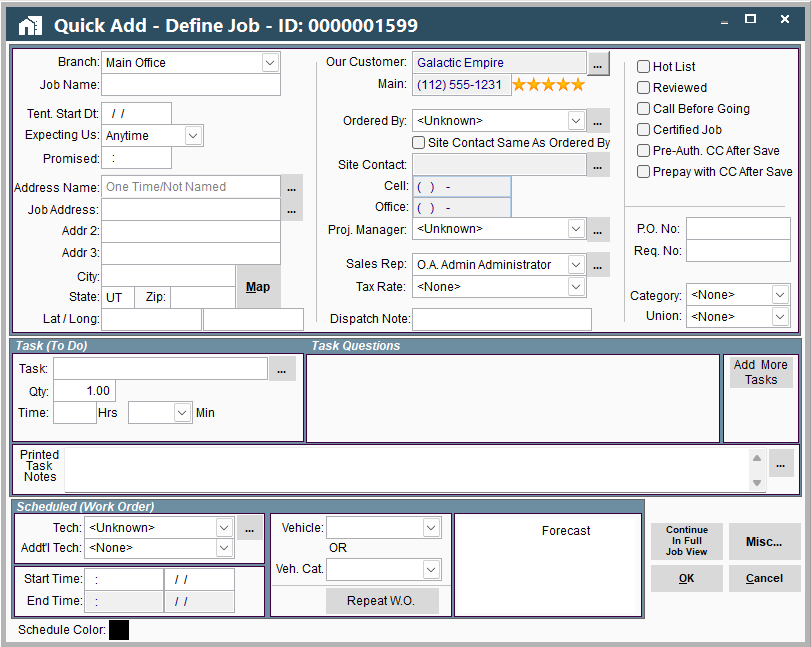
Hot List
This is so you can add the customer to a priority wait list. In your schedule you can click the fire icon on the upper right side and see if you can fit their job into the schedule as soon as something opens up. See this link for more information: Hot List
Reviewed
This is designed so that one person can enter the job into the system and another individual can review it. IF you are NOT going to have a review process, you can check that box off from the start.
Call Before Going
Click this box to opt the customer into phone call updates about job schedules and arrival times
The scheduler screen will then have a reminder for you to call the customer, if applicable.
Remember!!! Cenpoint offers several options to automate communication with a customer about schedules and arrival times if the customer does NOT prefer a phone call
e.g. text messages when the technician starts arriving, ETA for arrival at the job site, text messages the day before the job begins, etc.
Certified Job
Check this box If the job requires certified payroll.
Pre-Auth. CC After Save
See this link for more information on what a Pre-Authorization is: Pre-Auth on CC
Prepay with CC (Credit Card) After Save
Click this box if the customer is going to be paying ahead of time, then click the “OK” button at the bottom of the screen. A box will then appear for you to type in that card information so that you can make a charge.
-Field and number boxes:
P.O Number box:
Enter your P.O. Number here
Req. (requisition) number:
Enter your Job Number here
Custom Job Fields (*if added*):
IF you desire to add custom job fields in this section of the table, please refer to our “Custom Job Fields” Help Doc (link below) for the proper information to get you started.
Category drop-down menu:
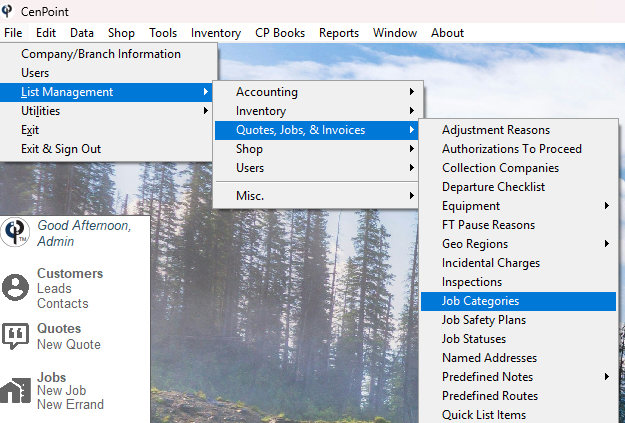
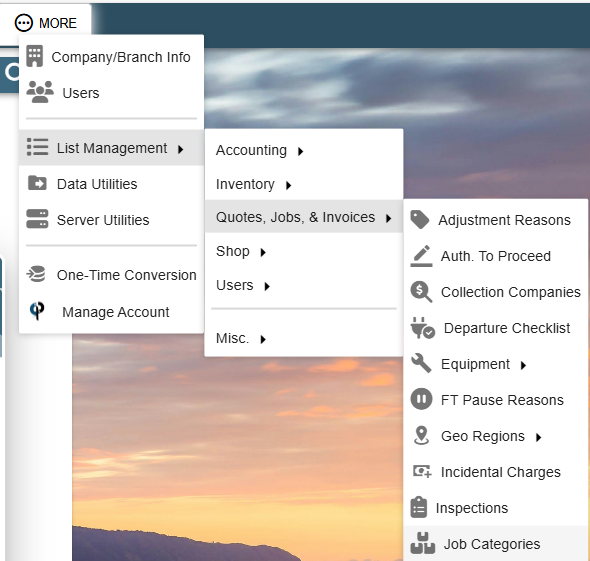
This lets you sort your customers by category. You can customize your categories to improve your organization by clicking on the “File” → “List Management,” → "Quotes, Jobs, & Invoices" → “Job Categories.”
Step 5: Task table on Desktop
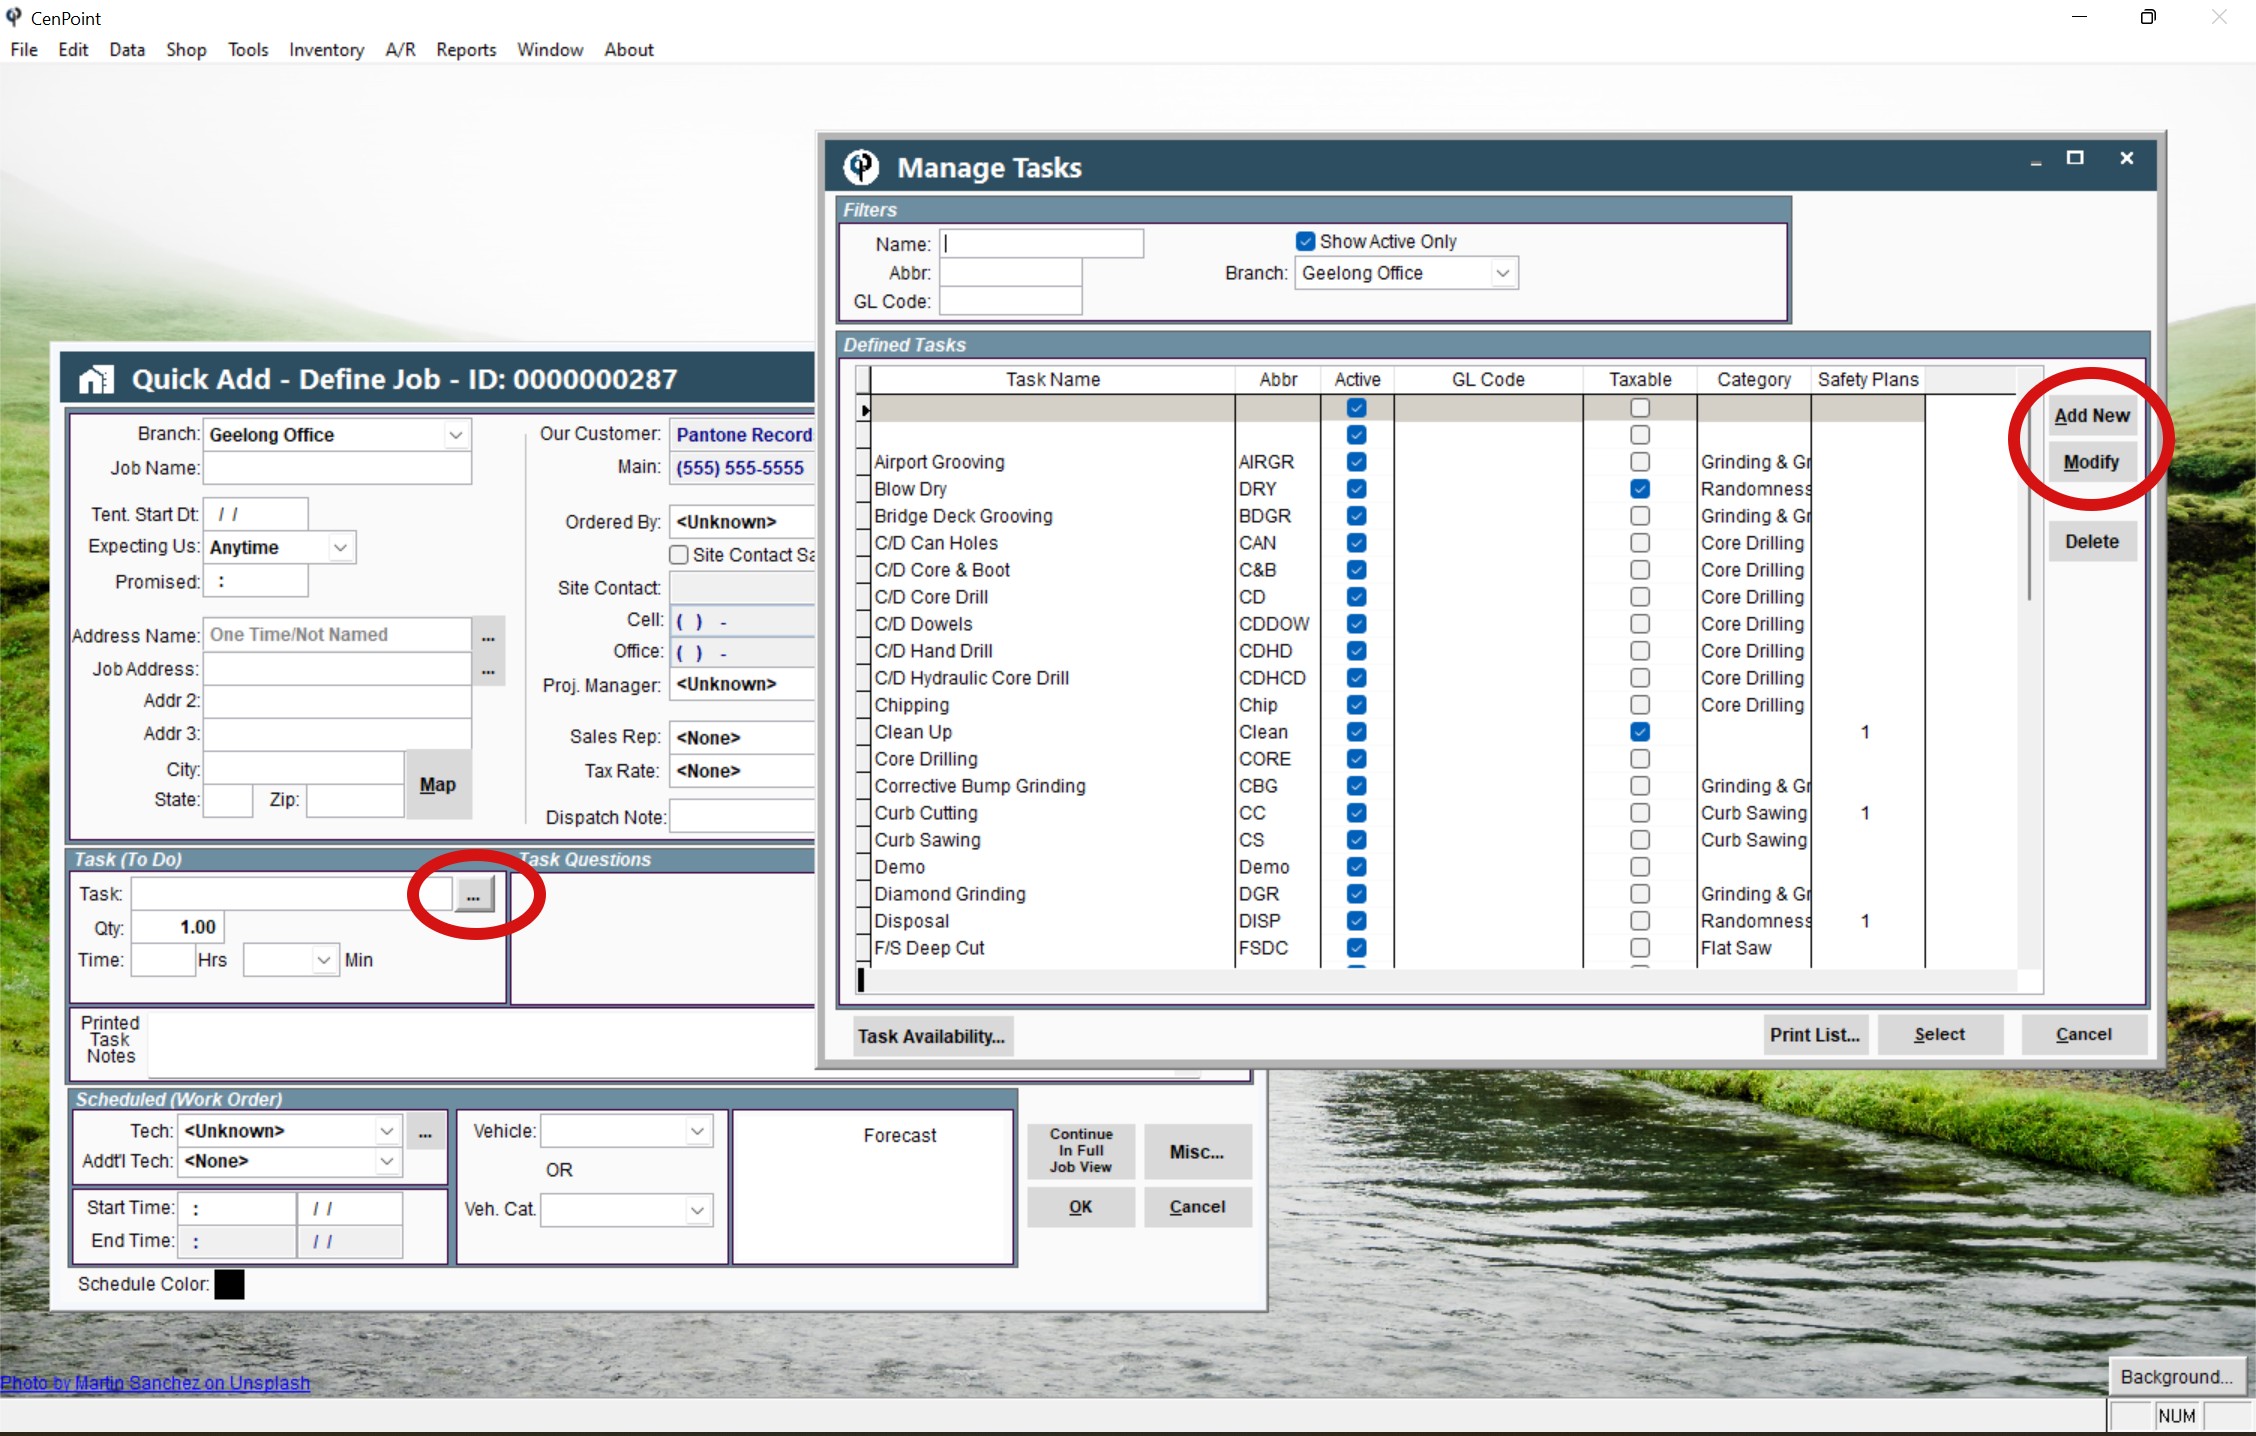
Task box:
Use this box to add in the designated task for the specified job.
If you want to search a task (or you cannot find the one that you need) click the (...) at the end of the task box to search and/or add a new task.
Quantity:
Use this box to fill out the following:
The quantity of the tasks that need to be completed
The total labor hours/minutes expected for the job
Printed Task Notes:
Use this box to add in specific task notes (if needed)
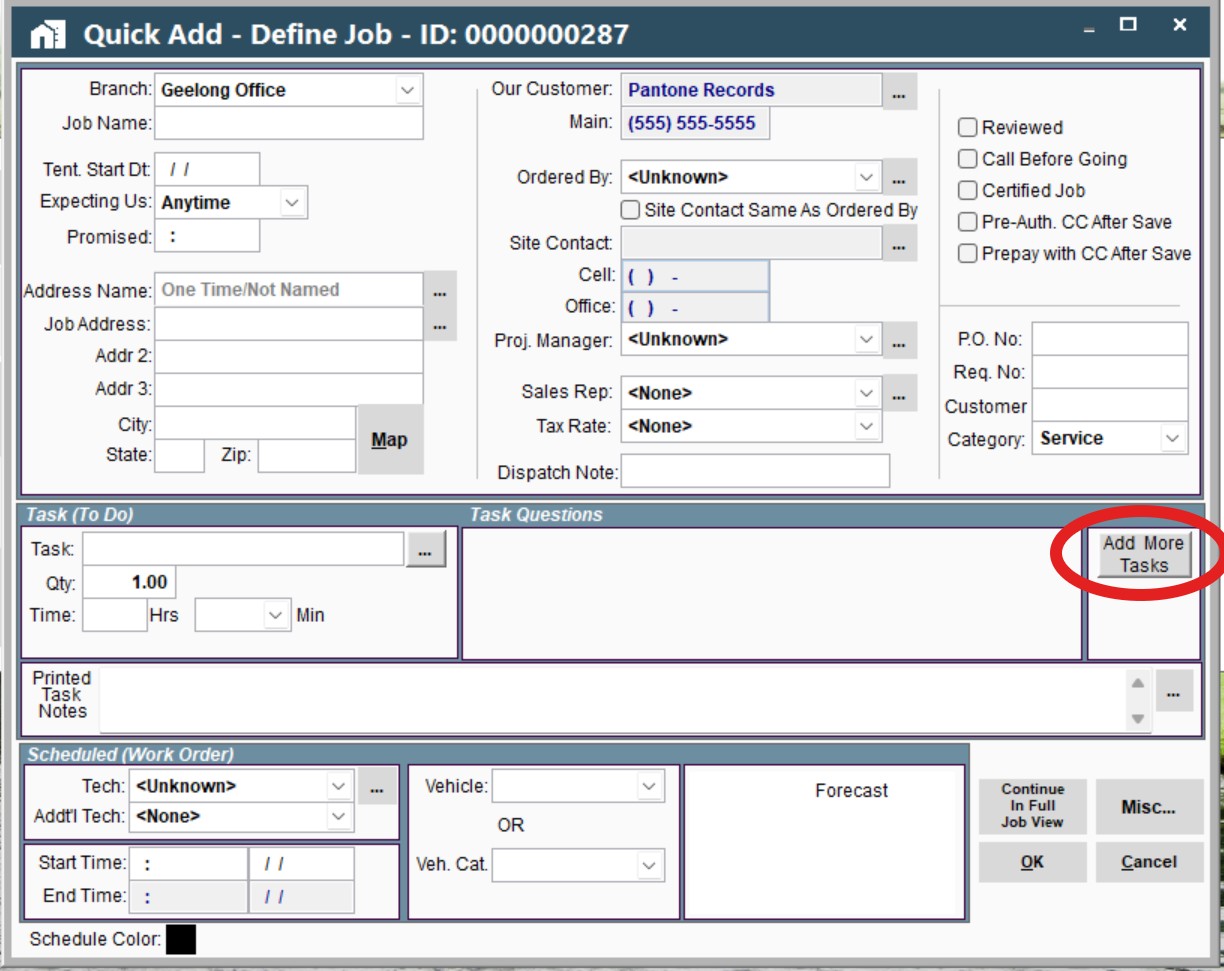
Add More Tasks
This box is located on the far right side of the task table.
Click this button if a job requires more than one task, and repeat the appropriate steps
Click “modify” or “delete” to manage your tasks as needed.
Step 6: Scheduled (Work Order) table on Desktop

Begin scheduling the first day of the job by assigning:
Technician
Additional Technician
From this “Quick Add” screen, you can only add two technicians; from the “Full Job” screen you can add as many as you would like
Start time
This can be adjusted if needed
End time
This time period defaults based on the amount of hours you placed in the “Total labor hours/minutes” box within the Task table
OR
It will default to an 8 hour work day if the amount of hours entered within the “Total labor hours/minutes” box are too many to complete in one designated day
Vehicle
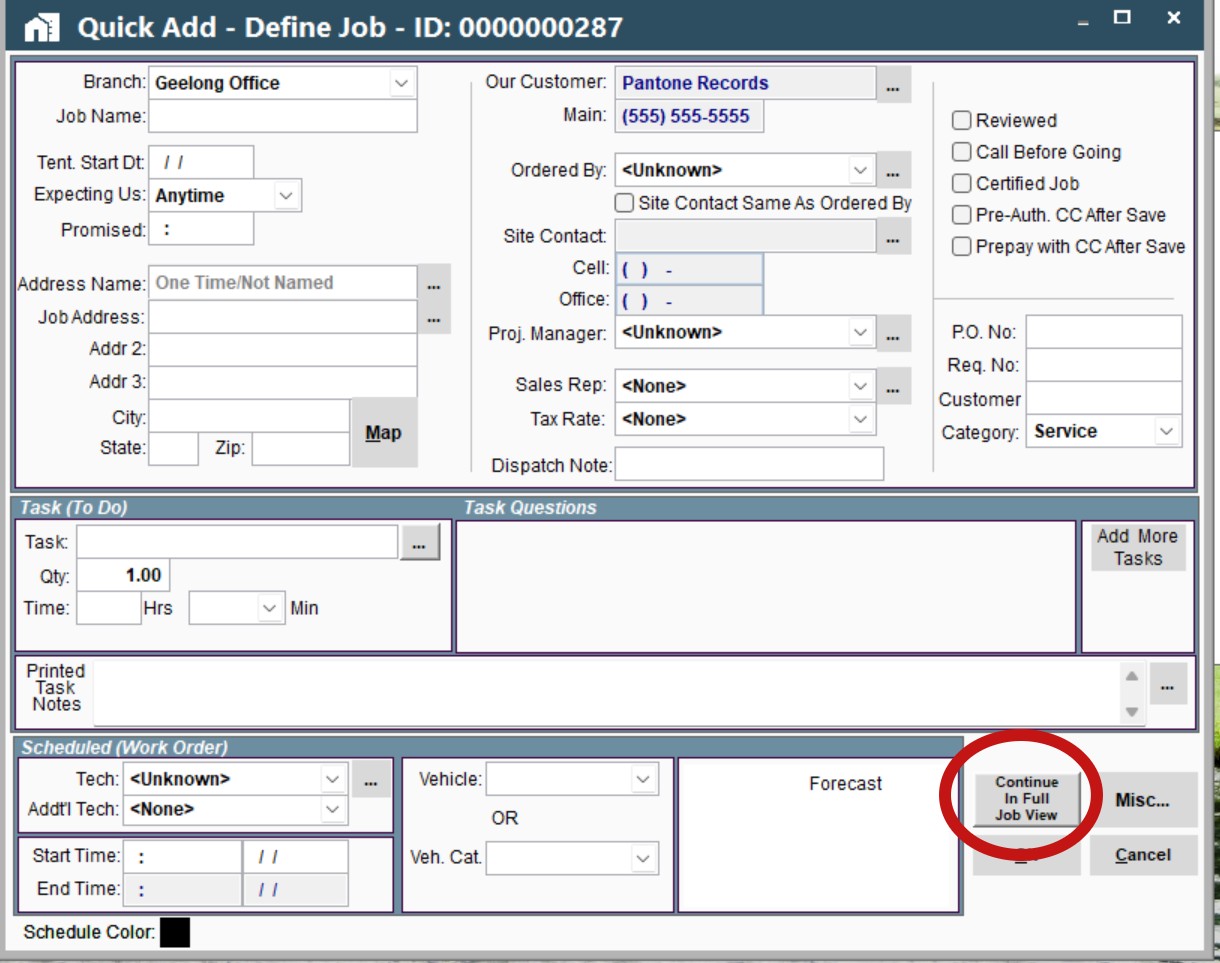
Continue in Full Job Screen for more specific applications
-----------------------------------------------------------------
Quick Add Job screen on Portal
Alter Job Preferences to "Quick Add" on Portal
Go to More → Users and select your user
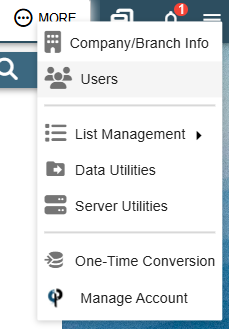
Then go to User Preferences and alter the Job Add Mode
Tip: If you leave your Job Add Mode on Prompt it will always give you the choice between SS Quick Add, Job Quick Add, and Full Job View Mode.
When set to prompt this popup would appear every time you click New Job.
This saves you the hassle of swapping back and forth in the settings whenever you want to change which job entry mode you want to use.
Step 1: Creating a job on Portal
To add a new job, click the new job button
Either click the “New Job” button or click on Jobs → Add
.png)
Select your customer
Find your desired customer. Click on them then click select. You may use the search bar to find them more quickly.
(Example shown in the video): If a pop up box appears to notify that this particular customer already has a job setup. Please verify that you want to submit another job for the same customer OR add onto the existing job that is already in place.
**NOTE: Any message with a “Do not show this again” checkbox are notifications to help you learn how to use the system. Once you feel comfortable with the system, you can dismiss those checkboxes.
Step 2: Top Table- First column (General Info) on Portal
.png)
From the Quick Add Job Screen, start by entering the correct:
Branch
Job name
Start date for the designated job, and
Time of day in which the work will begin
Time of day can be entered as AM, PM, a specific time frame, or you can select “promised” and type in an exact time in which the work is promised to begin.
***This information is useful for dispatchers to keep track of schedules and expected arrivals.
Job address
Enter in the location/address of the job.
Please add a name to associate with the address if you so choose.
This allows you to be able to type in the designated name instead of the full address for future projects taking place at the same location.
Step 3: Top Table- Second Column (Customer) on Portal
Our Customer tab
Presents the customer’s name
To see more available information on your customer, click the (...) button at the end of the “Customer” tab and select “View/Modify Customer Info.”
.png)
A blue phone that will call the Customer’s main phone number
Ordered By:
Allows you to see all of the available contacts for that specific customer through the drop-down menu
If the contact you are looking for is not in the drop-down menu, click the (...) button on the right of the drop-down arrow and select “Add New Customer Contact” to fill out the new contact’s information.
Click the box for “Site Contact same As Ordered By” if it applies to your job.
Proj. Manager:
Repeat the steps used when filling out the “Ordered By” information box.
Sales Rep:
This box will default to yourself unless you specify otherwise.
Tax Rate:
Pick a tax rate via this drop-down menu if that is applicable to you
****If further notes/information are required for the job dispatcher, please enter it into the “Dispatch Note” box***
Step 4: Top Table- Third Column (Additional Info) on Portal
.png)
Check boxes:
Hot List
This is so you can add the customer to a priority wait list. In your schedule you can click the fire icon on the upper right side and see if you can fit their job into the schedule as soon as something opens up. See this link for more information: Hot List
Reviewed
This is designed so that one person can enter the job into the system and another individual can review it. IF you are NOT going to have a review process, you can check that box off from the start.
Certified
Check this box If the job requires certified payroll.
Prepay with CC (Credit Card) After Save
Click this box if the customer is going to be paying ahead of time, then click the “OK” button at the bottom of the screen. A box will then appear for you to type in that card information so that you can make a charge.
Pre-Auth. CC After Save
This box will allow you to do a Pre-Authorization of funds and put a "hold" on a predetermined amount of money to help guarantee payment. See this link for more information on what a Pre-Authorization is: Pre-Auth on CC
-Field and Number Boxes
Job P.O No:
Enter your P.O. Number here
Requisition No:
Enter your Job Number here
Custom Job Fields (*if added*):
IF you desire to add custom job fields in this section of the table, please refer to our “Custom Job Fields” Helpdoc (link below) for the proper information to get you started.
Category drop down menu:
This lets you sort your customers by category. You can customize your categories to improve your organization by clicking on More → List Management → Quotes, Jobs, & Invoices → Job Categories.
Union dropdown menu:
Clarify if a Union is involved in the job or on a Task-by-Task basis.
Step 5: Task table on Portal
Task box:
Use this box to add in the designated task for the specified job.
If you want to search a task click the (...) at the end of the task box to search.
From the "Quick Add" screen you currently cannot create new tasks nor have more than one attatched. From the Full Job screen you may create and attach as many as you'd like.
.png)
Quantity:
Use this box to fill out the following:
The quantity of the tasks that need to be completed
The total labor hours/minutes expected for the job
Printed Task Notes:
Use this box to add in specific task notes (if needed)
Step 6: Scheduled (Work Order) table on Portal
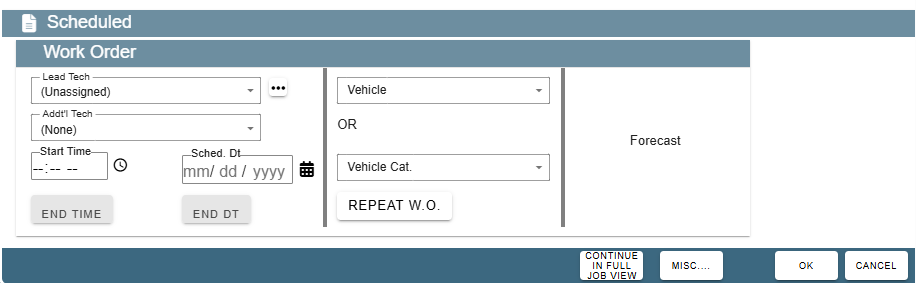
Begin scheduling the first day of the job by assigning:
Lead Technician
Additional Technician
From this “Quick Add” screen, you can only add two technicians; from the “Full Job” screen you can add as many as you would like
Start time
This can be adjusted if needed
End time
This time period defaults based on the number of hours you placed in the “Total labor hours/minutes” box within the Task table
OR
It will default to an 8 hour work day if the amount of hours entered within the “Total labor hours/minutes” box are too many to complete in one designated day
Vehicle
Continue in Full Job Screen for more specific applications
