
What is a Work Order?
Each work order=1 day of work
Each job contains one or more work orders.
A work order is all of your planned work at the beginning of the day. A Field Ticket is the report on what actually got done.
Work Order on Desktop
Create a New Work Order on Desktop
There are many ways to create a new work order
One of the ways is to create a new job
Select one of the following ways to create your new job:
SS Quick Add
This allows you to make 1 Work Order and 1 task.
Quick Add Mode
This allows you to make 1 Work order and 1 task
Job View Mode
This allows you to make Several Work Orders and Several Tasks.
Here are links to more information on the different ways to add a job.
Quick Add Job Screen: https://help.cenpoint.com/docs/quick-add-job-screen
SS Quick Add: https://help.cenpoint.com/docs/ss-quick-add-1
Full Job Screen: https://help.cenpoint.com/docs/full-job-screen?highlight=full%20job%20s
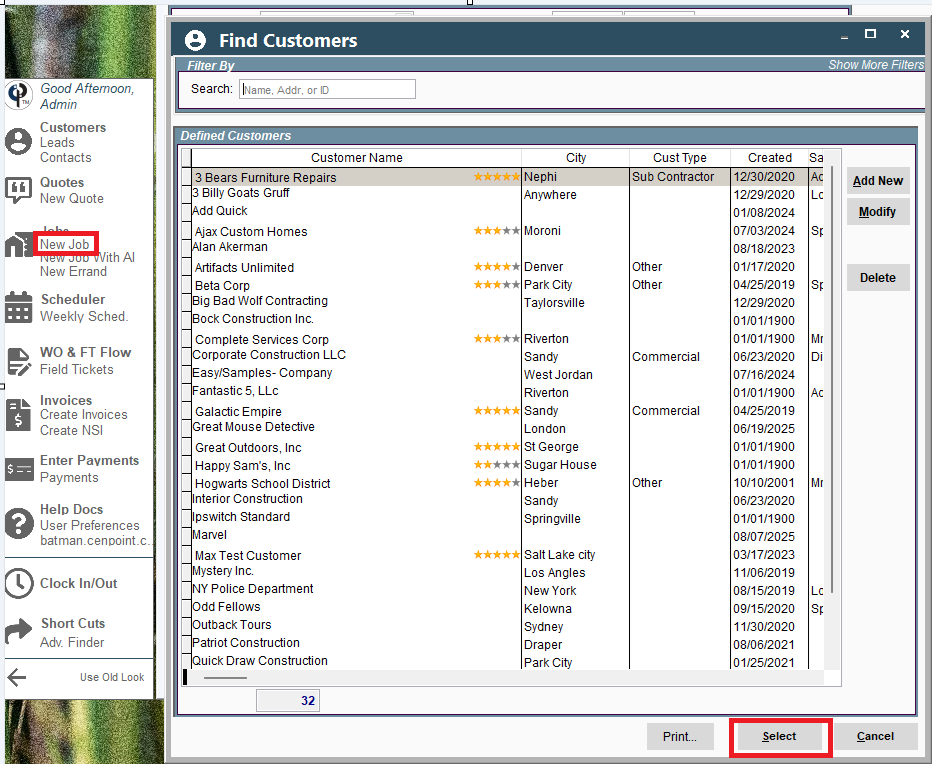
Click on New Job and select your customer.
This will bring you to the same place that Modify a Job will.
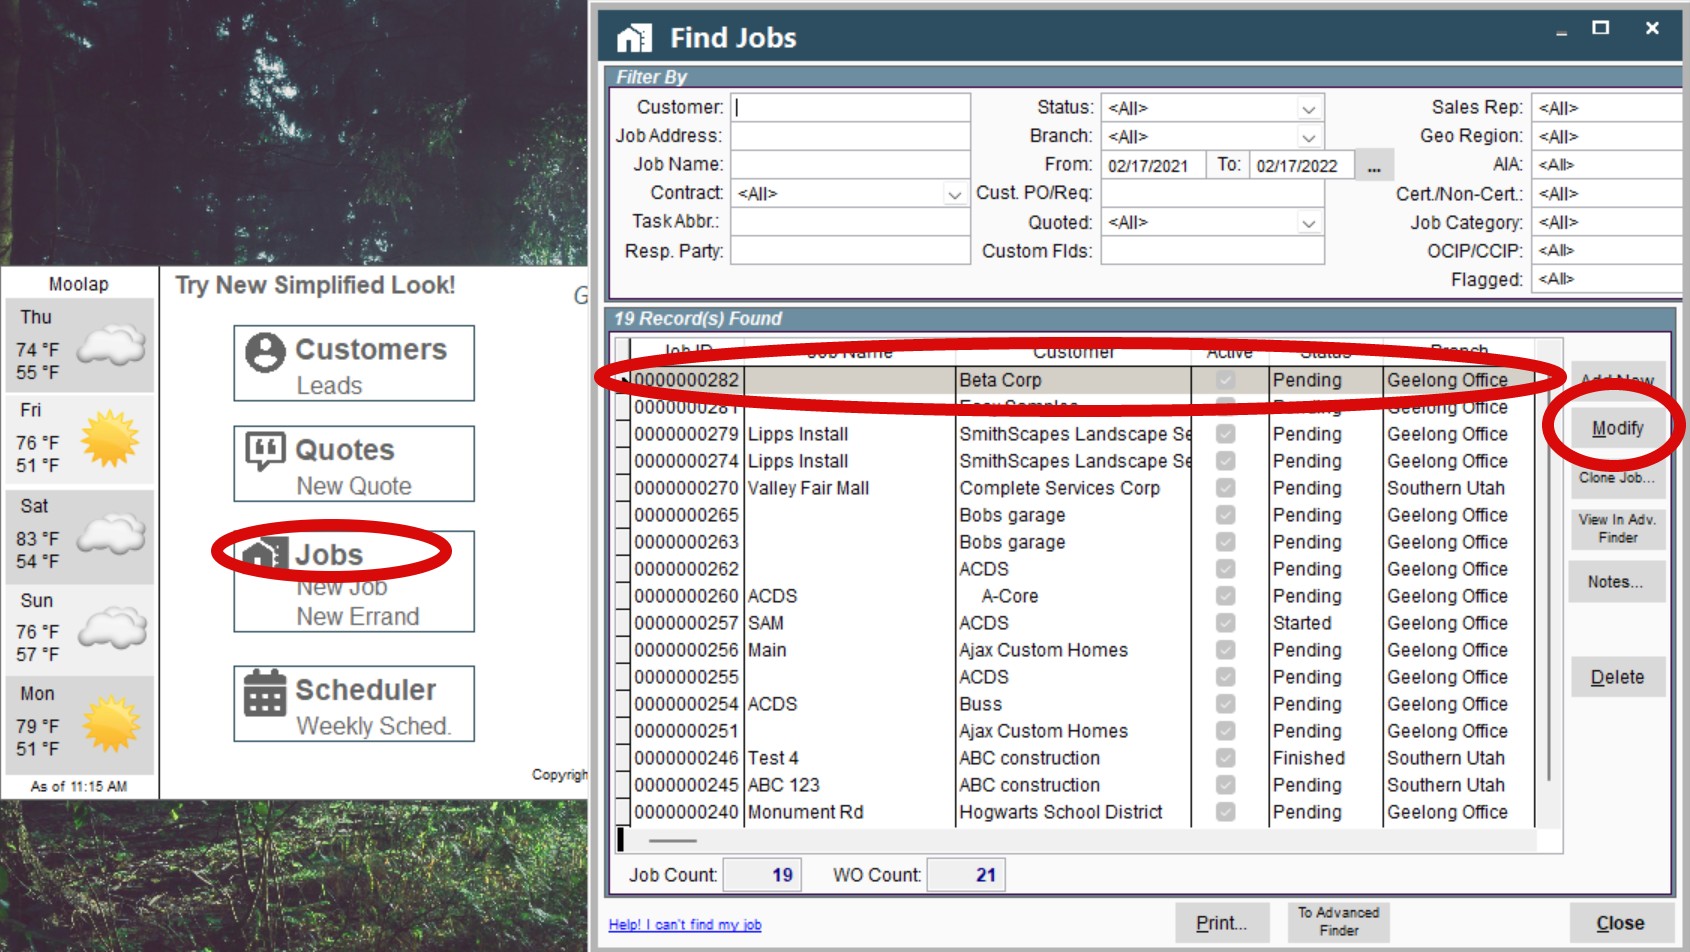
Modify An Existing Job on Desktop
Go to Jobs -> Select the desired job -> Click Modify
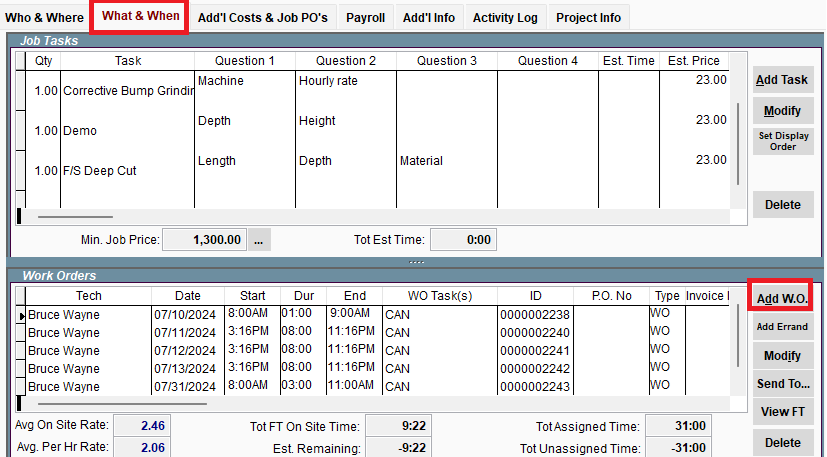
Go to the "What and When" tab; in the bottom section is where all of the work orders pertaining to that job live.
Click the "Add W.O." button on the right side of that section to add another work order to the designated job.
Fill Out the New Work Order Page on Desktop
Fill out the following boxes on the designated work order page appropriately:
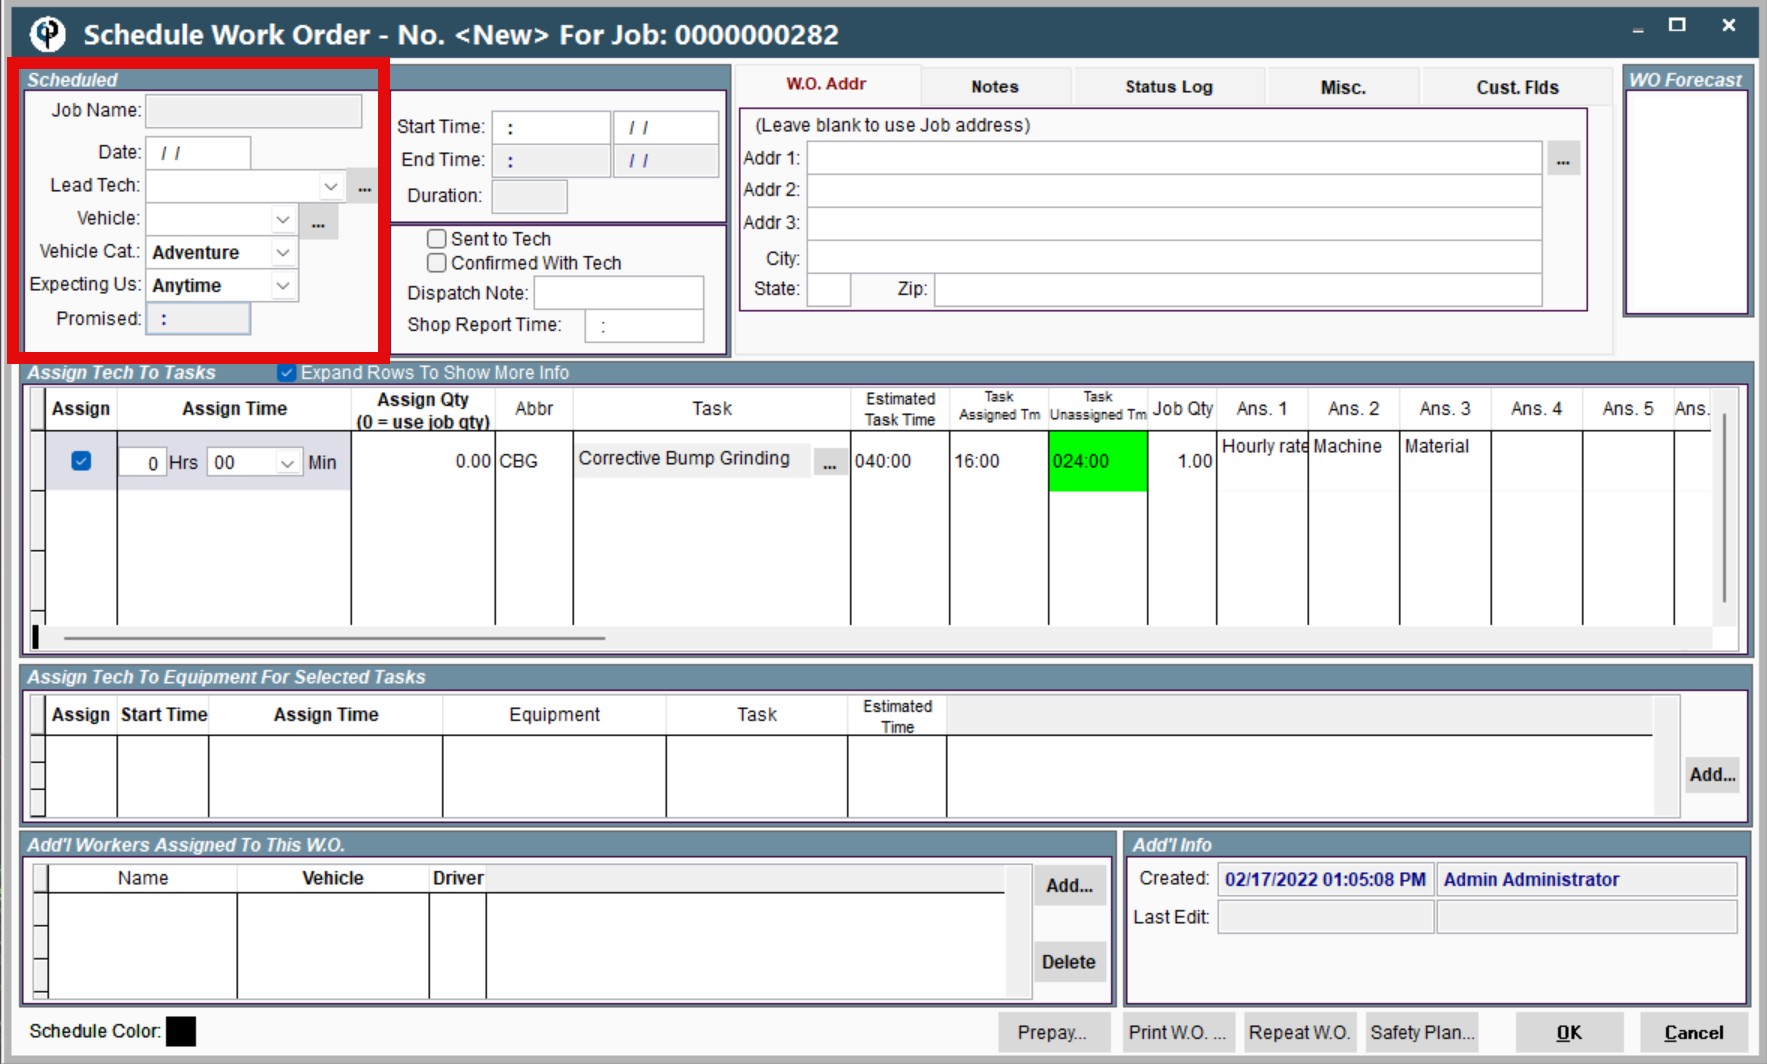
Date
Lead technician on the job
to add a tech that is not on the "Lead Tech" drop-down menu, click the (...) button, and click "Select a tech not in list."
Vehicle
To add more vehicles, look at the “Add Additional Workers” step (below)
Expecting Us
This automatically pops-up with the information that you have previously filled out when initially creating the job
Promised
This automatically pops-up with the information that you have previously filled out when initially creating the job
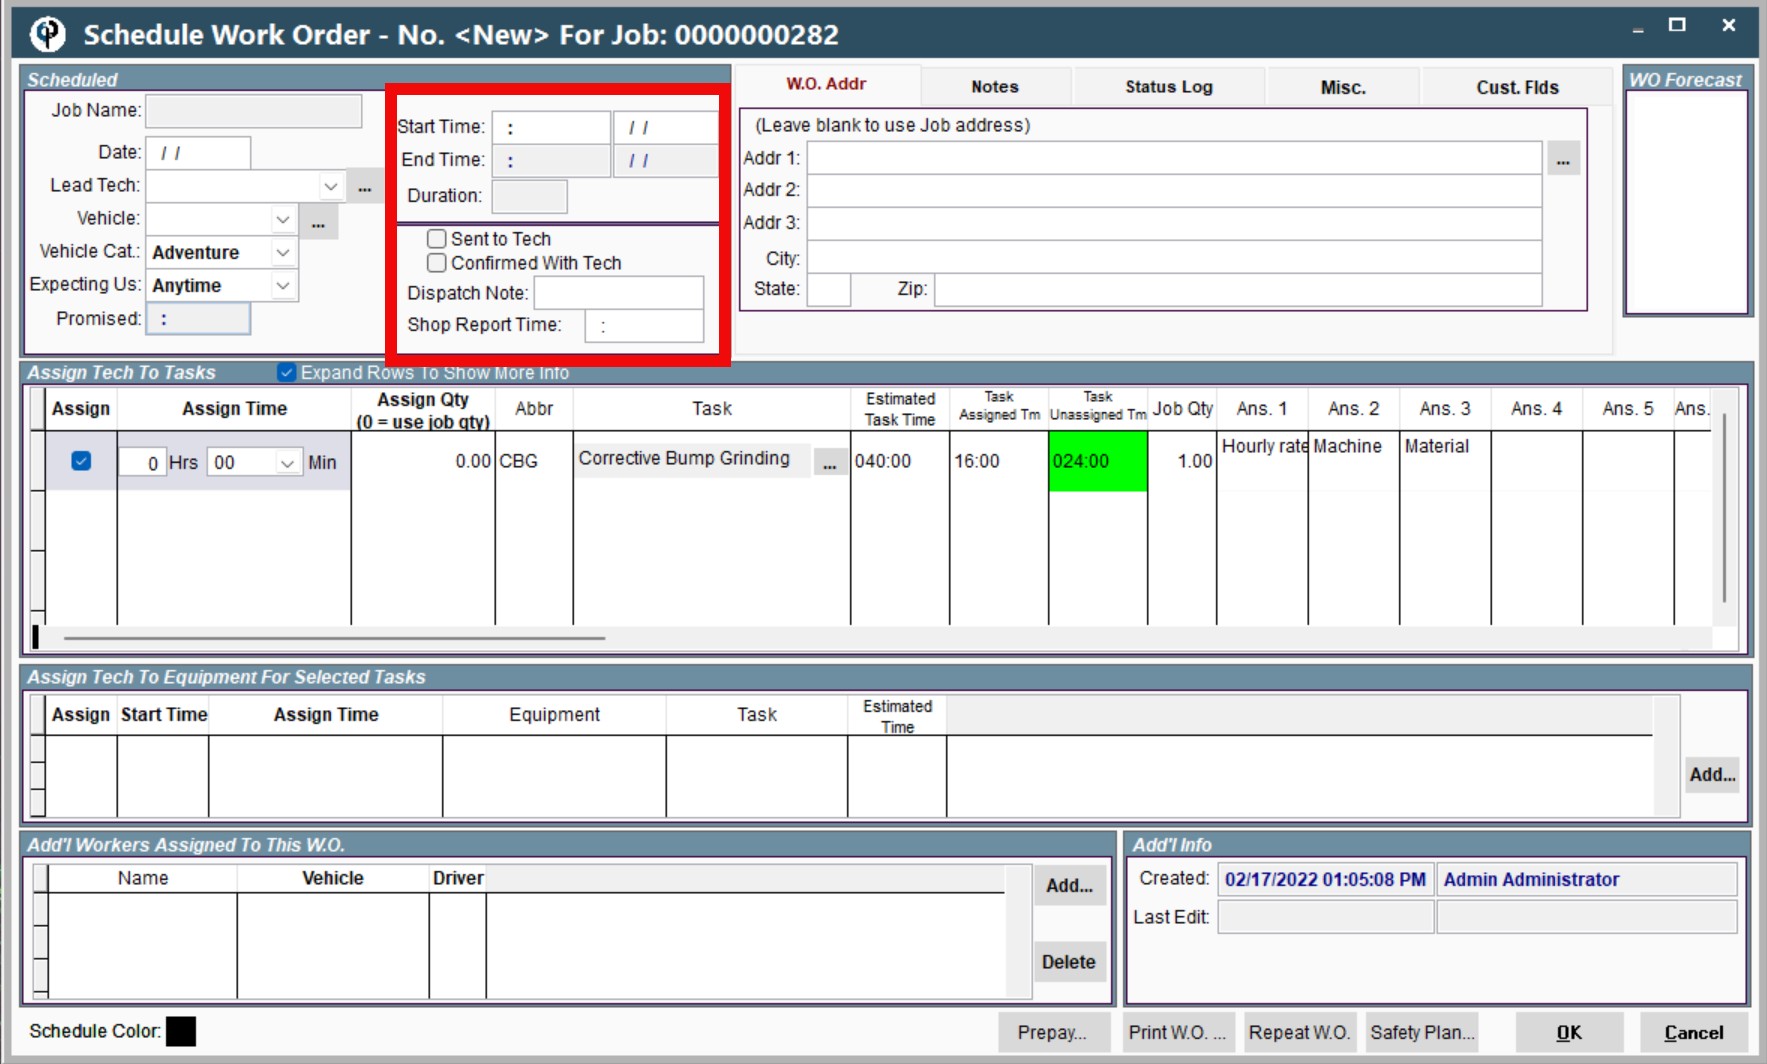
Start time
This is the time that the job is intended to begin
Will automatically pop-up with the time stated in the initial job order OR can be adjusting depending on your individual needs
End time
IF YOU CANNOT TYPE INTO THE "END TIME" FIELD, that means that the system has calculated the end time for you
TO ADJUST THE END TIME refer to the middle section (Assign Tech to Tasks) of the Work Order screen and refer to the column that says Assign
Click on the jobs that you plan to do on this particular day. Once you have selected the jobs, the estimated time for each job will appear in the next column.
To change the End Time of the Work Order, just adjust the estimated times in the Assign Times column
Shop report time
This is a note to leave for the technicians assigned to this Work Order in order to remind them of the time that they need to be at the shop preparing for the designated job
Can be earlier than the promised Start time if needed
Assign Tech to Equipment for Selected Tasks on Desktop
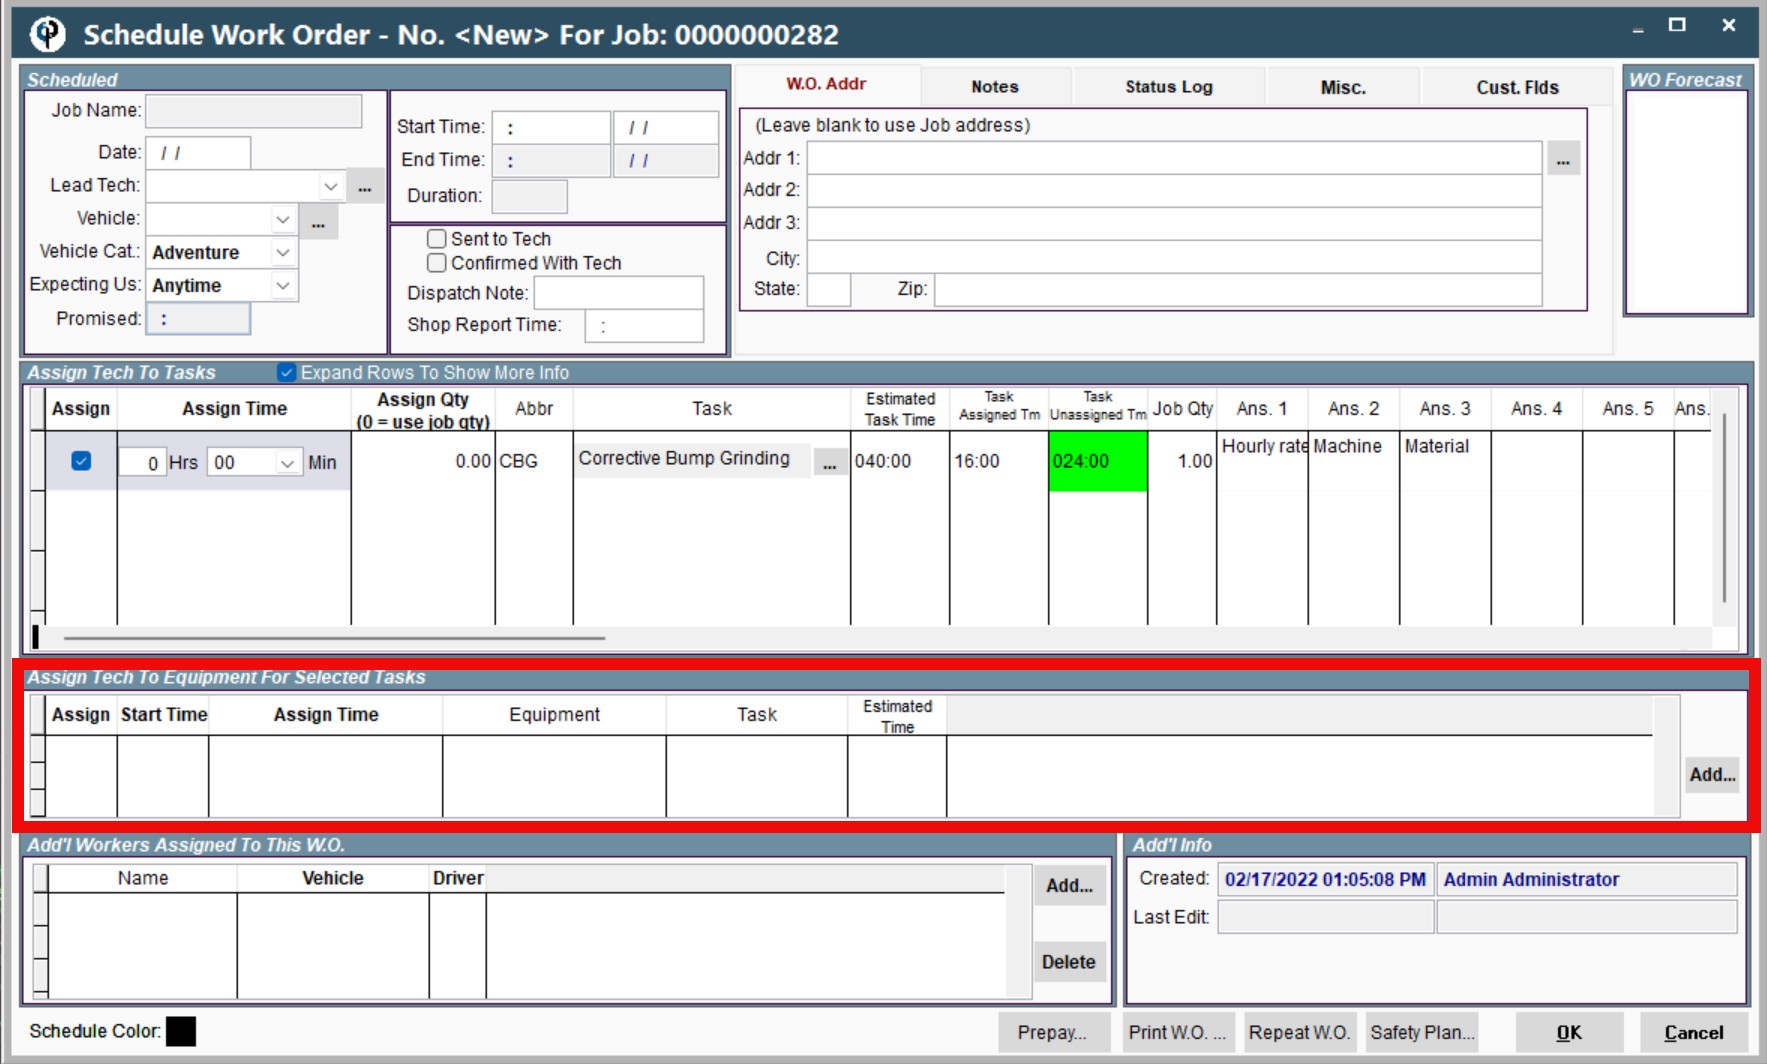
You can include equipment information for the technicians in the notes, OR
Go to the section that is second from the bottom of the page > click the Add button at the far right side of that section > add your equipment information
Add Additional Workers (if needed) on Desktop
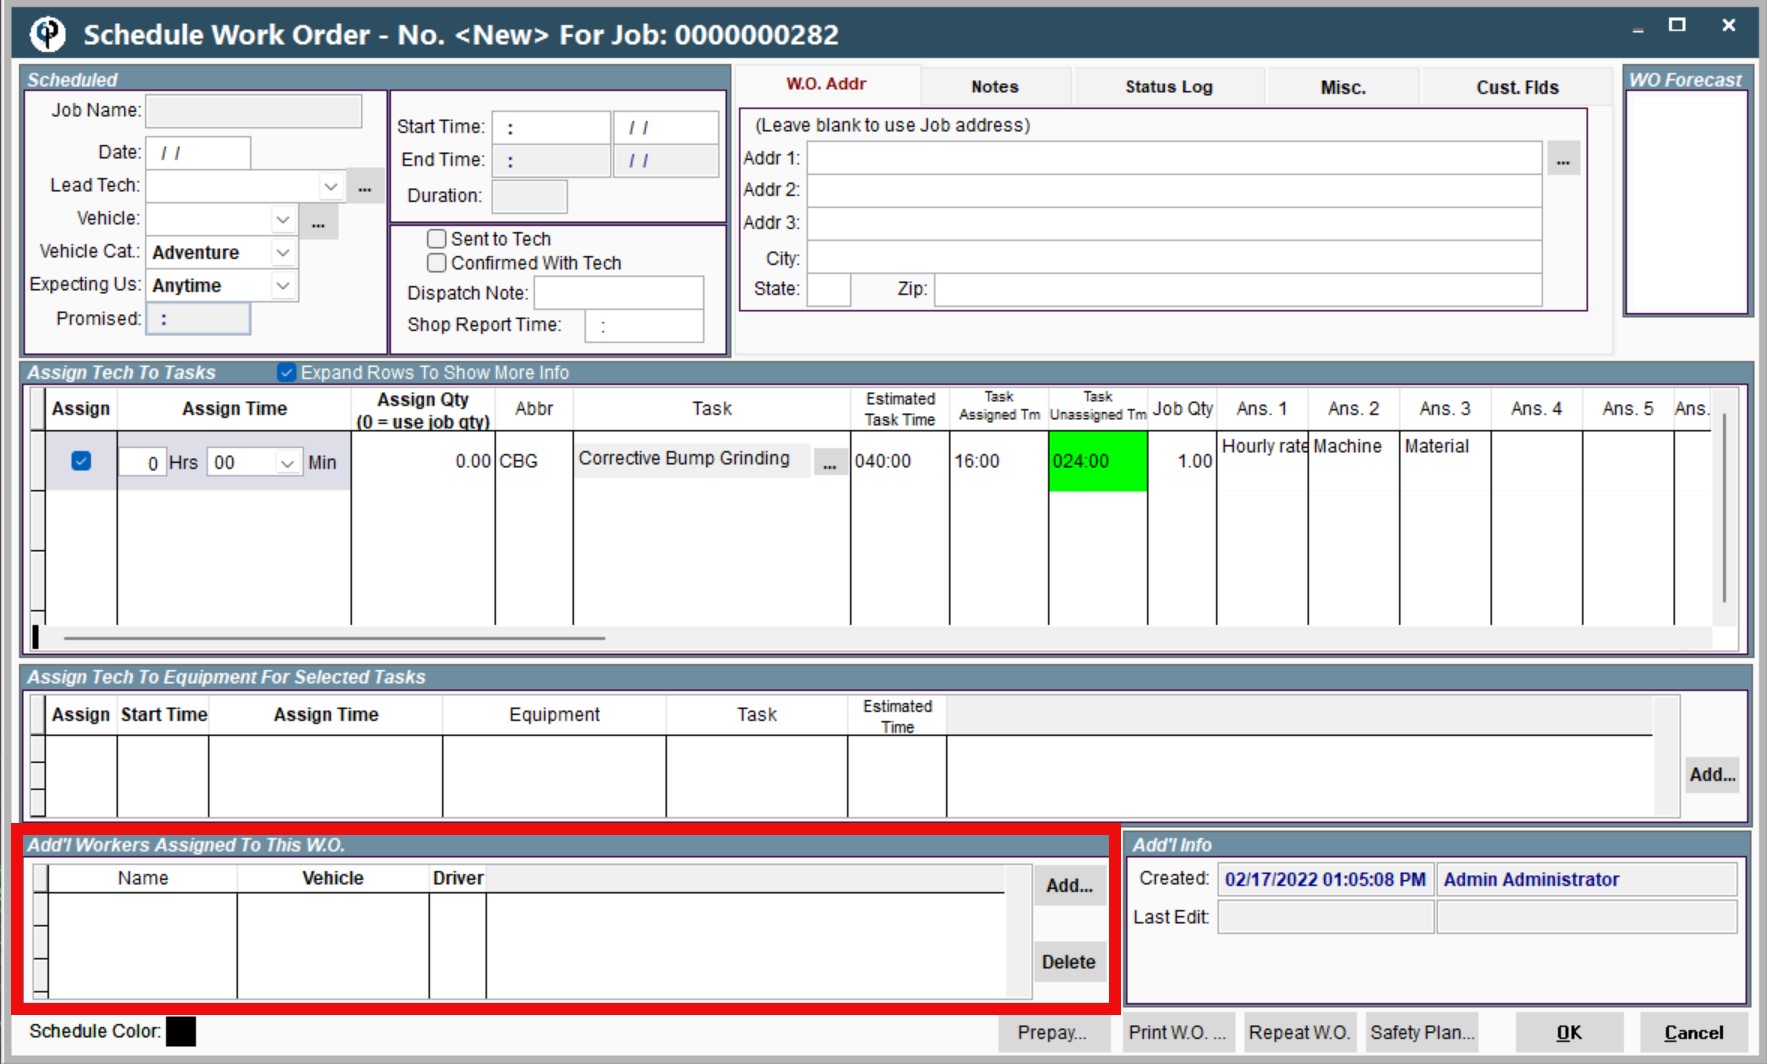
To add people: In the bottom section of the page, click Add > Add tech
If you need to add a crew of techs, click Add > Add crew
Click on the name(s) of the techs that you want to assign to this work order
To add vehicles: The vehicle for all of the additional techs will default to the same vehicle as the Lead technician.
If you need to add more vehicles, then click on the vehicle column next to each name of the technicians in that bottom section of the Work Order page and assign your vehicle of choice for each technician.
Any technician with a blank space under their vehicle column will ride in the same vehicle as the Lead technician.
Add Notes for the Technicians
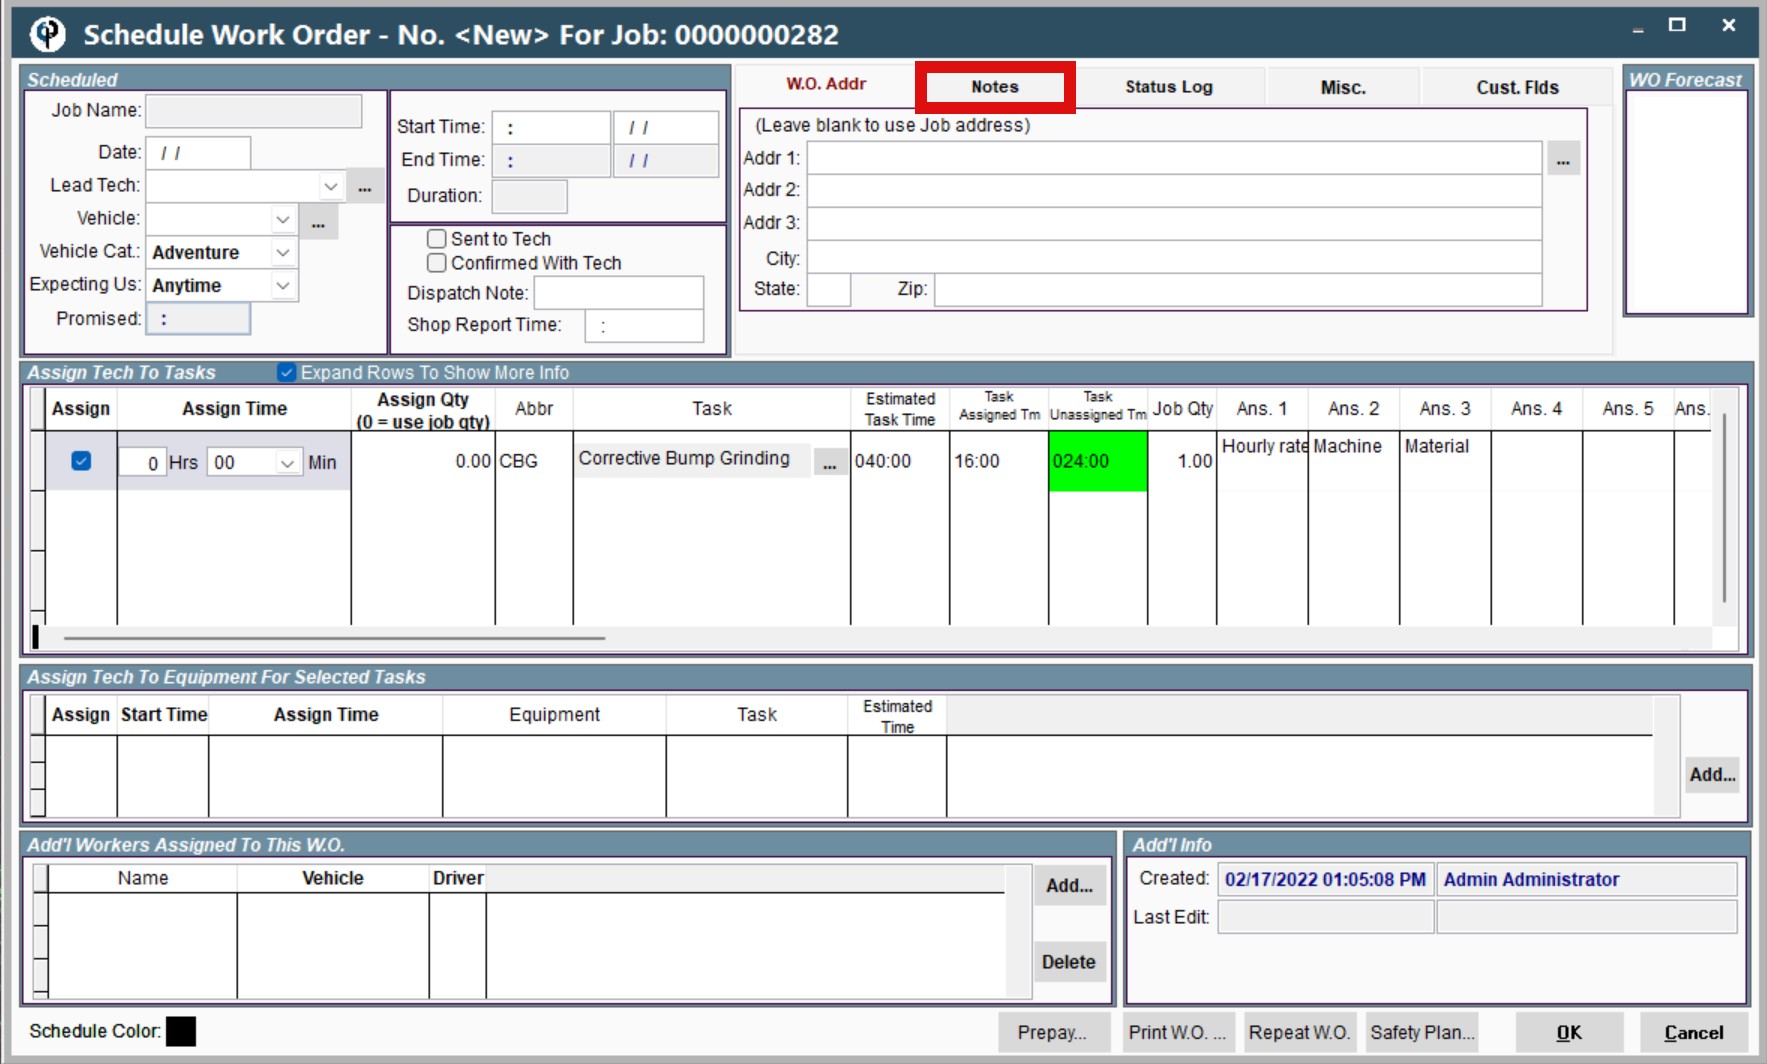
If you wish to add more notes that are specific for the individual day, then click the Notes tab at the top right hand of the Work Order screen and type in any notes that are needed for this particular day
The technicians will be able to see all notes directly associated with the tasks as well
Find Pre-Existing Work Order
The Work Order (WO) & Field Ticket (FT) Flow feature provides users with a comprehensive view of all work orders and field tickets within the system. Here's a breakdown of its functionality:
Accessing WO & FT Flow: Simply click on the "WO & FT Flow" option within the Home Page to access all existing work orders and field tickets.
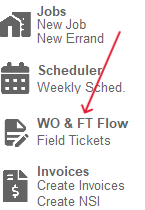
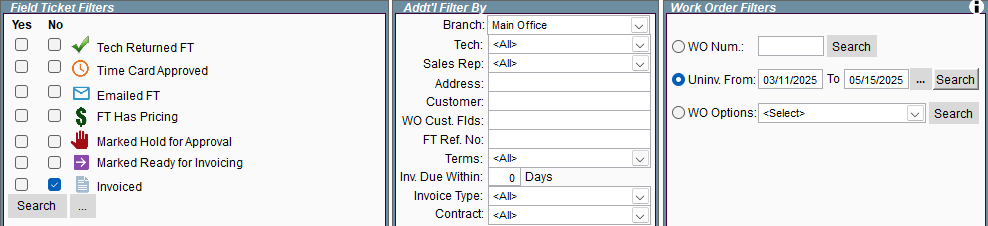
Detailed Filter Box: Positioned on the top of the page, this filter box offers more advanced filtering options for precise searches.
Additional Actions: Simply click on a work order and then click one of the buttons on the right-hand side of the window:
Open FT: Opens the selected field ticket for detailed viewing and editing.
View All FT For Job: Opens a window displaying all field tickets associated with the job.
Open WO: Allows users to access and manage the details of the chosen work order.
Open Job: If relevant, this option opens the associated job linked to the selected work order or field ticket.
View in Adv. Finder: This allows you to use advanced search settings on your chosen work order
Open Quote: If applicable, users can navigate to the associated quote related to the selected item.
Delete: Permanently deletes the selected work order.
.png)
Repeat Work Order on Desktop
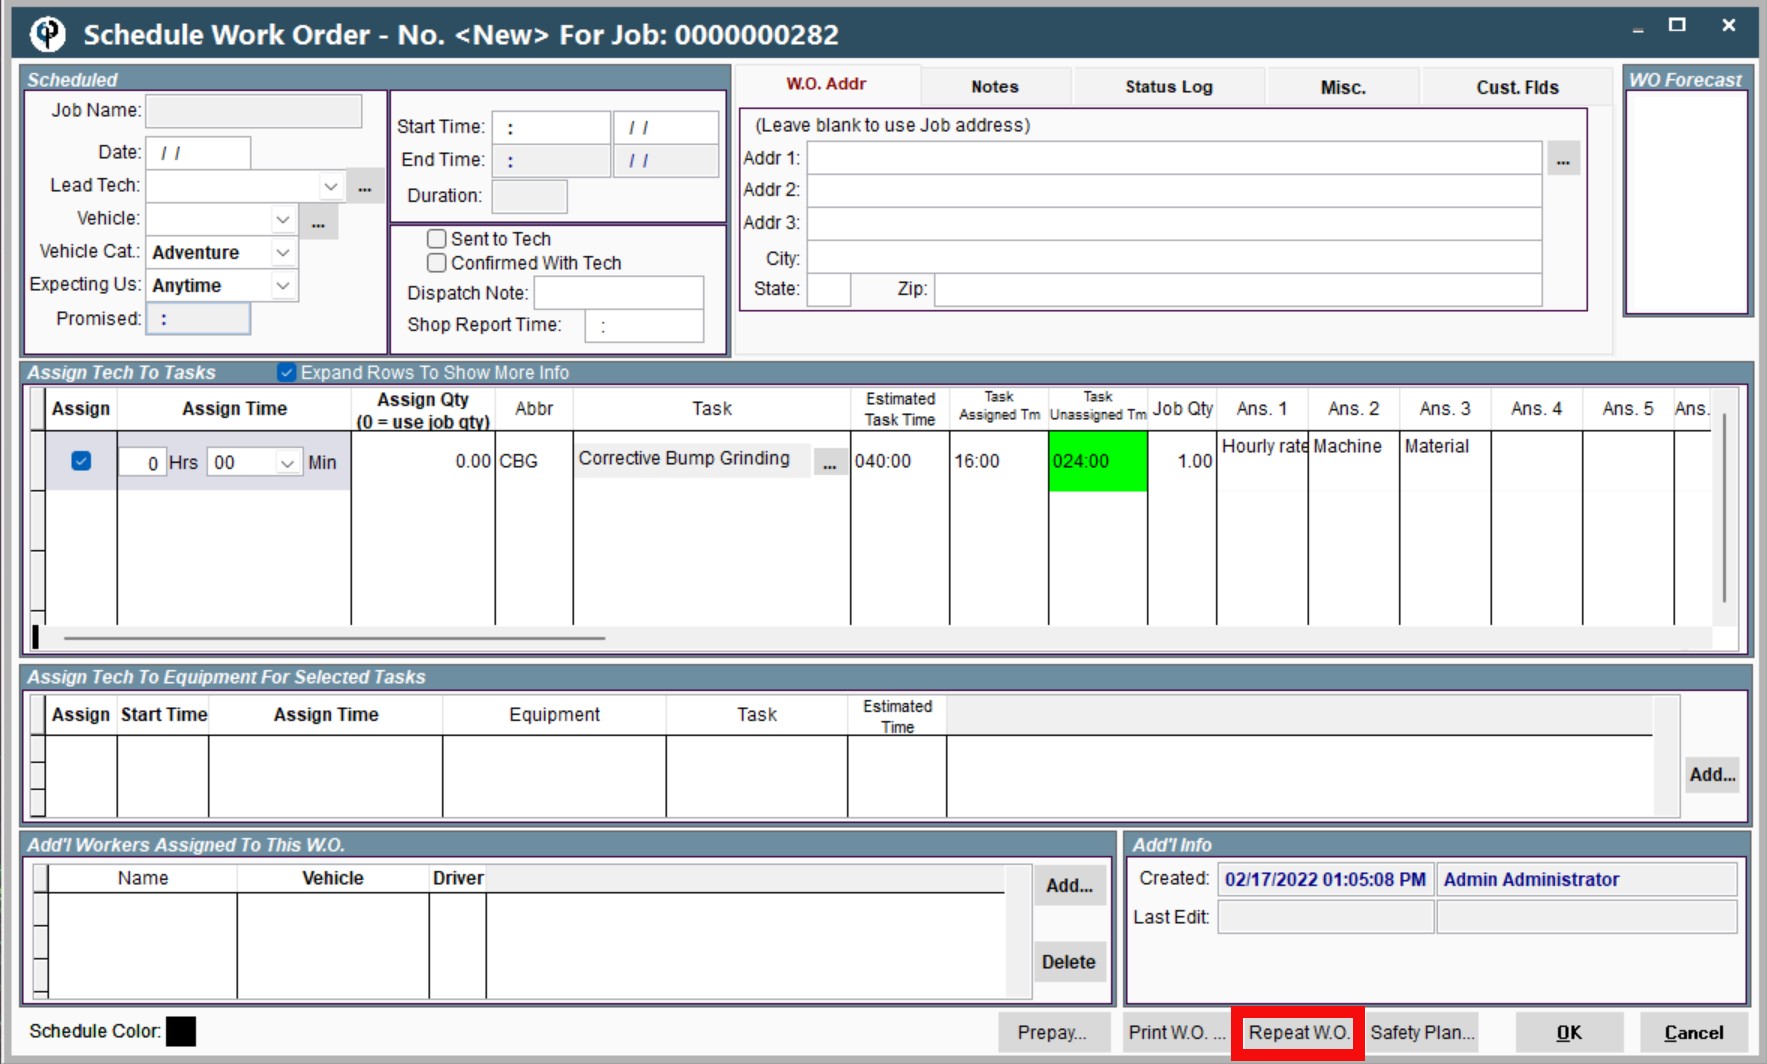
There is a button at the bottom of the Work Order screen > Repeat W.O
(See **NOTE below for more information)
**If you need additional help on how to repeat a Work Order, we have an additional video(s) and articles that cover that specific topic. To access that information, please click the following link: https://help.cenpoint.com/docs/repeat-wo
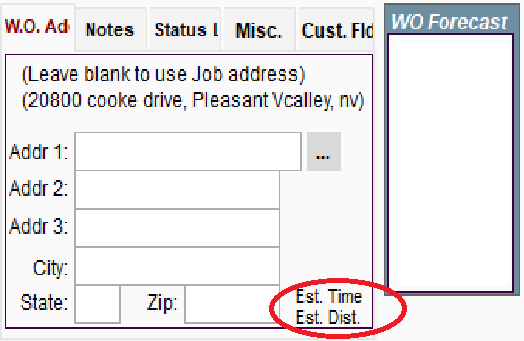
New Feature:
The distance from the branch to the address on the Work Order is displayed next to the Work Order address.
Field Tickets and Work Orders cannot be retrieved once deleted!
If you still have questions feel free to contact us!
Email: support@cenpoint.com
Phone: 801-478-6822
Work Order Overview on Portal
Keep in mind that 1 Work Order = The scheduled 1 Day of work.
A Field Ticket = what a worker actually did for the Work Order.
Create a New Work Order on Portal
There are many ways to create a new work order. The first way is to do so as you are making a new job.
There are many ways to create a new work order
One of the ways is to create a new job
Select one of the following ways to create your new job:
SS Quick Add
This allows you to make 1 Work Order and 1 task.
Quick Add Mode
This allows you to make 1 Work order and 1 task
Job View Mode
This allows you to make Several Work Orders and Several Tasks.
Here are links to more information on the different ways to add a job.
Quick Add Job Screen: https://help.cenpoint.com/docs/quick-add-job-screen
SS Quick Add: https://help.cenpoint.com/docs/ss-quick-add-1
Full Job Screen: https://help.cenpoint.com/docs/full-job-screen?highlight=full%20job%20s
Click on New Job and select your customer.
This will bring you to the same place that Modify a Job will.
.png)
Modify An Existing Job on Portal
Go to Jobs → Find the desired Job → Click on the Ellipsis (the three dots) → select Modify
.png)
Go to the “What and When” tab. The list of Work Orders will be the bottom table.
Click the Add button to add another work order to your job.
.png)
Fill out the New Work Order Page on Portal
Fill out the following boxes on the designated work order page appropriately
.png)
Scheduled Date
Lead technician on the job
to add a tech that is not on the "Lead Tech" drop-down menu, click the (...) button, and click "Select a tech not in list."
Vehicle
To add more vehicles, look at the “Add Additional Workers” step (below)
Expecting Us
This automatically pops-up with the information that you have previously filled out when initially creating the job
Promised
This automatically pops-up with the information that you have previously filled out when initially creating the job
Start time
This is the time that the job is intended to begin
Will automatically pop-up with the time stated in the initial job order OR can be adjusting depending on your individual needs
End time
IF YOU CANNOT TYPE INTO THE "END TIME" FIELD, that means that the system has calculated the end time for you
TO ADJUST THE END TIME refer to the middle section (Assign Tech to Tasks) of the Work Order screen and refer to the column that says Assign
Click on the jobs that you plan to do on this particular day. Once you have selected the jobs, the estimated time for each job will appear in the next column.
To change the End Time of the Work Order, just adjust the estimated times in the Assign Times column
Sent to Tech
This marks that you have sent this work order to the Tech
Confirmed with Tech
This marks that you’ve confirmed with the technician that this work order will be done.
Report to Shop
This is a note to leave for the technicians assigned to this Work Order in order to remind them of the time that they need to be at the shop preparing for the designated job
Can be earlier than the promised Start time if needed
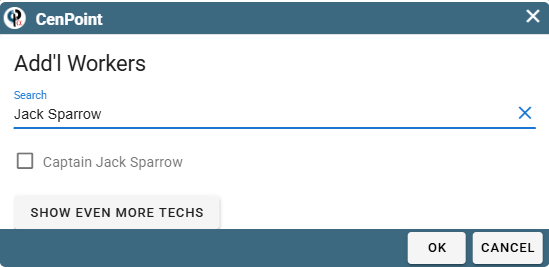
Add Additional Workers (if needed) on Portal
.png)
To Add People:
Click the Add and find your tech, select them, and click OK.
To add vehicles: The vehicle for all of the additional techs will default to the same vehicle as the Lead technician.
If you need to add more vehicles, then click on the vehicle column next to each name of the technicians in that bottom section of the Work Order page and assign your vehicle of choice for each technician.
Any technician with a blank space under their vehicle column will ride in the same vehicle as the Lead technician
Add Notes for the Technicians
.png)
If you wish to add notes that are specific for the individual day, click the Notes tab at the top right hand of the Work Order screen and type in any notes that are needed.
The technicians will be able to see all notes directly associated with the tasks as well.
Repeat Work Order on Portal
.png)
To schedule repeating work orders, click the red circled button that says “Repeat W.O.” and follow the steps from there.
If you would like additional information on how to repeat a Work order, please click the following link.
Repeating Work Order: https://help.cenpoint.com/docs/repeat-wo
Find a Pre-Existing Work Order on Portal
Select WO & FT Flow. This will open up a Finder for Work Orders and their corresponding Field Tickets
.png)
Accessing WO & FT Flow: Simply click on the "WO & FT Flow" option within the Home Page to access all existing work orders and field tickets.
Search Bar: Located at the top of the page, users can input keywords to quickly find specific work orders or field tickets.
Detailed Filter Box: Positioned on the right side of the page, this filter box offers more advanced filtering options for precise searches.
Additional Actions via Ellipsis (Three Dots): Clicking on the ellipsis icon associated with each work order or field ticket opens a menu with various options:
Open FT: Opens the selected field ticket for detailed viewing and editing.
View All FT For Job: see a list of all of the field tickets attatched to that job
Open Work Order: Allows users to access and manage the details of the chosen work order.
Send To:
Open Job: If relevant, this option opens the associated job linked to the selected work order or field ticket.
Open Quote: If applicable, users can navigate to the associated quote related to the selected item.
Delete FT: Permanently removes the selected field ticket from the system.
Delete WO: Similar to deleting a field ticket, this option deletes the chosen work order.
From there you can edit, create, and delete work orders and field tickets.
Please remember that Field Tickets and Work Orders cannot be retrieved once deleted!
-----------------------------------------------------------------------------------------------------------------------------------
Now you should be ready to go! If you still have questions then please feel welcome to contact us!
Phone: 801-478-6822 Opt. 4
Email: support@cenpoint.com
-----------------------------------------------------------------------------------------------------------------------------------