
Here are some of the key points this article covers:
- Setting Up Inspections on Desktop and Portal
- Inspections on the Mobile App
- Job Safety Analysis (JSA)
- Authorization to Proceed
- Safety Plan
- Previous Job Inspections
Inspection Overview
There are four types of inspections.
1. Pre-Trip/Vehicle Inspection
2. Equipment Inspection
3. Job Site Inspection
4. Outside Equipment Inspection
The below definitions include screenshots from the Technician's view of these inspections.
Pre-Trip/ Vehicle Inspection
A vehicle inspection or Pre-Trip inspection will show up on the technician schedule screen when they log in for the day.
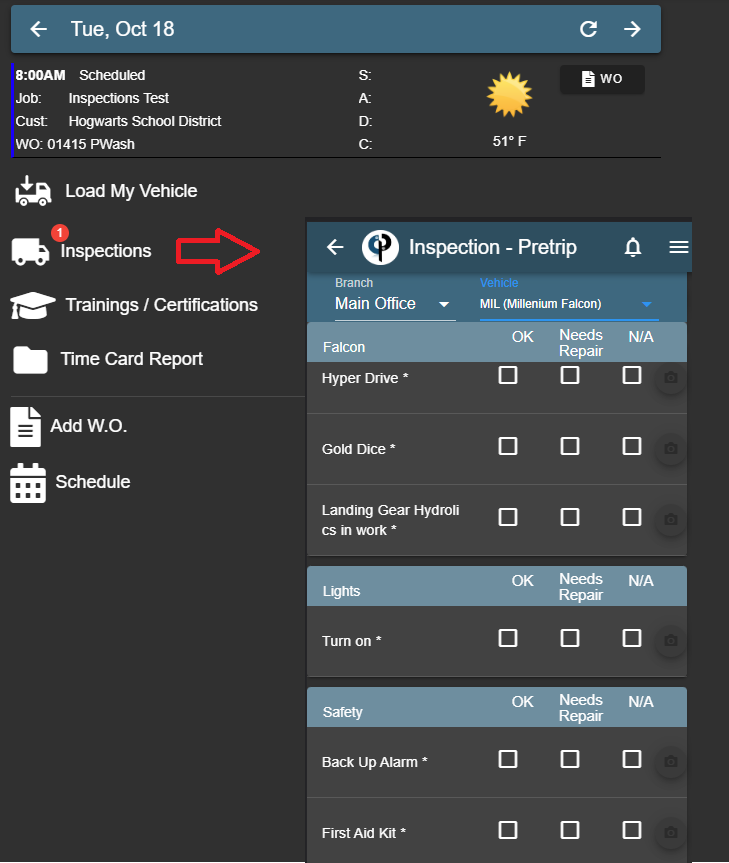
Equipment Inspection
An equipment inspection will show up on the technician schedule screen
under Load My Vehicle if Equipment is assigned to the job.
.png)
Job Site Inspection
A Job Site inspection or JSA will show up on the Work Order screen
after the technician has clicked Arrived.
.png)
If for some reason the JSA inspection is not seen, the tech can add it by clicking 'Add Inspection'
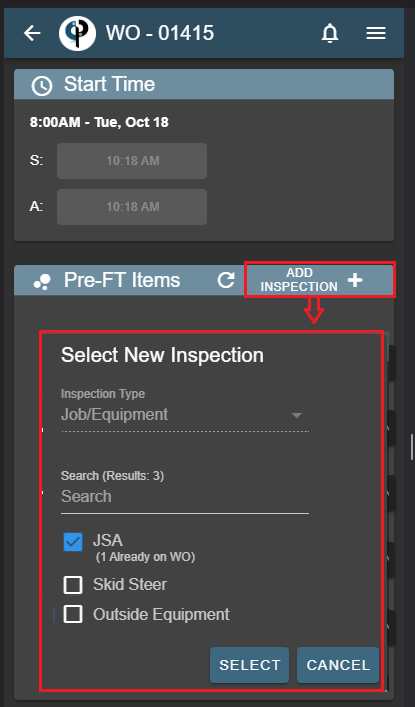
Outside Equipment Inspection:
This is an inspection of equipment that is being borrowed
outside of your company, like a scissor lift on the job site.
Outside Equipment inspections will show up under 'Add Inspections'
on the W/O after the technician has clicked Arrived.
.png)
Inspections on Portal
Set Up Inspections on Portal
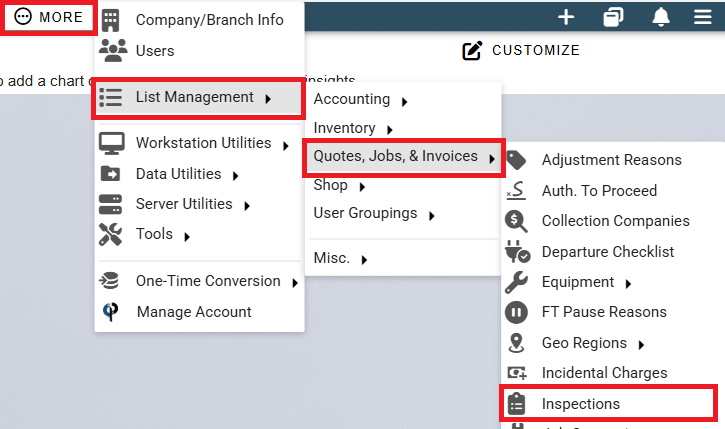
Set up inspections by going to More -> List Management -> Shop -> Inspections
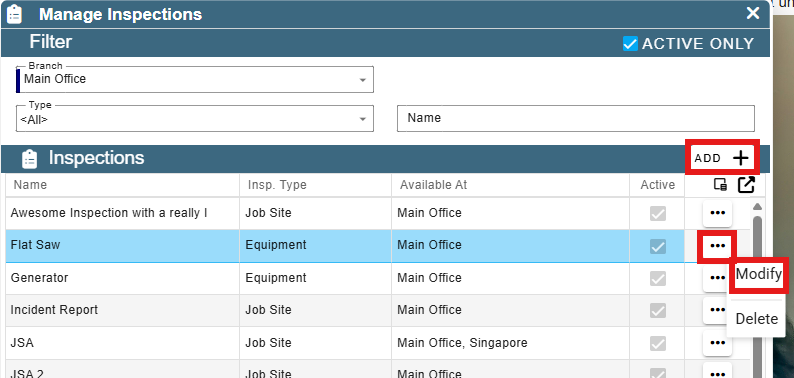
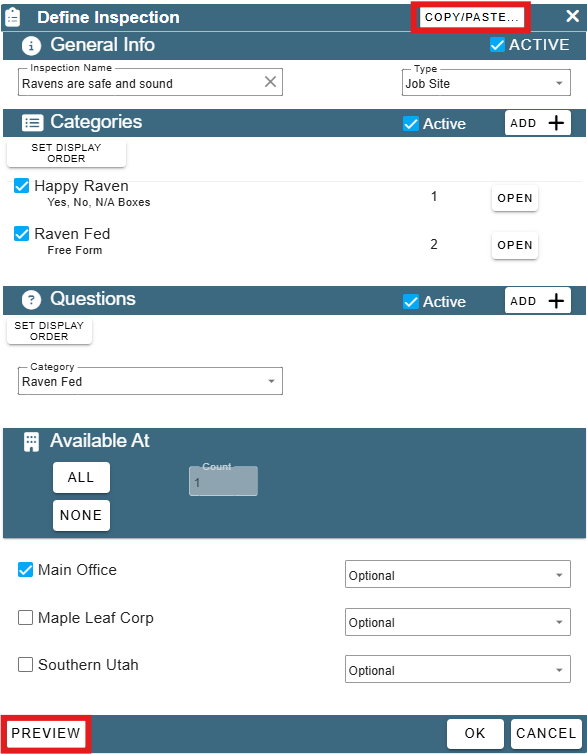
Click 'Add' to create an Inspection.
Select an Inspection and click the Ellipsis -> Modify to edit it.
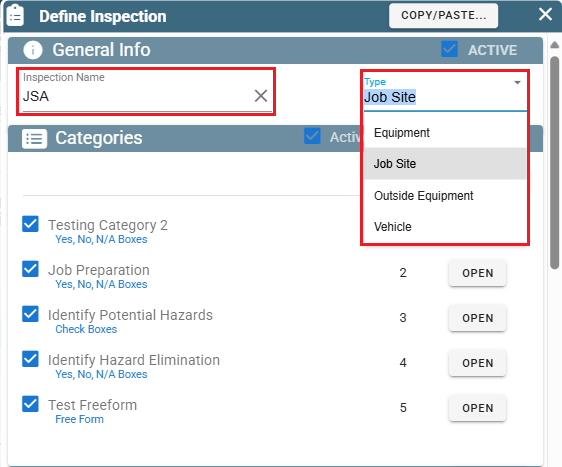
Name the Inspection, you are limited to 34 characters with the name, so be mindful with that. :)
Select the 'Type' for the inspection.
Type (Equipment, Job Site, Outside Equipment, Vehicle) will affect where the inspection is found on the Work Order or Field Ticket for the technician.
See the Inspection Overview for a brief explanation of what each one is and where they are found.
Define an Inspection Category by clicking add new. Edit a Category by clicking the 'Open' button to the right of the category.
Name the category then choose the answer type for all the questions that will be added under that category.
Some examples of categories could be brakes, engine, tires, etc...
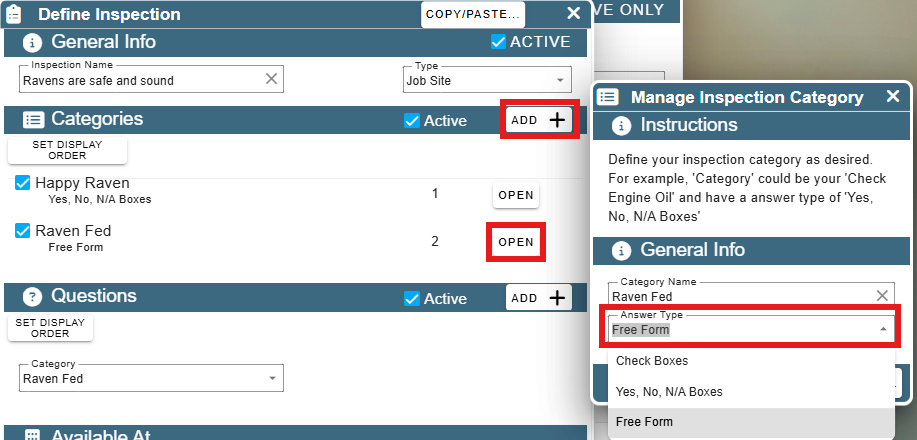
Once your category is defined you can now add questions to that category.
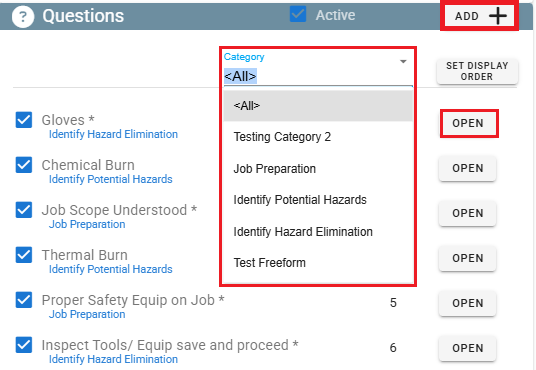
Select the category that the questions will go under. Then click 'Add' to create a question or click 'Open' to edit an existing question.
Note: Clicking on the name of a Question will mark it as "inactive" and it will disappear from the list.
To find a question that has been marked as "inactive" simply uncheck the 'Active' box on the upper right-hand of the Questions Table.
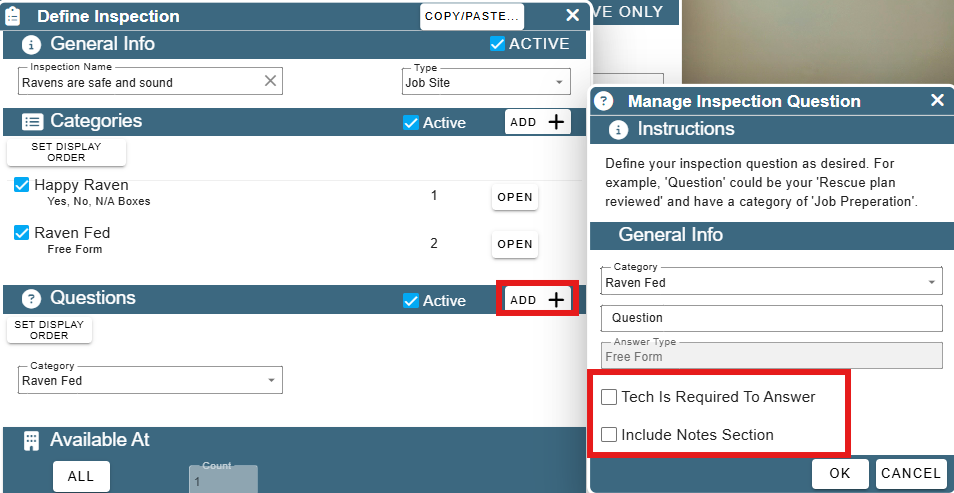
Add questions for this category, check the boxes if the technician is required to answer,
and mark if you want a notes section included for that question.
Each Question has a Category, Question, and Answer Type.
Note: The 'Free Form' Answer Type gives you about 120 characters. If you need more answer space for a question, check the box named 'Include Notes Section'. Once the tech answers the question the tech can input as many comments as they'd like in the Notes section.
Now that you have the categories and questions set up click 'Preview' to launch the browser to view the inspection.
* Use the Copy/Paste feature for setting up multiple inspections.
Example of what Preview may look like:
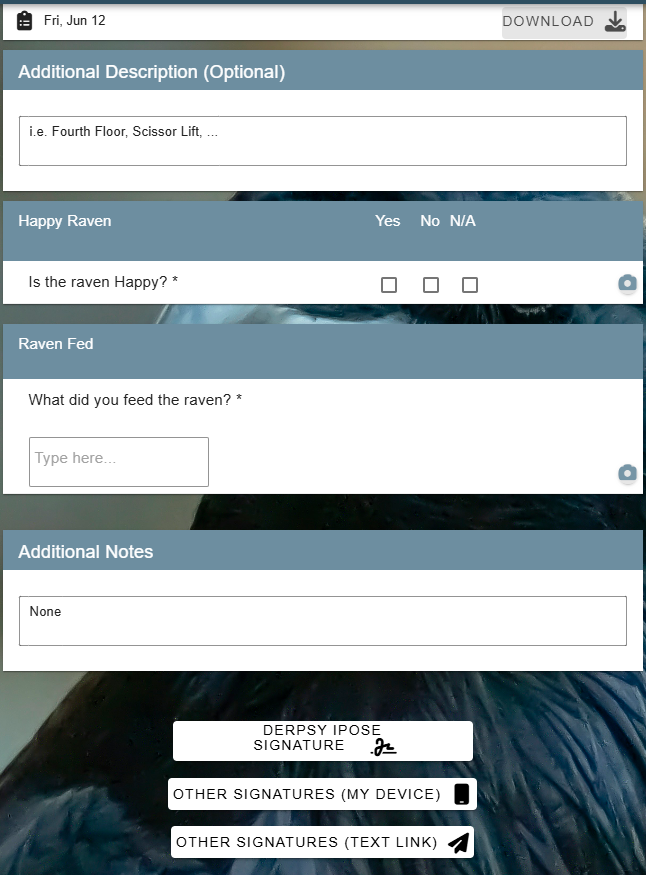
NOTE: The Additional Description is not removable. It is useful if you have multiple jobs at the same location and you need to make sure your techs were in the right place or doing the right thing.
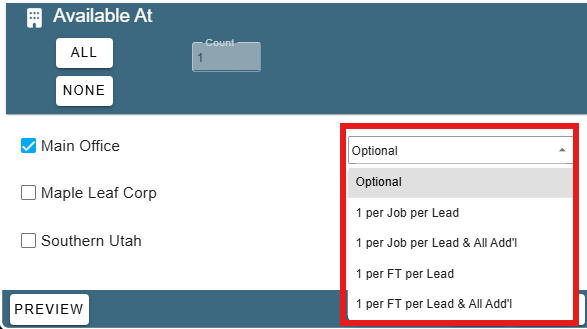
Check the 'Available At' section to define what branches this Inspection is available to.
Also select the required settings for this inspection.
(This can also be set under company/branch)
Require Pre-Trip Inspections Before Tech Can Open WO's on their Mobile app from Portal
Go to More -> Company/Branch Info
.png)
Double click on the desired branch or click on the Ellipsis -> Modify
.png)
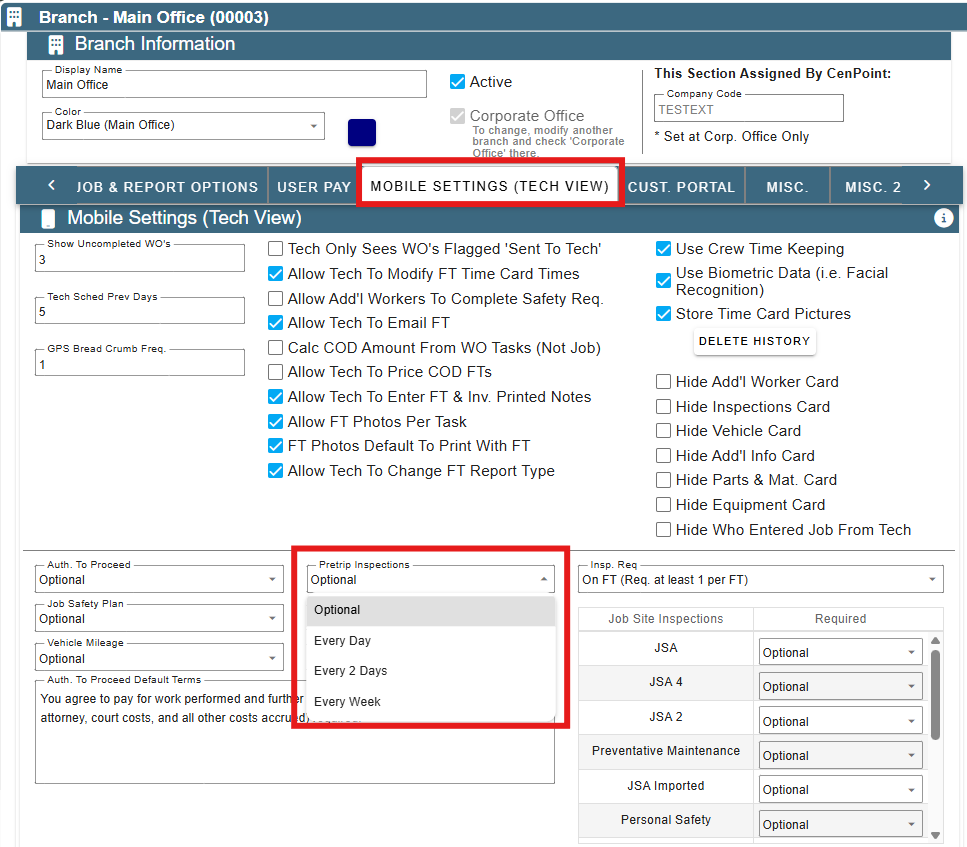
Go to the Mobile Settings (Tech View) tab and select how frequently the pre-trip inspections will be required. If the pre-trip is not required, technicians will still have the option to fill it out.
Safety Plan
Open the Safety Plan and sign to indicate completion of the documents.
For more information, follow: Job Safety Plan: https://help.cenpoint.com/docs/safety-plan
Job Safety Analysis (JSA)
Job Safety Analysis: https://help.cenpoint.com/v1/docs/en/job-safety-analysis
Set Up the Frequency for Pre-trip and JSA Inspections
Go to More -> Company/Branch Info
.png)
Double click on the desired branch or click on the Ellipsis -> Modify
.png)
Go to the Mobile Settings (Tech View) tab.
Use the dropdowns to select the frequency of Pre-trip Inspections and Job Site Inspections.
The "Optional" option makes an inspection not required, but the tech can still fill one out if they so desire.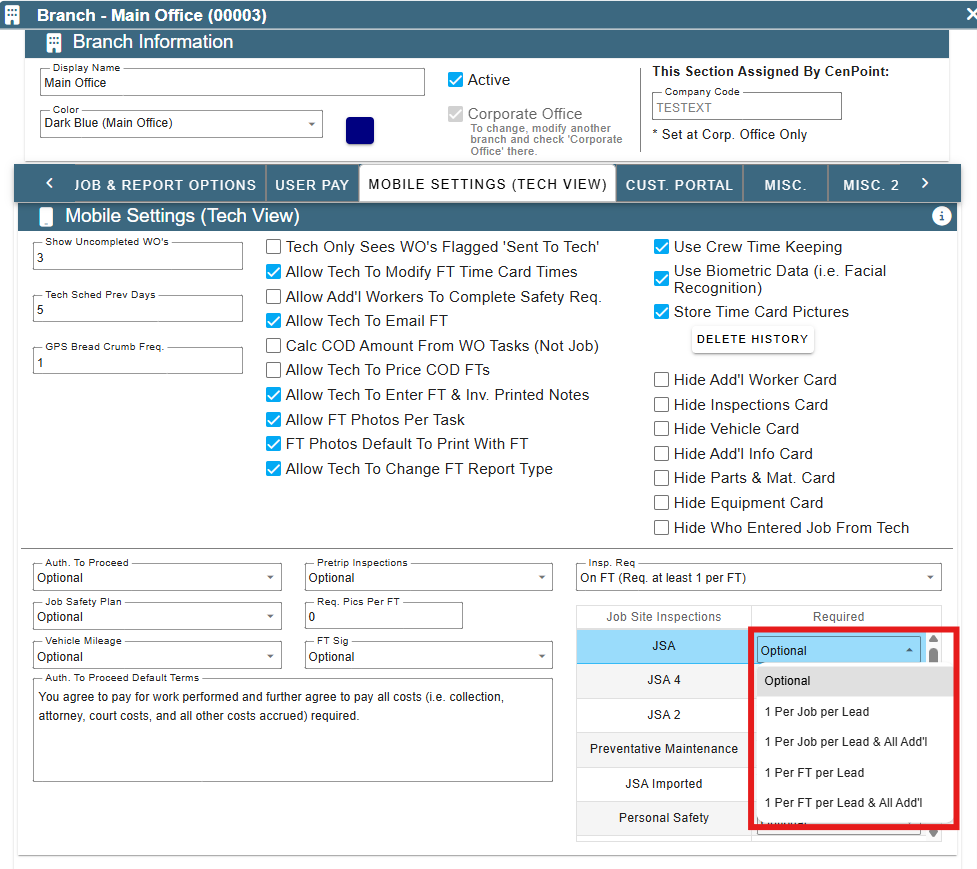
Inspection Reports
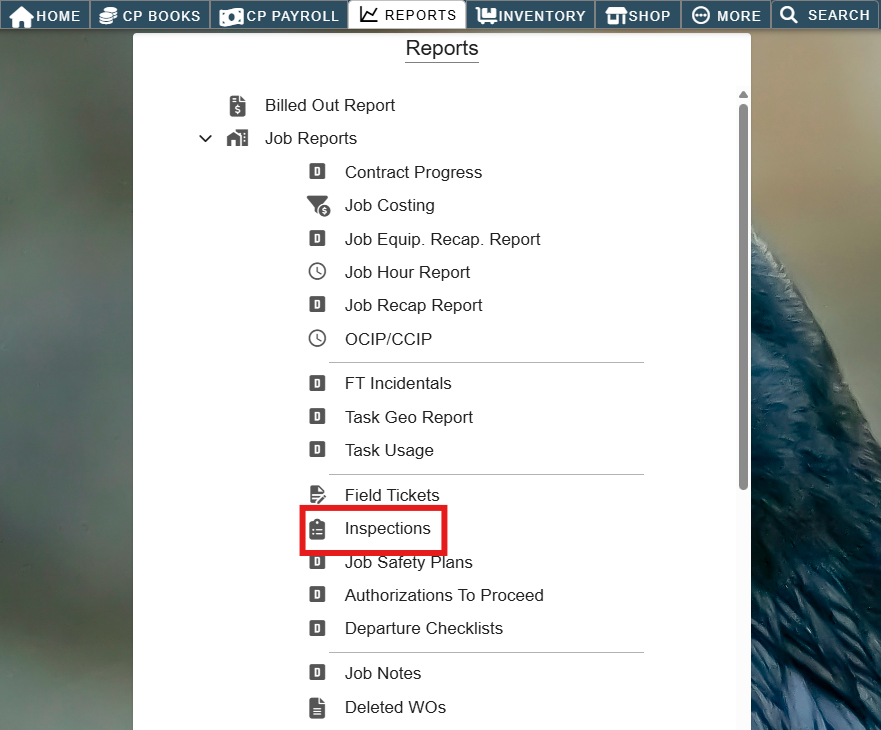
Go to Reports -> Job Reports -> Inspections
Use the filters like the date range, job, and customer to find an inspection.
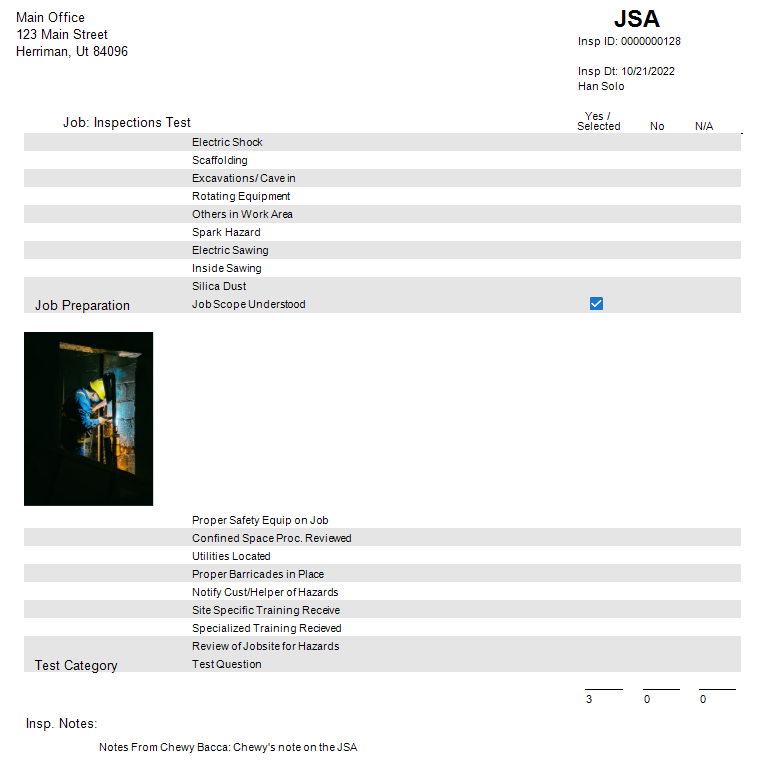
Click on the ellipsis next to your desired inspection and click 'View' to see the report of the inspection.
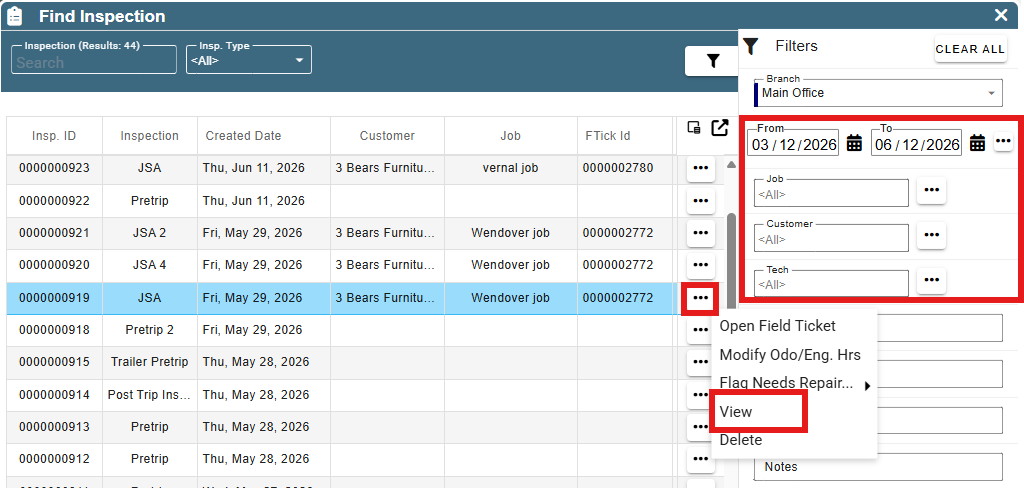
Any signatures, photos, or notes that were added will print on the report.

Authorizations to Proceed
Authorization to Proceed is where someone (usually the customer) signs a document giving permission for your technician(s) to commence work on a Job or Field Ticket.
They can also cover interesting cases like absolving the technicians from liability for things like hitting buried pipes.
See this link for further information on Authorizations to Proceed.
Previous Job Inspections
See this link for further information on how to view previous Job Inspections
Inspections on the Mobile App
Video for Mobile App Inspections: JSA, Safety Plan and Authorization to Proceed
The following examples will show where the inspection types
will be found on the Mobile App.
Equipment Inspection
An equipment inspection will show up on the technician schedule screen
under Load My Vehicle if Equipment is assigned to the job.
Job Site Inspection
A Job Site inspection or JSA will show up on the Work Order screen
after the technician has clicked Arrived.
If for some reason the JSA inspection is not seen, the tech can add it by clicking 'Add Inspection'
Outside Equipment Inspection:
This is an inspection of equipment that is being borrowed
outside of your company, like a scissor lift on the job site.
Outside Equipment inspections will show up under 'Add Inspections'
on the W/O after the technician has clicked Arrived.
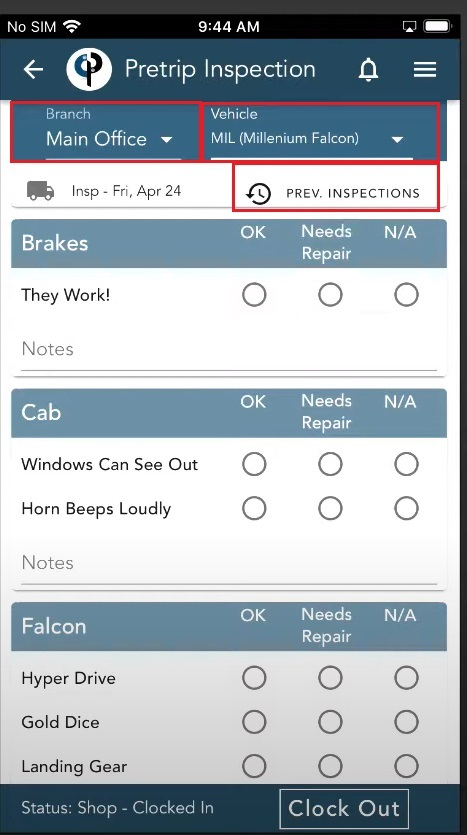
Mobile Pre-Trip Inspections
First, you will look at the time when you need to be at the shop, then you clock in on the mobile app choosing the shop from the drop-down list. The first thing is to do the pre-trip for work order.
Click on Pre-trip Inspections -> Enter Pre-trip -> Choose the branch from the drop-down list -> Choose the vehicle -> Do all the check marks for the inspection -> Put odometer reading -> Signature -> Submit.
*You can also see the previous inspections and download it.
Here is more information on Pretrip Inspections: Pretrip Inspection Video
How to Complete an inspection:
Technicians will see their required inspections
or already completed inspections on the Work Order screen.
Technicians also have the ability to 'Add' an Inspection.
.png)
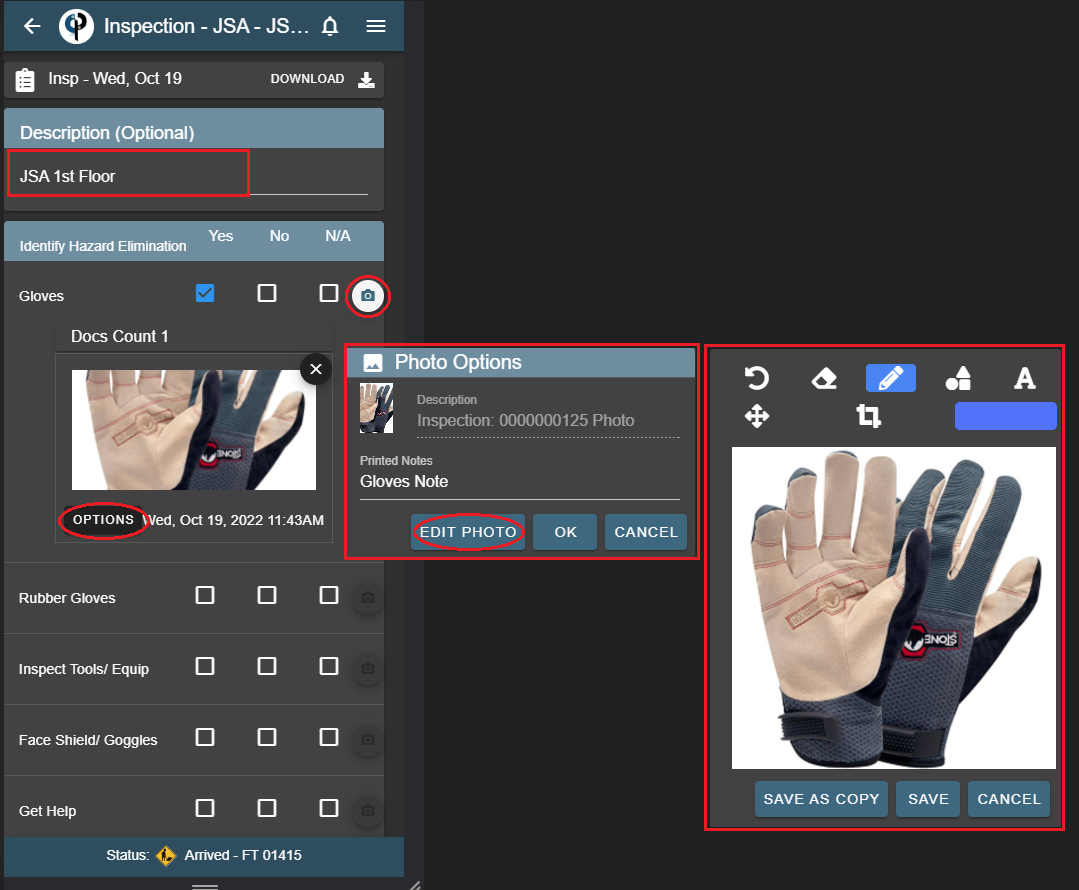
'Open' inspection
Add a description to the Inspection if desired.
Once a question has been answered, a photo can be added,
a note for the photo, and edit options are available.
Once an inspection is signed by anyone (lead, addtl. tech, site contact)
it becomes read only, for everyone including those who still need to sign.
If there is a discrepancy on the inspection for another person who needs to sign it,
they can add their own notes and pictures to answered questions to resolve the discrepancy. (or 'Add' another inspection)
*When in Offline mode there will be an inspection for each instance it is signed.
(It will not become read only for other users because of Offline circumstances)

Signature section of the JSA and Outside Equipment allow for multiple signatures.
Technicians can collect multiple signatures either on 'My Device' or 'Text Link'.
Additional Technicians are listed if they are on the Work Order,
(If additional techs are using the CenPoint app they will see their inspections,
they need to sign and can complete the inspection on their own device.)
Click 'Add' to add a new Customer/Other signature.
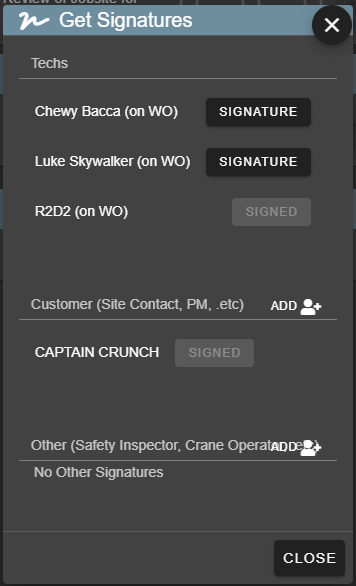
'My Device' allows tech to collect a signature on their phone/tablet.
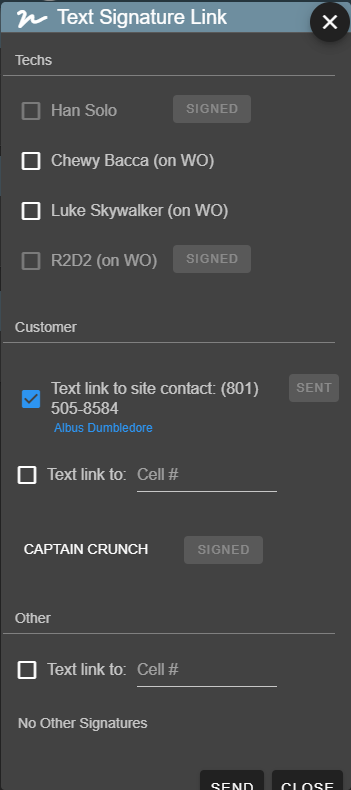
'Text Link' allows the tech to send a text to collect a signature.
The Field Ticket inspection section shows the inspections
that technician has signed, 'My Signed Inspections'.
'Others Inspections' are listed and are inspections
that may have been completed by other technicians on the Work Order.
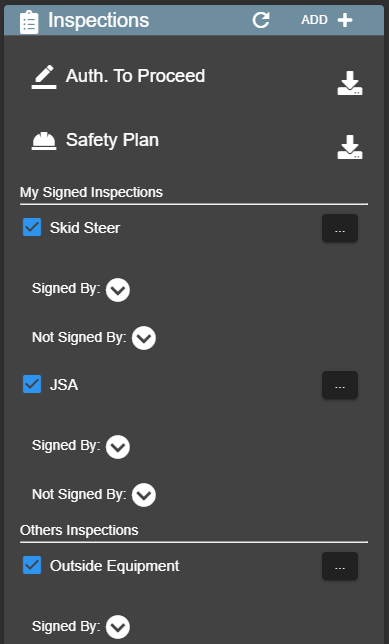
Use the arrows to expand and collapse the Signed/Not Signed By section.
Only a lead technician can see who has not signed an inspection,
as they would be in charge of verifying all signatures have been collected.
Use the ellipsis to open or download the inspection.
.png)
Authorization to Proceed and JSA
Once you have clicked "Arrived", the pre Field Ticket section will become accessible including authorization to proceed, JSA, safety plan and field ticket. If your company requires them, they must be completed before the field ticket can be accessible
There are 2 sections for Authorization to Proceed: Costumer and Technician. Start with filling out JSA. If you want to add a note, either type those in or click the three dots at the top right
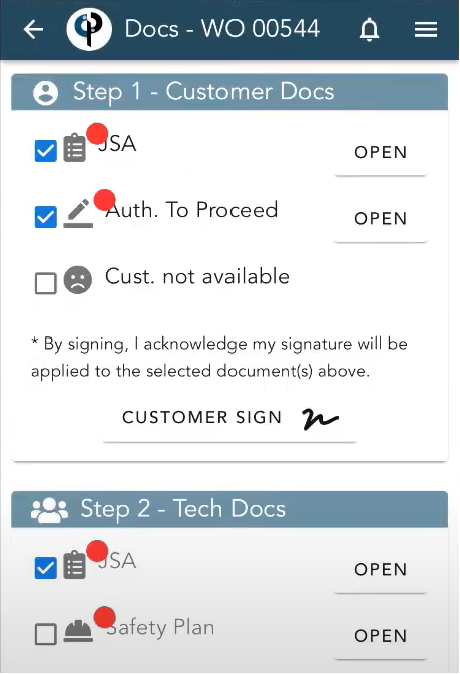 Since both documents are marked with a blue check mark, the customer will be signing for both documents with one signature.