
This article covers the "Add'l Info" tab and is broken into the following parts.
1. Billing
2. Misc.
3. Fuel Surcharge
4. Interest Rate
5. Identifying No's
6. Taxes
7. Required Trainings / Certifications
8. Part Use Type
Add’l Info Tab on Desktop
.png)
1. Billing Section Under Additional Info
Choose the Invoice Type, Default, Standard, Detailed, Quote as Detailed Invoice or if your company has a Custom Invoice.
Header and Footer allows you to add additional attachments/documents from your computer.
What day of the month the Invoice is due. Filter by invoice due, using the 'Work Order/Field Ticket Flow','Find Field Ticket, or 'Create Invoice' screens. This helps you find the soonest due date to stay on top of pricing field tickets and invoicing.
What Type of Statement, Per Customer, This Job Only, or This Job +Linked Jobs
Choose the terms. The terms will default to what the default terms that are on the customer. If you change the terms for a specific job it only changes for that job.
Retention Percentage
Choose if you want retention to print on the invoices by checking the box.
If there is AIA Billing on this job, check the box.
AIA increase previous payments and choose the amount, or leave at 0.00 to use CenPoint Payments.
.png)
2. Misc.
Created date and who created the job and if the Job is an "Out of Town Job".
.png)
Out of town jobs are setup under File → Company/Branch Information → double clicking your branch or select it and click “Modify” → Go to the “User Pay” tab.
.png)
Set up the "Out of Town Jobs" criteria. If you include a mileage radius in your set up, the box under Misc. on the Job will be checked when the address on the job is Geo coded and falls outside the mileage radius.
The out of town pay and per diem would then be applied to this job, and included in job cost reporting. If the box is checked on the job, and it is not an out of town job, please uncheck the box.
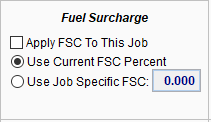
3.Fuel Surcharge
On the job you can select to "Apply Fuel Surcharge", then choose either "Use Current Fuel Surcharge" or "Use a Job Specific Fuel Surcharge"
To set up the Fuel Surcharge go to File → Company/Branch Information → Select your branch Branch and click “Modify” → go to the “Misc.” tab
.png)
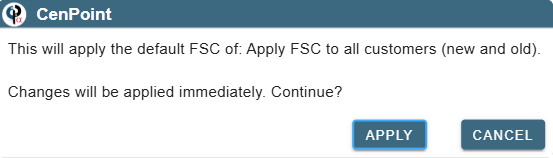
Select the default FSC settings for new customers from the dropdown. Click the “Apply to All” button to apply this default to all existing customers as well.
.png)
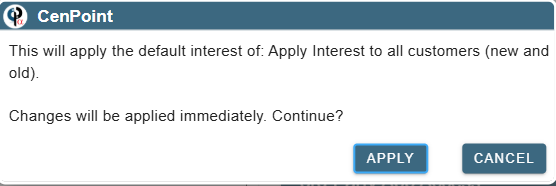
Upon clicking “Apply All” this warning will appear.
Then set up Fuel Surcharges by clicking "Add" or click on "Ellipsis → Modify" to edit an existing record.
.png)
FSC: Calculate your Fuel Surcharge as what percentage of the invoice/task price
Taxable: Selects whether this fee needs to be accounted for with taxes
Tax Type: Use this dropdown (if applicable) to select what type of tax this fee would fall under
If you need the FSC to calculate as milage instead of a percentage you would set FSC up as a task and use Formula Pricing for distance.
Here is more info on formula pricing: https://help.cenpoint.com/docs/formula-pricing
4. Interest Rate
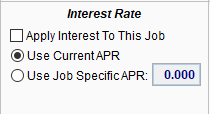
On the job you can select to "Apply Interest", then choose either "Use Current APR" or "Use a Job Specific APR"
 To set up the Interest Rate go to File → Company/Branch Information → Select your Branch and click “modify” → go to the “Misc.” tab.
.png)
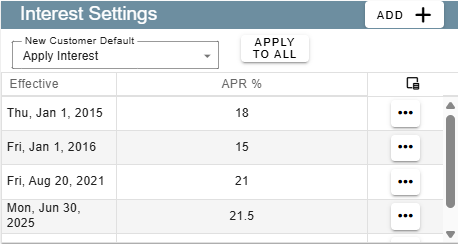
Then choose to apply or not apply to New Customers upon creation, or you can apply the default to all using the "Apply to All" button.
Upon clicking “Apply to All” a warning will appear asking you to confirm your choice:
Then set up Interest charges by clicking "Add" or edit an existing one by clicking on the ellipsis → "Modify"
.png)
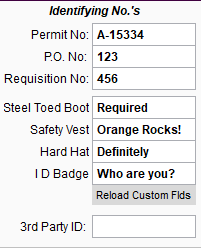
5. Identifying Numbers
Enter a Permit, P.O.or Requisition Number, under requisition number you can add up to 4 customized fields. For more information on how to set or edit custom fields, please see this link: Custom Fields
For more on P.O.'s follow these links
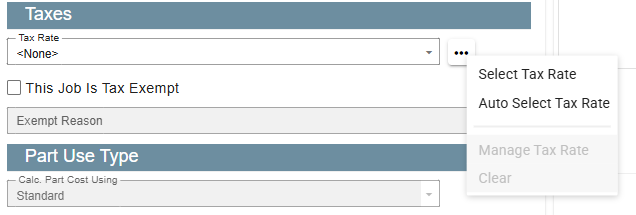
6. Taxes
On the Job select the tax rate and/or mark the job as tax exempt.
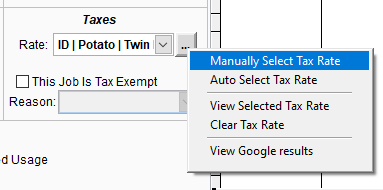
Follow the links for more information on taxes
7. Required Training and Certification
Add a training or job specific certification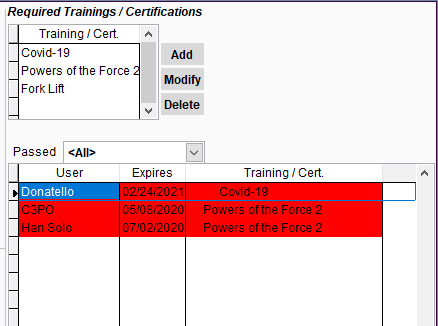
Follow the link below to learn how to set up trainings and certifications.
Set up trainings and certifications
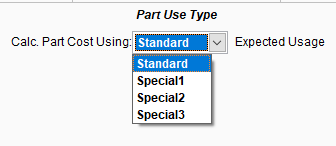
8. Parts Use Type
Select your Parts Use Type
To Set up Parts Use Type go to File → Company/Branch Information → Select your branch and click “ Modify” → Go to the “Misc 2” tab. The fields you’re looking for will be in the “Inventory Options” group.
.png)
Follow the link below for more information on Inventory
Add’l Info Tab on Portal
1. Billing Section Under Additional Info
Choose the Invoice Type, Default, Standard, Detailed, Quote as Detailed Invoice or if your company has a Custom Invoice.
Header and Footer allows you to add additional attachments/documents from your computer.
What day of the month the Invoice is due. Filter by invoice due, using the 'Work Order/Field Ticket Flow','Find Field Ticket, or 'Create Invoice' screens. This helps you find the soonest due date to stay on top of pricing field tickets and invoicing.
What Type of Statement, Per Customer, This Job Only, or This Job +Linked Jobs
Choose the terms. The terms will default to what the default terms that are on the customer. If you change the terms for a specific job it only changes for that job.
Retention Percentage
Choose if you want retention to print on the invoices by checking the box.
If there is AIA Billing on this job, check the box.
AIA increase previous payments and choose the amount, or leave at 0.00 to use CenPoint Payments.
.png)
2. Misc.
The “Misc” section has the created date, who created the job, and marks if the Job is an "Out of Town Job".
.png)
You can define what constitutes an out of town job and what kind of pay differences take effect by going to the branch settings.
Go to More→ Company/Branch Info → Select your desired branch and click the Ellipsis → Modify → Go to the User Pay tab.
Set up the "Out of Town Jobs" criteria. If you include a mileage radius in your set up, the box under Misc. on the Job will be checked when the address on the job is Geo coded and falls outside the mileage radius.
The out of town pay and per diem would then be applied to this job, and included in job cost reporting. If the box is checked on the job, and it is not an out of town job, please uncheck the box.
3. Fuel Surcharge
On the job you can select to "Apply Fuel Surcharge", then choose either "Use Current Fuel Surcharge" or "Use a Job Specific Fuel Surcharge"
.png)
To edit the rates of Fuel Surcharge, go to the Branch settings by giong to More → Company/Branch Information → Find your desired branch and click the Ellipsis→Modify, and then go to the Misc. Tab.
Select the default FSC settings for new customers from the dropdown. Click the “Apply to All” button to apply this default to all existing customers as well.
Upon clicking “Apply All” this warning will appear.
Then set up Fuel Surcharges by clicking "Add" or click on "Ellipsis → Modify" to edit an existing record.
4. Interest Rate
On the job you can select to "Apply Interest", then choose either "Use Current APR" or "Use a Job Specific APR"
.png)
Set up the Interest Rate by going to “Company Branch Information → Select your branch and click on the Ellipsis→Modify, and then go to the “Misc.” Tab.
Then choose to apply or not apply to New Customers upon creation, or you can apply the default to all using the "Apply to All" button.
Upon clicking “Apply to All” a warning will appear asking you to confirm your choice:
Then set up Interest charges by clicking "Add" or edit an existing one by clicking on the ellipsis → "Modify"
5. Identifying Numbers
Enter a Permit, P.O.or Requisition Number, under requisition number you can add up to 4 customized fields. For more information on how to set or edit custom fields, please see this link: Custom Fields
.png)
For more information on P.O.'s follow these links
6. Taxes
On the Job you can select the tax rate by clicking on the ellipsis or mark the job as tax exempt by checking the little box.
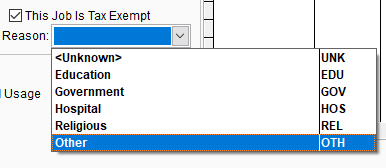
If you do mark the job as exempt, please use the dropdown menu to select a reason.
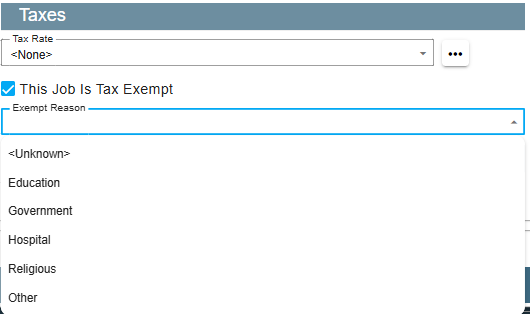
Please follow these links for more information on taxes
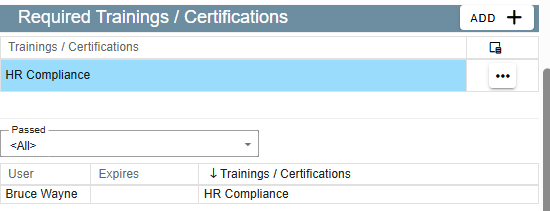
7. Required Training and Certification
If desired, you can add trainings that the technicians are required to complete before being able to work on this job.
Add a training by clicking the “Add in the upper right corner.
Technicians that have already passed the listed trainings/certifications will show up here.
Follow the link below to learn how to set up trainings and certifications.
Set up trainings and certifications
8. Parts Use Type
Use the dropdown menu to select your part use type.

To Set up Parts Use Type go to More → Company/Branch Information → Select your branch and click the Ellipsis → “ Modify” → Go to the “Misc 2” tab. The fields you’re looking for will be in the “Inventory Options” group.
Follow the link below for more information on Inventory