Entering a New Quote on Desktop Video
Before you can create a quote you will need to set up tasks. See the following link for more information: Setting Up Tasks
Customize the Lead Source drop down.
Create Predefined Notes.
Find Quote Screen on Desktop Video
Entering a New Quote on Portal Video
Additional Topics
Quotes on Desktop
Find Tasks on Desktop
To set up a quote you will attach tasks. A task is what your technicians would do on the jobsite. An example of a task would be “drilling holes” or “pouring concrete”.
This way your quote can be itemized based on the smaller tasks that make up the job.
For information on setting up tasks, please use the following link: Setting Up Tasks
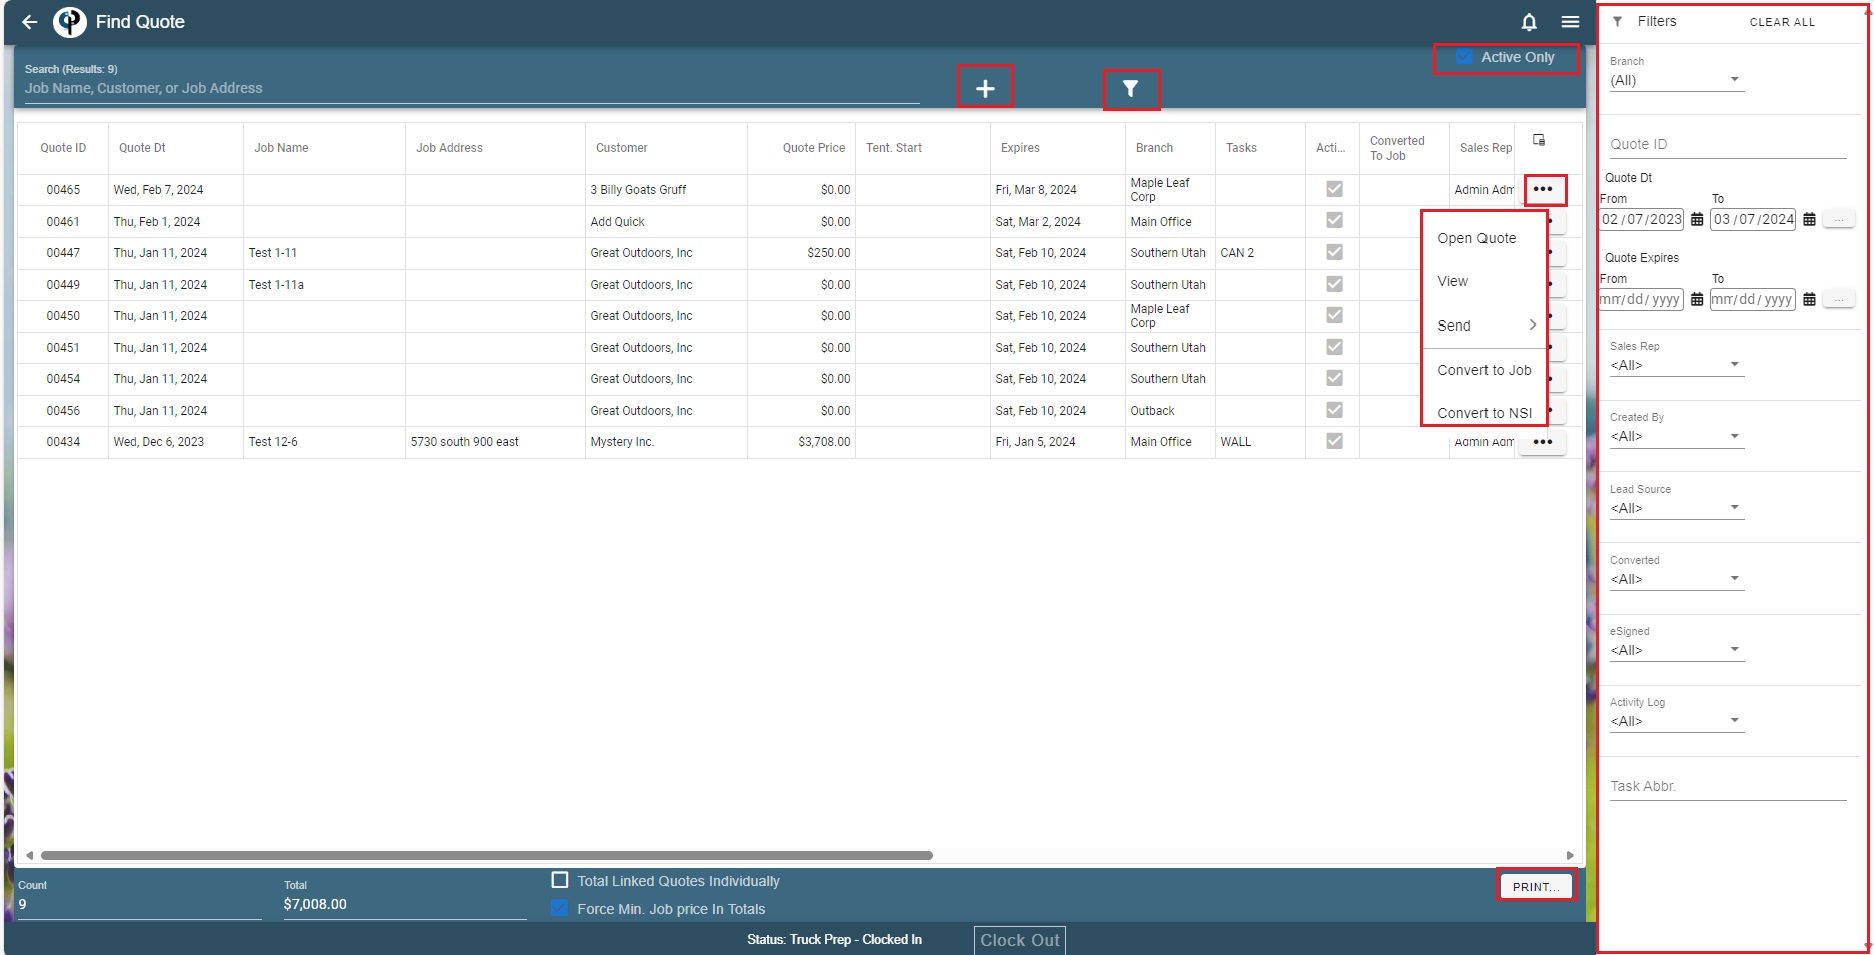
Find Pre-existing Quotes on Desktop
On the quote screen, you can filter your list by altering the fields on the top. Tip: Make sure that your date range is set how you want it.
If you're looking for only active quotes, click "Active Only" on the right top corner.
There is a print button at the bottom to print the list of all the Quotes.
To edit an existing quote, highlight it and click the ‘Modify’ button.
.png)
Create a New Quote on Desktop
Note: A Quote defaults to expire 30 days after the “Quote Date” You can manually adjust the date it expires when creating the quote.
There are two ways to create a new quote:
The first way is to click the phrase “New Quote” on the home screen:
.png)
The other way to create a new quote is to click on Quotes → Add New
.png)
Upon clicking the button to create a new quote, the ‘Find Customers’ screen will appear, allowing you to select the customer that this quote is for.
Double click on the desired customer or highlight them and click ‘Select’
.png)
You are now ready to fill out any necessary information about this quote.
Click ‘OK at the end to save your quote in CenPoint and to close the window.
See the below sections for more information on the Quote’s different fields.
.png)
Attach Tasks to a Quote on Desktop
On a Quote go to the ‘What’ tab and click ‘Add New’. To edit an existing task on a quote select it and click ‘Modify’ (Just below the ‘Add New’ button).
.png)
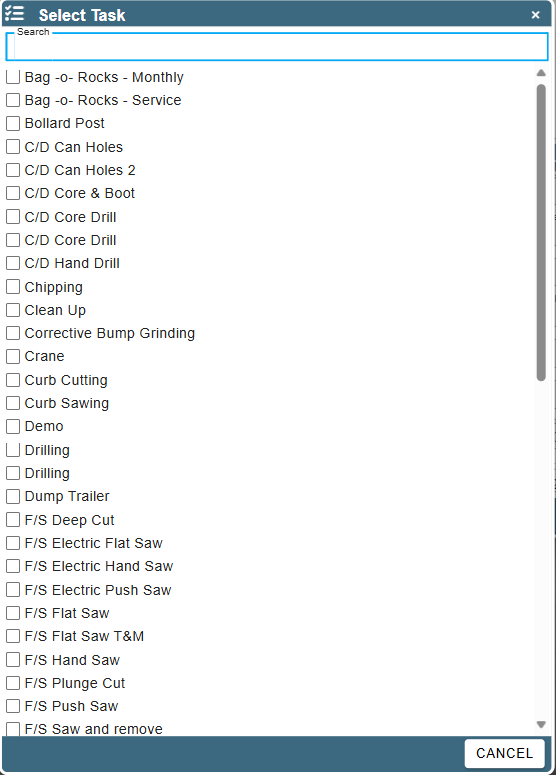
The “Manage Tasks” window will appear. Double Click on your desired task or highlight it and click “Select”.
.png)
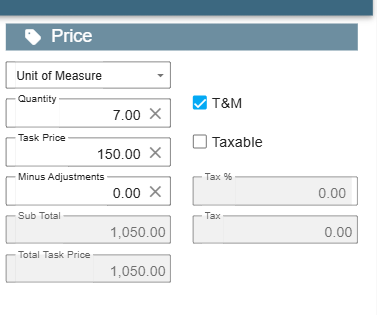
The Task window will appear.
Select the Quantity (How many times this task will be done. Example: We will be chipping in 3 locations.)
List the Price for performing the task. (The price will be multiplied against the Quantity. Example: I put the price as $200 and set the Quantity to 3. The total price will be 3 x $200 = $600)
Convert A Quote to a Job on Desktop
On the find Quote screen select the desired quote and click “Convert To Job”
You can choose to covert the quote to a Job or NSI (non service invoice).
.png)
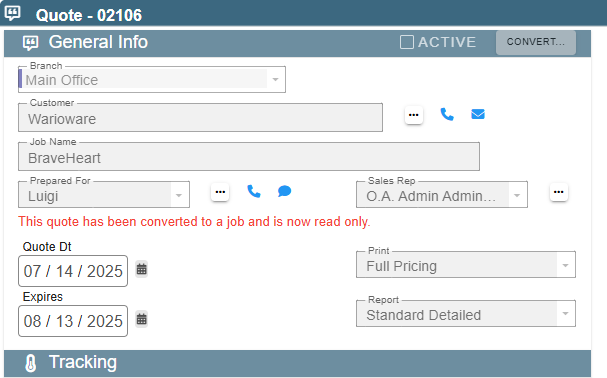
Once a quote has been converted it will become read only.
Under the Add’l Info section it will show the Job number the quote was converted to.
Click Ellipsis and you can open the job, or unlink from job.
.png)
Preview How a Customer sees a Quote on Desktop
Once you’ve entered all desired information in the quote, you can send it to the customer to sign or convert it to a Job.
You can Preview how the customer will see the quote by clicking print.
.png)
You can edit what information displays on the printed quote by using the dropdown menu:
.png)
You may also select what type of quote this is or what format you’d like the quote to be.
.png)
Cenpoint can also create a custom quote format to suit your company’s unique needs. Feel free to contact us at Support@Cenpoint.com or 801-478-6822 option 4 to learn more!
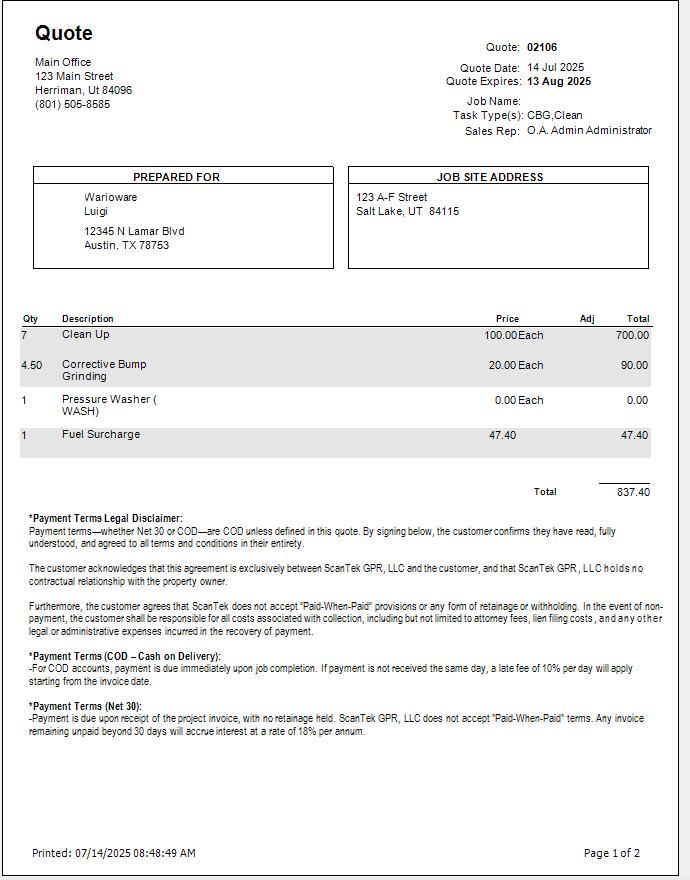
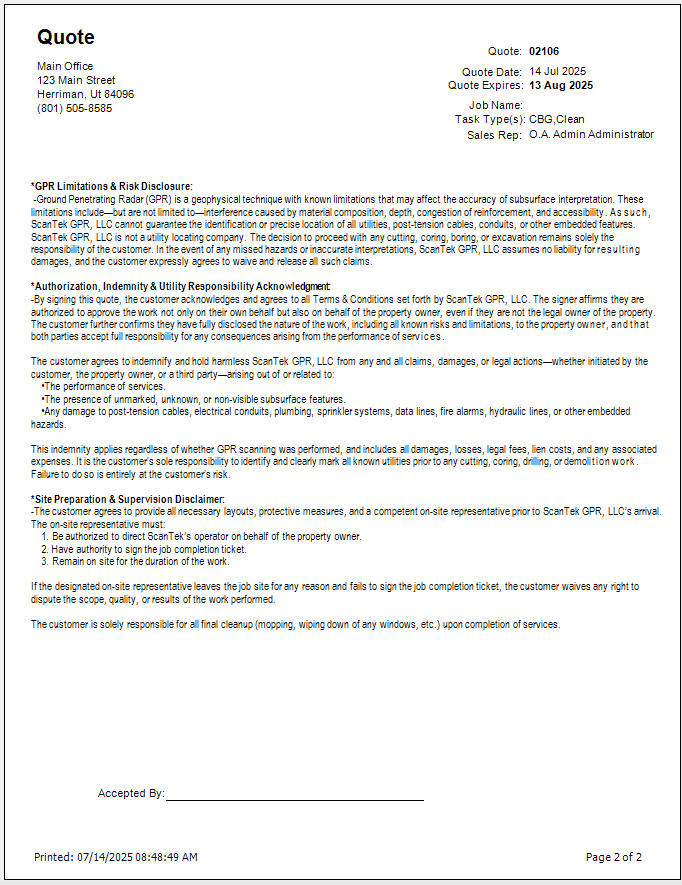
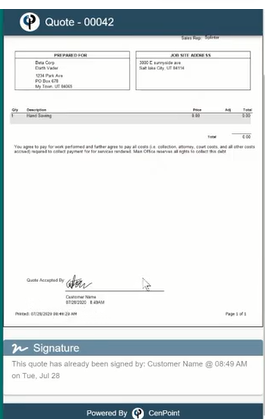
Here’s an example of what the quote could look like.
Sending a Quote to a Customer on Desktop
There are three ways to send a quote to a customer:
-Email a PDF of the quote
-Email a link where they can view and sign the quote
-Text a link where they can view and sign the quote
.png)
Choosing Email -PDF will send the customer a pdf of the quote.
Click the ‘Quick’ button to select a customer to send the quote to. If the desired email address isn’t found, you can always enter it in manually.
.png)
Choosing Email -Link will send the customer a link where they can both view and sign the quote.
Click the ‘Quick’ button to select a customer to send the quote to. If the desired email address isn’t found, you can always enter it in manually.
.png)
Choosing Text -Link will automatically send a text like this.
To set up this text message, see the following link: Customer Portal Quote Signature
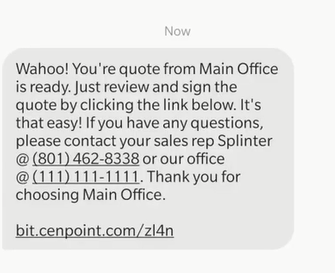
The customer can open the link in a browser and have the option to sign the quote and download the signed quote.
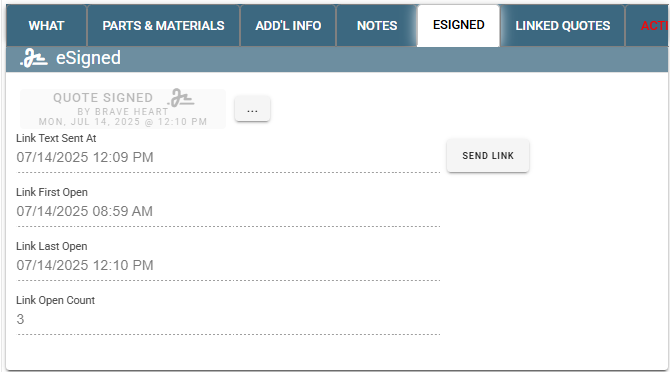
Once a quote has been singed it becomes read only. Use the filters on the find quote screen to include eSigned.
.png)
On the quote under eSigned shows when the quote was signed.
.png)
Quotes on Portal
Find Tasks on Portal
To set up a quote you will attach tasks. A task is what your technicians would do on the jobsite. An example of a task would be “drilling holes” or “pouring concrete”.
This way your quote can be itemized based on the smaller tasks that make up the job.
For information on setting up tasks, please use the following link: Setting Up Tasks
Before creating a first quote, it is important to define your tasks.
Find Pre-existing Quotes on Portal
On the quote screen, you can filter your list on the right side.
If you're looking for only active quotes, click "Active Only" on the right top corner.
The ellipsis will give you the options to Open Quote, View the quote, Send, Convert to Job or NSI options.
There is a print button at the bottom to print the list of all the Quotes.
To add a new quote, click Plus icon
Create a new Quote on Portal
Note: A Quote defaults to expire 30 days after the “Quote Date” You can manually adjust the date it expires when creating the quote.
There are two ways to create a new quote:
The first way is to click the phrase “New Quote” on the home screen:
.png)
The other way to create a new quote is to click on Quotes → Add
.png)
Upon clicking the button to create a new quote, the ‘Find Customers’ screen will appear, allowing you to select the customer that this quote is for.
Double click on the desired customer or highlight them and click ‘Select’
.png)
You are now ready to fill out any necessary information about this quote.
Click ‘Close’ at the end to save your quote in CenPoint and to close the window.
See the below sections for more information on the Quote’s different fields.
.png)
Attach Tasks to a Quote on Portal
On a Quote go to the ‘What’ tab and click ‘Add…’. To edit an existing task on a quote click the ellipsis and then click ‘Modify’.
.png)
Select a task from the task list and fill the information for the task.
Fill in the quantity and the other questions on that task.
Use predefined notes to save you time when you use the same note over and over.
For more information on how to add a predefined note: Predefined Notes
CenPoint also has the translate option in note fields.
You can add in Latitude and Longitude from Google Maps. If you need your tech to know the location, they need to do this task. For example: You may be doing highway work, and the job address is Highway 89. But you need your tech to drill at specific location along the highway. Maybe every half mile. Use the Latitude and Longitude to pinpoint where each task needs to take place.
Click Map in the ellipsis to see the launch the location in maps
.png)
List the Price for performing the task. (The price will be multiplied against the Quantity. Example: I put the price as $200 and set the Quantity to 3. The total price will be 3 x $200 = $600)
If you have the tax rates set up, Cenpoint should automatically fill in the rate based on the job address.
For more information on how to set up taxes use the following links:
https://help.cenpoint.com/docs/taxes
https://help.cenpoint.com/v1/docs/en/multiple-tax-rates
Any drop-down list like Unit of measure is customizable in CenPoint. See this article for more information on how to edit said lists: Picklist Data
Convert a Quote to a Job on Portal
Click on the “Convert” button and select what you wish to convert the quote to.
You can choose to covert the quote to a Job or NSI (non service invoice).
.png)
Once a quote has been converted it will become read only
Under the Add’l Info section it will show the Job number the quote was converted to.
Click Ellipsis and you can open the job, or unlink from job.
.png)
Preview How a Customer sees a Quote on Portal
Once you’ve entered all desired information in the quote, you can send it to the customer to sign or convert it to a Job.
You can preview how the customer will see the quote by clicking View/Send → View
.png)
You can edit what information displays on the printed quote by using the dropdown menus:
.png)
Cenpoint can also create a custom quote format to suit your company’s unique needs. Feel free to contact us at Support@Cenpoint.com or 801-478-6822 option 4 to learn more!
Here’s an example of what the quote could look like.
Sending a Quote to a Customer on Portal
Note: When you send a link in CenPoint it is trackable and you can see how many times a customer has viewed the quote,
or when the customer has signed the quote.
There are three ways to send a quote to a customer:
-Email a PDF of the quote
-Email a link where they can view and sign the quote
-Text a link where they can view and sign the quote
.png)
Choosing Email -PDF will send the customer a pdf of the quote.
Click the ‘Quick’ button to select a customer to send the quote to. If the desired email address isn’t found, you can always enter it in manually.
Choosing Email -Link will send the customer a link where they can both view and sign the quote.
Click the ‘Quick’ button to select a customer to send the quote to. If the desired email address isn’t found, you can always enter it in manually.
Choosing Text -Link will automatically send a text like this.
To set up this text message, see the following link: Customer Portal Quote Signature
The customer can open the link in a browser and have the option to sign the quote and download the signed quote.
Once a quote has been singed it becomes read only. Use the filters on the find quote screen to include eSigned.
.png)
On the quote under eSigned shows when the quote was signed.
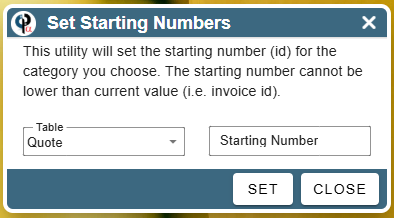
Set starting number for Quote
To select the starting number for your quote you will need to be on the Portal version on CenPoint.
Then go to More→Data Utilities→ Set Starting Numbers
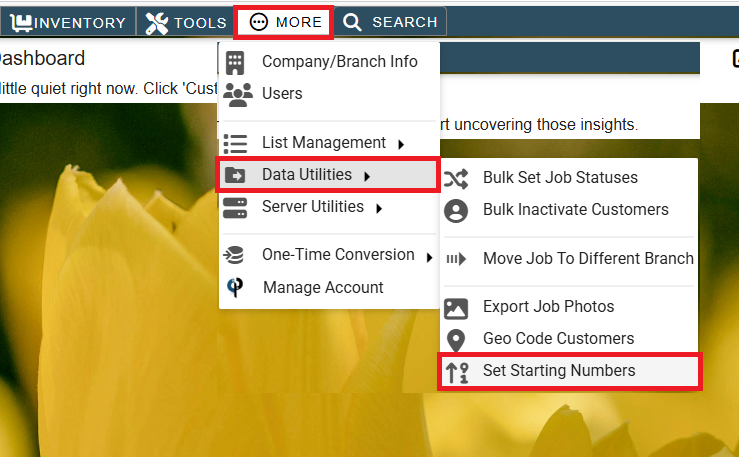
Select Quote from the dropdown list, select the number you would like your quotes to start on and click Set